728x90

이제 부터 제대로 HTTP에 대해 알아보자.


  • HTTP의 기본 개념

HTTP는 HyperText Transfer Protocol의 약자로

최근에는 이 HTTP 메시지에 모든 것을 전송하고 있다.

HTML 뿐만아니라 이미지, 영상, JSON 거의 모든 형태의 데이터를 전송 가능하다.


지금 가장 많이 사용하는 HTTP는 1.1 버전으로 1997년에 등장하게 되었다.

그 뒤로는 2, 3 버전이 나왔으며 현재는 섞어서 사용하고는 있지만 그래도 1.1 버전을 가장 많이 사용한다.


전에 배웠던 TCP, UDP 중에서 TCP가 가장 좋아 쭉 TCP를 사용할 것 같지만

3 버전 이후로는 속도가 빠른 UDP를 사용하며 2와 1.1도 점점 사용하는 추세이다.


  • 클라이언트 서버 구조

JSP에서 공부했던 것처럼 Request와 Response 구조이다.

클라이언트는 서버에 요청을 보내고, 응답을 대기한다.

그러면 서버가 요청에 대한 결과를 만들어서 응답하는 것이다.

  • 무상태 프로토콜

서버가 클라이언트의 상태를 보존하지 않는 것을 말한다.

무상태로 서버를 만들면 응답 서버를 쉽게 바꿀 수 있다.


예를 들어보자.

이렇게 상태를 유지하는 서버가 있다.

클라이언트는 첫번째 서버로 A 물품, 3개의 Request의 요청을 보낸다.

그러다가 갑자기 첫번째 서버에 고장이 나면

첫번째 서버에서 상태를 저장하고 있기 때문에 큰 일이 난다.


하지만 상태를 저장하지 않고 요청에 정보를 담아 보내는 무상태 서버라면 그냥 다른 곳으로 응답을 요청하면 된다.

어차피 고장난 서버에서 상태를 저장하고 있지 않기 때문에

그리고 같은 이유로 서버 확장에도 유리하다.

하지만 모든 것을 무상태로 설계 할 수는 없다.

로그인과 같은 경우에는 상태 유지로 설계를 해야한다.


  • 비 연결성

연결을 유지하는 모델은 이렇게 응답을 받아도 TCP/IP 연결을 계속 유지한다.

하지만 연결을 유지하지 않는 모델은 응답을 받으면 TCP/IP 연결을 종료한다.

HTTP는 기본이 연결을 유지하지 않는 모델이다.

어차피 일반적으로 초 단위 이하의 빠른 속도로 응답하기 때문이다.

덕분에 서버 자원을 매우 효율적으로 사용할 수 있다.


하지만 아무리 빠른 속도로 응답을 하더라도 3 way handshake 시간이 추가된다.

또한 웹 브라우저로 사이트를 요청하면 HTML 뿐만 아니라 자바스크립트, css등의 자원이 함께 다운로드 된다.

그렇기에 HTTP도 지속 연결을 사용하기도 한다.


HTTP 지속연결은 아래와 같이 자원을 한번에 받고 연결을 종료하는 방법이다.


  • HTTP 메시지

위에서 HTTP 메시지에 모든 것을 전송할 수 있다고 했었다.

그럼 그 메시지들을 한 번 보도록 하자

이게 가장 대표적인 예시로 요청과 응답에 사용했던 HTTP 요청 메시지, HTTP 응답 메시지이다.


HTTP 메시지의 기본 구조는 아래와 같다.

이 기본 구조만 지키면 되는 것이다.

그럼 이 구조들을 하나씩 살펴보자.


시작 라인

이 부분은 요청과 응답이 살짝 다르다.


우선 요청부터 보자면

request-line = [method] [request-target] [HTTP-version]엔터

위의 요청 메시지에서 HTTP method는 GET이었고, 요청 대상은 /search?q=hi&hl=ko이며 HTTP/1.1임을 나타내고 있다.


method는 서버가 수행해야 할 동작을 지정하며

종류에는 GET, POST, PUT, DELETE가 있다.


request-target은 절대경로[?query]의 형식으로 경로와 넘길 커리를 지정한다.


HTTP-version은 사용한 HTTP 버전을 나타낸다.


응답을 보면

status-line=[HTTP-version] [status-code] [reason-phrase]


HTTP-version은 위처럼 사용한 HTTP 버전이다.


status-code는 성공과 실패를 나타낸다.

200은 성공, 400은 클라이언트 요청 오류, 500은 서버 내부 오류등을 나타낸다.


reason-phrase는 사람이 이해할 수 있도록 설명을 적는 곳이다.


헤더

header-field=[field-name:] [field-value]의 구조를 가진다.

HTTP 전송에 필요한 모든 부가정보를 담는다.

예를 들면 메시지 바디의 내용, 메시지 바디의 크기....


HTTP 메시지 바디

실제 전송할 데이터를 담는다.

HTML 문서, 이미지, 영상, JSON등을 모두 전송 가능하다.

'Devops > HTTP' 카테고리의 다른 글

HTTP 6일차  (0) 2023.03.09
HTTP 5일차  (1) 2023.03.09
HTTP 4일차  (0) 2023.03.08
HTTP 2일차  (0) 2023.03.02
HTTP 1일차  (0) 2023.03.01
728x90

시스템프로그래밍 5주차에는 시스템 정보에 관하여 배운다.


MAC에서는 사용자 전환이 잘 안되어서... groom으로 진행하겠습니다.


  • 시스템 정보

시스템에 설치된 운영체제에 관한 정보, 호스트명 정보, 하드웨어 종류에 대한 정보 등을 얻는 방법을 알아보자.


uname

shell에 uname을 사용하면 시스템의 기본 정보를 출력한다.

system call로 알아보자

#include <sys/utsname.h>

int uname(struct utsname *buf);

-buf

읽은 정보를 저장할 utsname 구조체의 포인터

return: 0(success), -1(error)


여기에 들어가는 utsname 구조체에 대해 살펴보면

struct  utsname {
	char    sysname[_SYS_NAMELEN];  /* [XSI] Name of OS */
	char    nodename[_SYS_NAMELEN]; /* [XSI] Name of this network node */
	char    release[_SYS_NAMELEN];  /* [XSI] Release level */
	char    version[_SYS_NAMELEN];  /* [XSI] Version level */
	char    machine[_SYS_NAMELEN];  /* [XSI] Hardware type */
};

이고 이 구조체를 이용하여 시스템의 기본 정보를 가져오는 코드를 작성해보자.

#include <sys/utsname.h>
#include <stdlib.h>
#include <stdio.h>

int main(void){
	struct utsname uts;

	if(uname(&uts) == -1){
		perror("uname");
		exit(1);
	}

	printf("OSname : %s\n", uts.sysname);
	printf("Nodename: %s\n", uts.nodename);
	printf("Release: %s\n", uts.release);
	printf("Version: %s\n", uts.version);
	printf("Machine: %s\n", uts.machine);
	
	return 0;
}

sysinfo

sysinfo를 사용해서 다른 정보들을 가져올 수도 있다.

#include <sys/sysinfo.h>

int sysinfo(struct sysinfo *info);

-info

읽은 정보를 저장할 sysinfo 구조체의 포인터

return: 0(success), -1(error)


sysconf

#include <unistd.h>

long sysconf(int name);

-name

검색할 정보를 지칭하는 상수

return: 요청한 정보의 값, -1(error)


이번엔 리소스의 정보를 가져오는 system call이다.


상수의 예

상수 설명
_SC_ARG_MAX(1) argv[]와 envp[]를 합한 최대 크기로, 바이트 단위로 표시한다.
_SC_CHILD_MAX(2) 한 UID에 허용되는 최대 프로세스 개수를 나타낸다.
_SC_CLK_TCK(3) 초당 클록 틱 수를 나타낸다.
_SC_OPEN_MAX(5) 프로세스당 열 수 있는 최대 파일 개수를 나타낸다.
_SC_VERSION(8) 시스템이 지원하는 POSIX.1의 버전을 나타낸다.
_SC_PASS_MAX(9) 패스워드의 최대 길이를 나타낸다.
_SC_LOGNAME_MAX(10) 로그인명의 최대 길이를 나타낸다.
_SC_PAGESIZE(11) 시스템 메모리의 페이지 크기를 나타낸다.

sysconf를 이용해서 리소스의 정보를 출력해보자면

#include <unistd.h>
#include <stdio.h>

int main(void){
	printf("Clock Tick : %ld\n", sysconf(_SC_CLK_TCK));
	printf("Max Open File : %ld\n", sysconf(_SC_OPEN_MAX));
	printf("Max Login Name Length : %ld\n", sysconf(_SC_LOGIN_NAME_MAX));
	
	return 0;
}

  • 사용자 정보

사용자를 추가하거나 권한을 관리하는 방법들이다.

우선 shell에서 사용자(seungkyu)를 추가해보자.

sudo adduser [사용자 이름]을 입력하면 된다.

일단 이렇게 모두 디폴트로 설정을 하면 된다.


해당 사용자로 접근을 해보자.

su [사용자 이름] 명령어를 사용하면 해당 사용자로 접근할 수 있다.

exit로 나갈 수 있다.

UID는 그 사용자에게 부여된 ID 번호이며, Login name은 문자 형태의 사용자 이름이다.

이렇게 id [사용자 이름]으로 확인 할 수 있다.

Process에 입장 할 때의 사용자에 대해 알아보자.

- Real user ID

최초에 Process를 실행한 user의 UID

- Effective user ID

현재 Process가 행사하는 UID

- Saved user ID

Process의 최초의 effective user ID


Effective User ID는 기본적으로는 Real UID와는 같다, 실행 파일의 setuid bit가 1인 경우 해당 파일 소유자의 UID가 effective UID가 된다.


Getting/Setting user IDs

#include <unistd.h>
#include <sys/types.h>

uid_t getuid(void);
uid_t geteuid(void);

return: 얻으려고 하는 uid

uid와 euid를 반환 받는 getuid와 geteuid 함수이다.


#include <sys/types.h>
#include <unistd.h>

int seteuid(uid_t uid);

Process의 EUID를 설정할 수 있는 seteuid 함수이다.


바로 실습으로 가보도록 하자.

#include <sys/types.h>
#include <unistd.h>
#include <stdio.h>

int main(void){
	uid_t uid, euid;

	uid = getuid();
	euid = geteuid();
	printf("[Init] UId = %d, EUID = %d\n", (int)uid, (int)euid);

	seteuid(getuid());
	int cur_euid = (int)geteuid();
	printf("[seteuid(uid)] UID = %d, EUID = %d\n", (int)uid, (int)cur_euid);

	seteuid(euid);
	cur_euid = (int)geteuid();
	printf("[seteuid(euid)]UID = %d, EUID = %d\n", (int)uid, (int)cur_euid);

	return 0;
}

이렇게 프로세스 내에서의 userID 변동을 살펴 볼 수 있다.


User information

우선 /etc/passwd 라는 파일을 한 번 보도록 하자.

이렇게 사용자들의 정보가 쭉 나온다.

LoginID:PassWord:UID:GID:UserInfo:HomeDir의 정보로 출력이 된다.


당연히 시스템 콜에서도 사용자의 정보를 불러 올 수 있고, 사용자에 대한 구조체가 존재한다.

struct passwd {
	char	*pw_name;		/* user name */
	char	*pw_passwd;		/* encrypted password */
	uid_t	pw_uid;			/* user uid */
	gid_t	pw_gid;			/* user gid */
	char	*pw_gecos;		/* Honeywell login info */
	char	*pw_dir;		/* home directory */
	char	*pw_shell;		/* default shell */
};

이렇게 존재한다.


Reading the passwd file

#include <sys/types.h>
#include <pwd.h>

struct passwd *getpwnam(const char *name);
struct passwd *getpwuid(uid_t uid);

passwd 파일을 가져오는 함수들이다.

-name

passwd file에서 정보를 읽어올 사용자의 이름

-uid

passwd file에서 정보를 읽어올 사용자의 uid

return: 해당 사용자에 대한 passwd structure가 저장된 pointer, -1(NULL)


#include <sys/types.h>
#include <pwd.h>
#include <stdio.h>

int main(void){
	struct passwd * pw;

	pw = getpwuid(getuid());
	printf("UID : %d\n", (int)pw->pw_uid);
	printf("Login Name : %s\n", pw->pw_name);

	return 0;
}

uid로 사용자를 불러온 모습이다.


Reading the group file

#include <sys/types.h>
#include <grp.h>

struct group *getgrname(const char *name);
struct group *getgrgid(gid_t gid);

struct group *getgrent(void);
void setgrent(void);
void endgrent(void);

사용자 뿐만 아니라 그룹에 대한 정보도 가져올 수 있다.

위와 비슷하고 그룹이란 것만 변경이 되었기 때문에 바로 실습으로 가보도록 하겠다.


group의 구조체는 아래와 같다.

struct group {
	char	*gr_name;		/* [XBD] group name */
	char	*gr_passwd;		/* [???] group password */
	gid_t	gr_gid;			/* [XBD] group id */
	char	**gr_mem;		/* [XBD] group members */
};


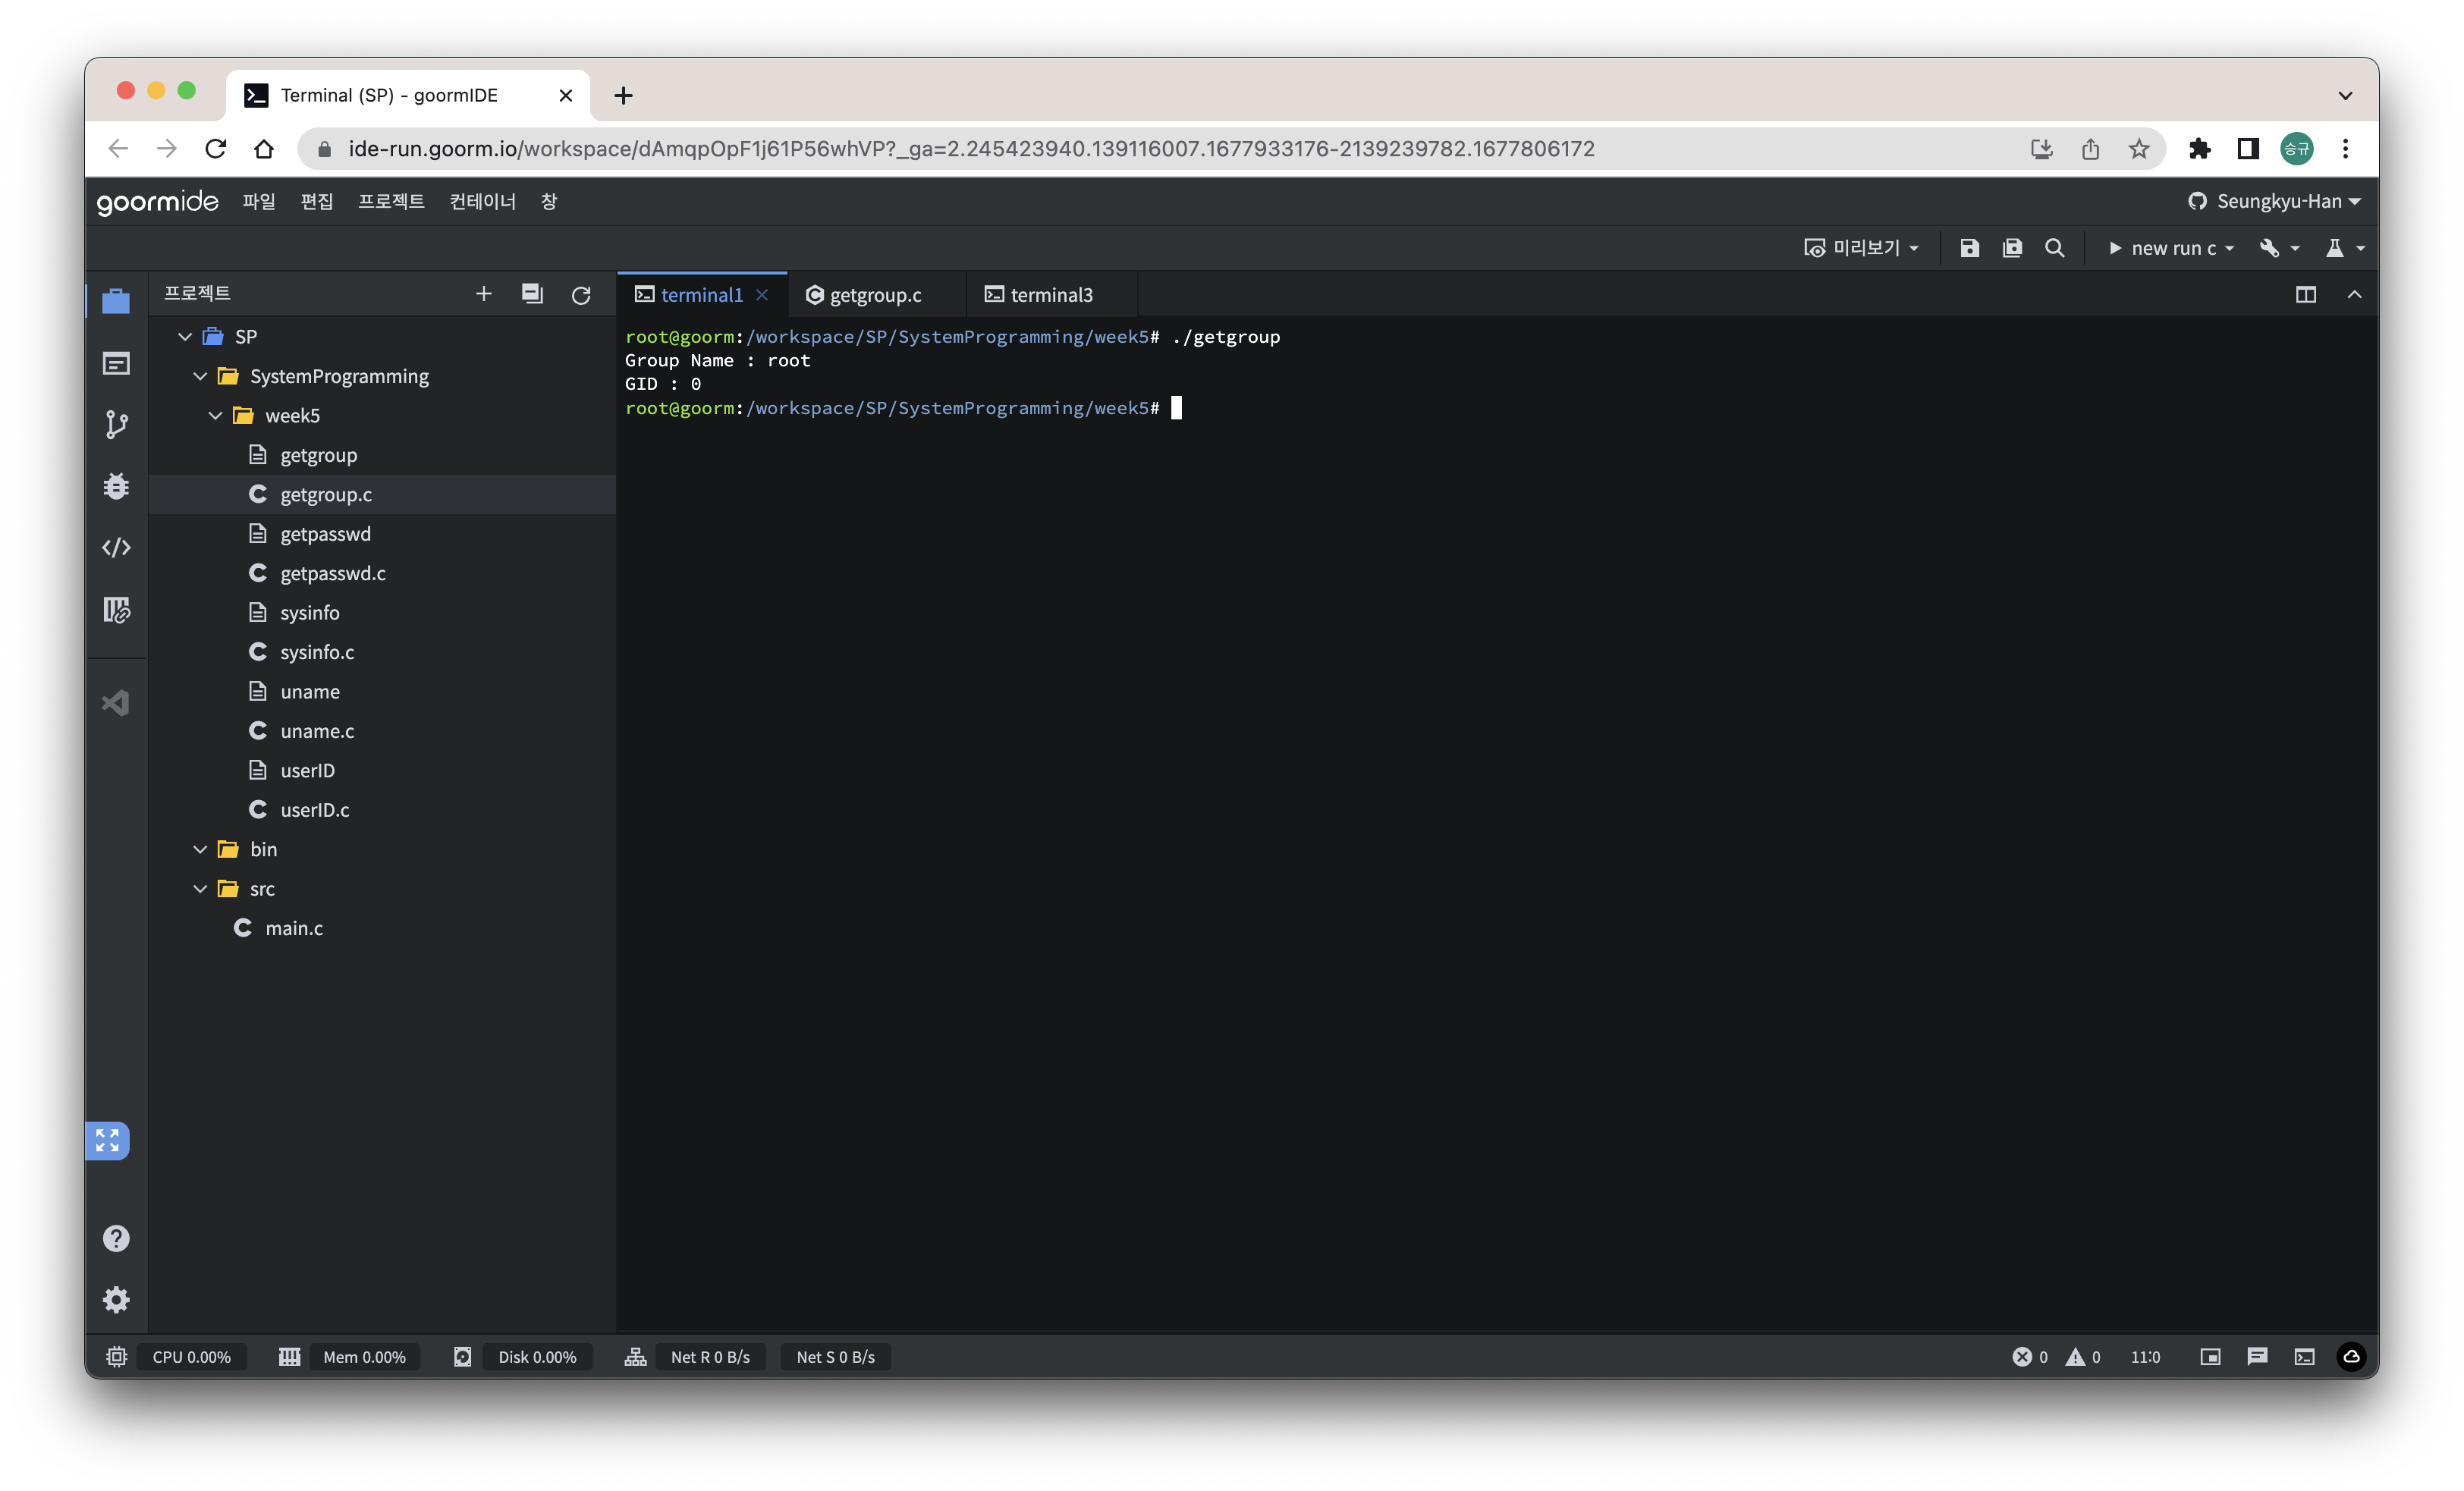
그룹에 대한 정보를 읽어오는 프로그램을 만들어보자.


#include <stdio.h>
#include <stdlib.h>
#include <grp.h>

int main(void){
	struct group *grp;

	grp = getgrnam("root");
	printf("Group Name : %s\n", grp->gr_name);
	printf("GID : %d\n", (int)grp->gr_gid);


	return 0;
}

그룹의 이름을 이용해 정보를 가져왔다.
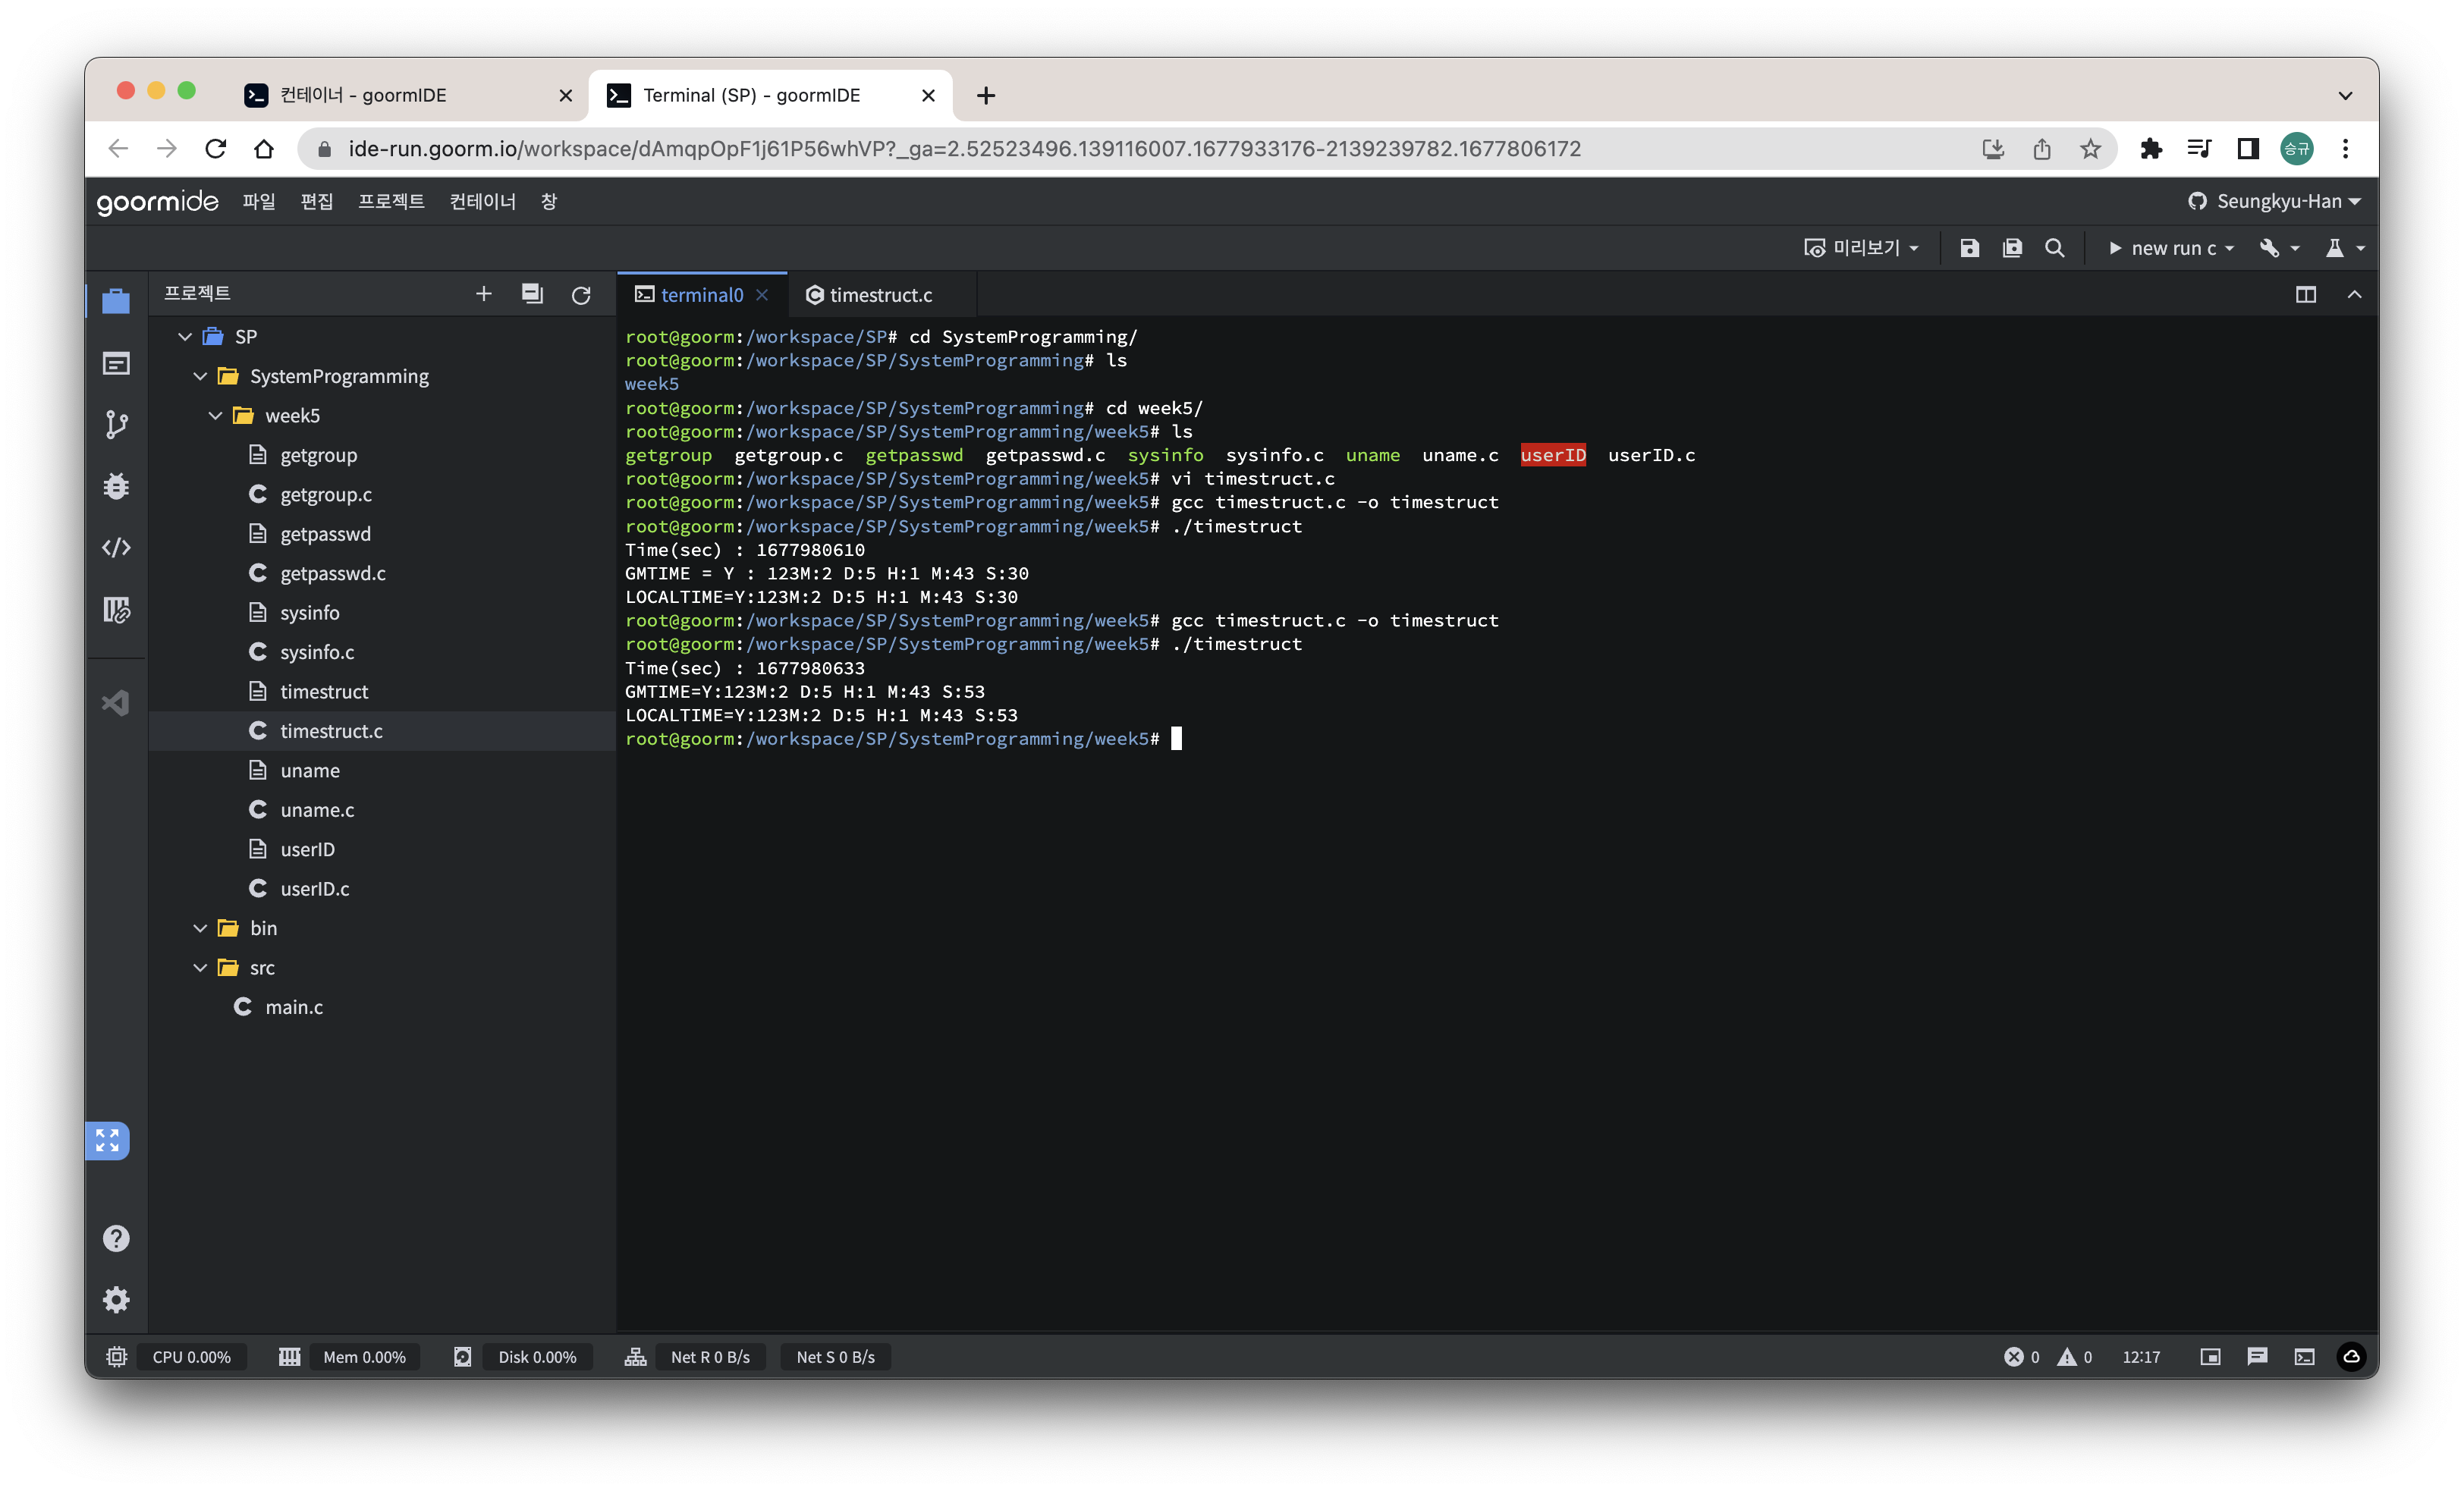
  • 시간 정보

리눅스의 시간은 1970년 1월 1일 0시 0분 0초를 기준으로 흘러가며 현재까지 경과한 시간을 초 단위로 저장한다.


Getting time

#include <sys/time.h>

time_t time(time_t *tloc);

-tloc

얻어올 초를 저장할 주소

return: 얻어온 초, -1(error)


하지만 이렇게 얻어온 시간은 흘러간 초로 표현이 되기 때문에 읽기가 매우 힘들다.

그래서 이 time_t를 우리가 보기 편한 시간으로 보여주는 함수가 있고 그 시간을 저장하는 구조체가 있다.


우선 해당 구조체부터 살펴보자면

struct tm {
	int	tm_sec;		/* seconds after the minute [0-60] */
	int	tm_min;		/* minutes after the hour [0-59] */
	int	tm_hour;	/* hours since midnight [0-23] */
	int	tm_mday;	/* day of the month [1-31] */
	int	tm_mon;		/* months since January [0-11] */
	int	tm_year;	/* years since 1900 */
	int	tm_wday;	/* days since Sunday [0-6] */
	int	tm_yday;	/* days since January 1 [0-365] */
	int	tm_isdst;	/* Daylight Savings Time flag */
};

이렇게 연부터 초들이 들어가게 되고


Seconds <-> tm struct

#include <time.h>

struct tm *gmtime(const time_t *timep);
struct tm *localtime(const time_t *timep);

time_t mktime(struct tm *tm);

-*timep

변환하려는 time_t 구조체

return: 변환된 tm 구조체


-tm

변환하려는 tm 구조체

return: 변환된 time_t 구조체


변환하여 출력해보자.

#include <time.h>
#include <stdio.h>

int main(void){
	struct tm *tm;
	time_t t;

	time(&t);
	printf("Time(sec) : %d\n", (int)t);

	tm = gmtime(&t);
	printf("GMTIME=Y:%d", tm->tm_year);
	printf("M:%d ", tm->tm_mon);
	printf("D:%d ", tm->tm_mday);
	printf("H:%d ", tm->tm_hour);
	printf("M:%d ", tm->tm_min);
	printf("S:%d\n", tm->tm_sec);

	tm = localtime(&t);
	printf("LOCALTIME=Y:%d", tm->tm_year);
	printf("M:%d ", tm->tm_mon);
	printf("D:%d ", tm->tm_mday);
	printf("H:%d ", tm->tm_hour);
	printf("M:%d ", tm->tm_min);
	printf("S:%d\n", tm->tm_sec);

	return 0;
}

이렇게 tm과 time_t 간에 변환이 된 모습이다.

728x90

URI와 웹 브라우저 요청에 대해 알아보자.


URI(Uniform Resource Identifier)

URI라고 하면 뭔가 URL의 오타같이 느껴질 것이다.

URL은 많이 봤어도 URI는 처음 봤을 것이다.

URI는 URL(locator), URN(name)로 나뉘고 URL은 그 종류일 뿐이다.


URI는

Uniform: 리소스를 식별하는 통일된 방식

Resource: 자원, URI로 식별할 수 있는 모든 것

Identifier: 다른 항목과 구분하는데 필요한 정보

의 약자이다.


URL: Uniform Resource Locator

URN: Uniform Resource Name


URL은 리소스가 있는 위치를 지정하고 URN은 리소스에 이름을 부여한다. 하지만 URN 이름만으로 실제 리소스를 찾을 수 있는 방법이 보편화 되지 않았기 때문에 보통 URL을 사용한다.


URL 분석

https://www.naver.com/search?q=hi&hl=ko 

를 타겟으로 분석해보자.


일단 URL의 전체 문법은

scheme://[userinfo@]host[:port][/path][?quert][#fragment] 이다.


  • scheme

주로 프로토콜(어떤 방식으로 자원에 접근할 것인가 하는 약속 규칙, http와 https 등등) 사용

http는 80포트, https는 443 포트를 사용하며 이 포트들은 생략이 가능하다.


  • userinfo

URL에 사용자정보를 포함해서 인증... 한다고 한다.

거의 사용하지 않기 때문에 그냥 넘어가도 될 듯 하다.


  • host

호스트명이다.

주로 도메인명을 사용하지만 IP 주소를 직접 사용할 수 있다.


  • port

어디에 접속하는지를 나타내는 포트이다.


  • path

리소스 경로이다.

ex) /home/target1.jpg

  • query

key=value형태로 나타낸 데이터이다.

?로 시작을 하며, 추가 할 때마다 &로 이어주면 된다.


  • fragment

서버에 전송하는 정보가 아닌 html 내부 북마크 등에 사용한다.


기본 문법을 알아보았으니, 타겟 주소로 분석을 해보자.

우선 www.google.com을 DNS 서버에서 조회해 IP 주소를 얻은 후 그곳으로 보낼 HTTP 요청 메시지를 생성한다.


그 때 HTTP 요청 메시지는

이렇게 만들어 질 것이다.

그 HTTP 요청 메시지가 단계를 거치며 포장이 되어 서버로 갈 것이다.

위 그림은 그 과정을 나타낸 것이다.


그 때 만들어진 패킷은

이렇게 메시지를 감싸서 만들어지게 될 것이다.


이렇게 만들어진 패킷을 서버에 보내면 서버에서 확인을 하고 응답 메시지를 만들어 보낼 것이다.

그러면 클라이언트는 이 응답 메시지를 웹 브라우저에서 렌더링하여 화면을 표시할 것이다.

'Devops > HTTP' 카테고리의 다른 글

HTTP 6일차  (0) 2023.03.09
HTTP 5일차  (1) 2023.03.09
HTTP 4일차  (0) 2023.03.08
HTTP 3일차  (0) 2023.03.06
HTTP 1일차  (0) 2023.03.01
728x90

시스템프로그래밍 4주차에는 리눅스의 파일에 관하여 배운다.


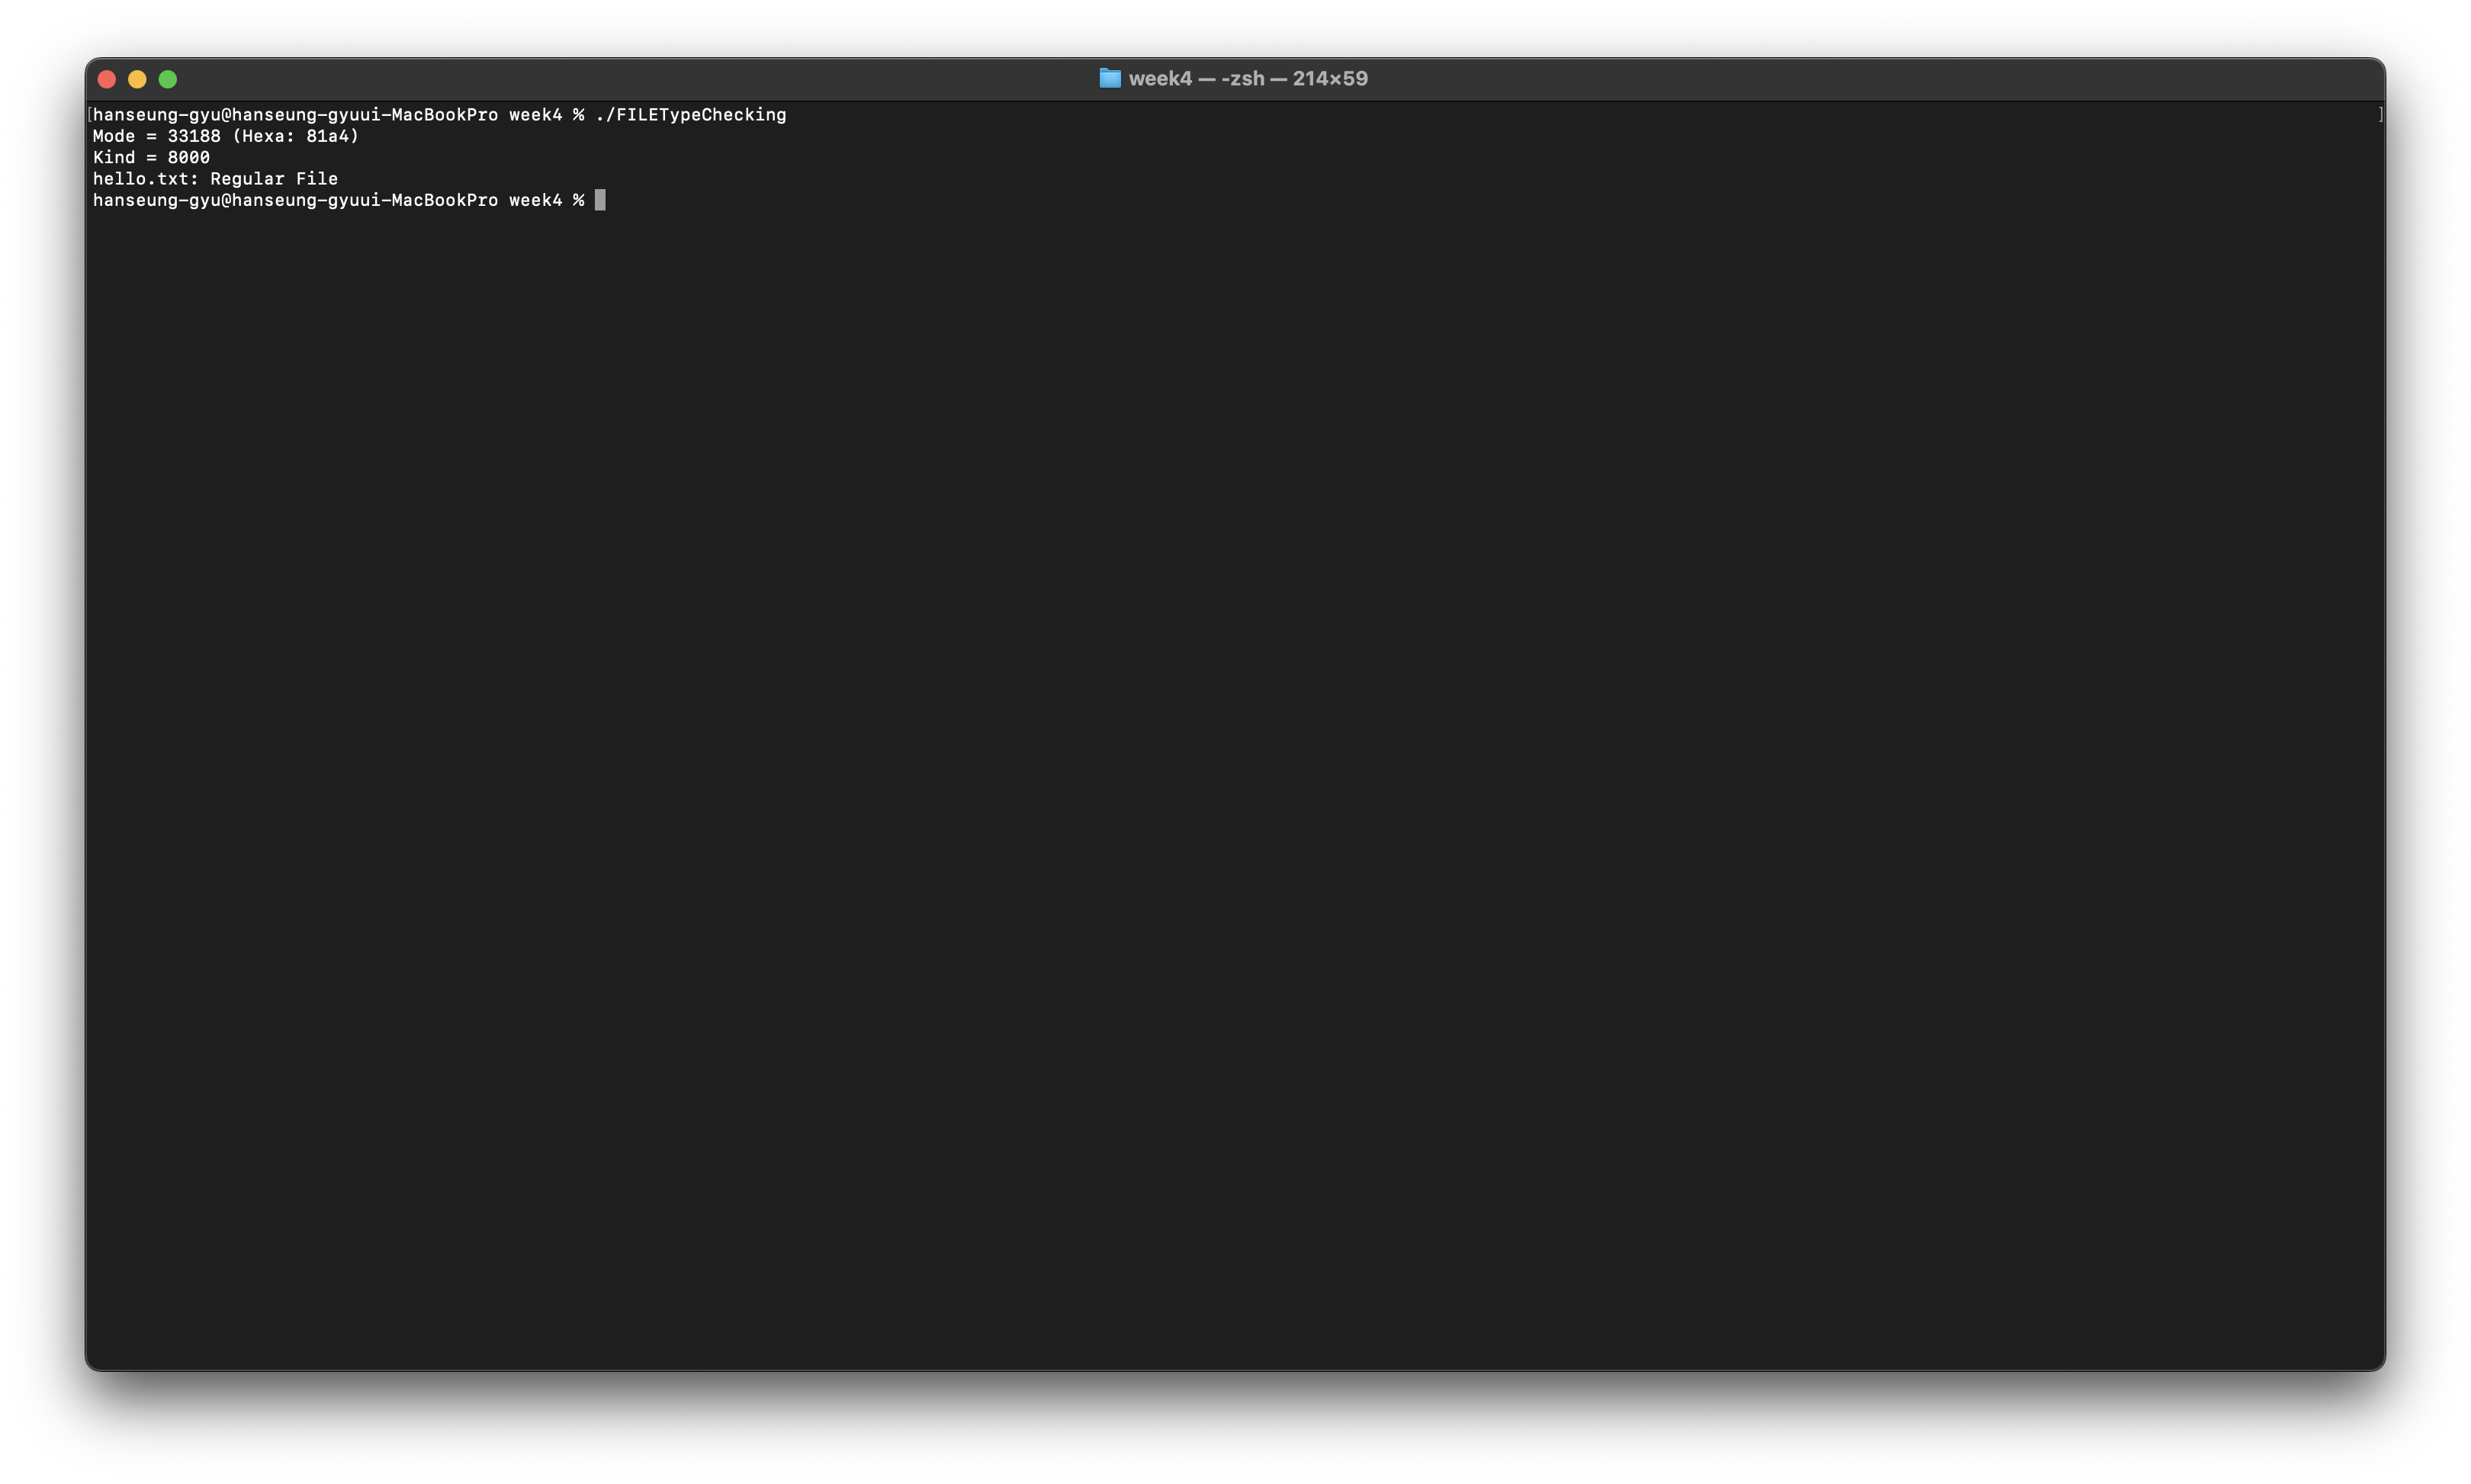
리눅스는 모두 파일로 저장이 되고 종류로는 Regular file, Special file, Directory, Symbolic link file... 등이 있다.

파일의 종류를 확인하고 싶으면 ls -l 명령어를 사용하면 된다.

정보 가장 앞에 나온 문자로 확인을 한다.

문자 파일의 종류
- 일반 파일
d 디렉토리
b 블록 장치 특수 파일
c 문자 장치 특수 파일
l 심볼릭 링크
  • Types of file

- Special file

장치와 데이터를 주고 받는 통로이다, 데이터 블록이 없으며 장치 번호를 inode에 저장한다.

단위에 따라 Character device file, Block device file로 나뉜다.

- Regular file

Text or binary data file이다.
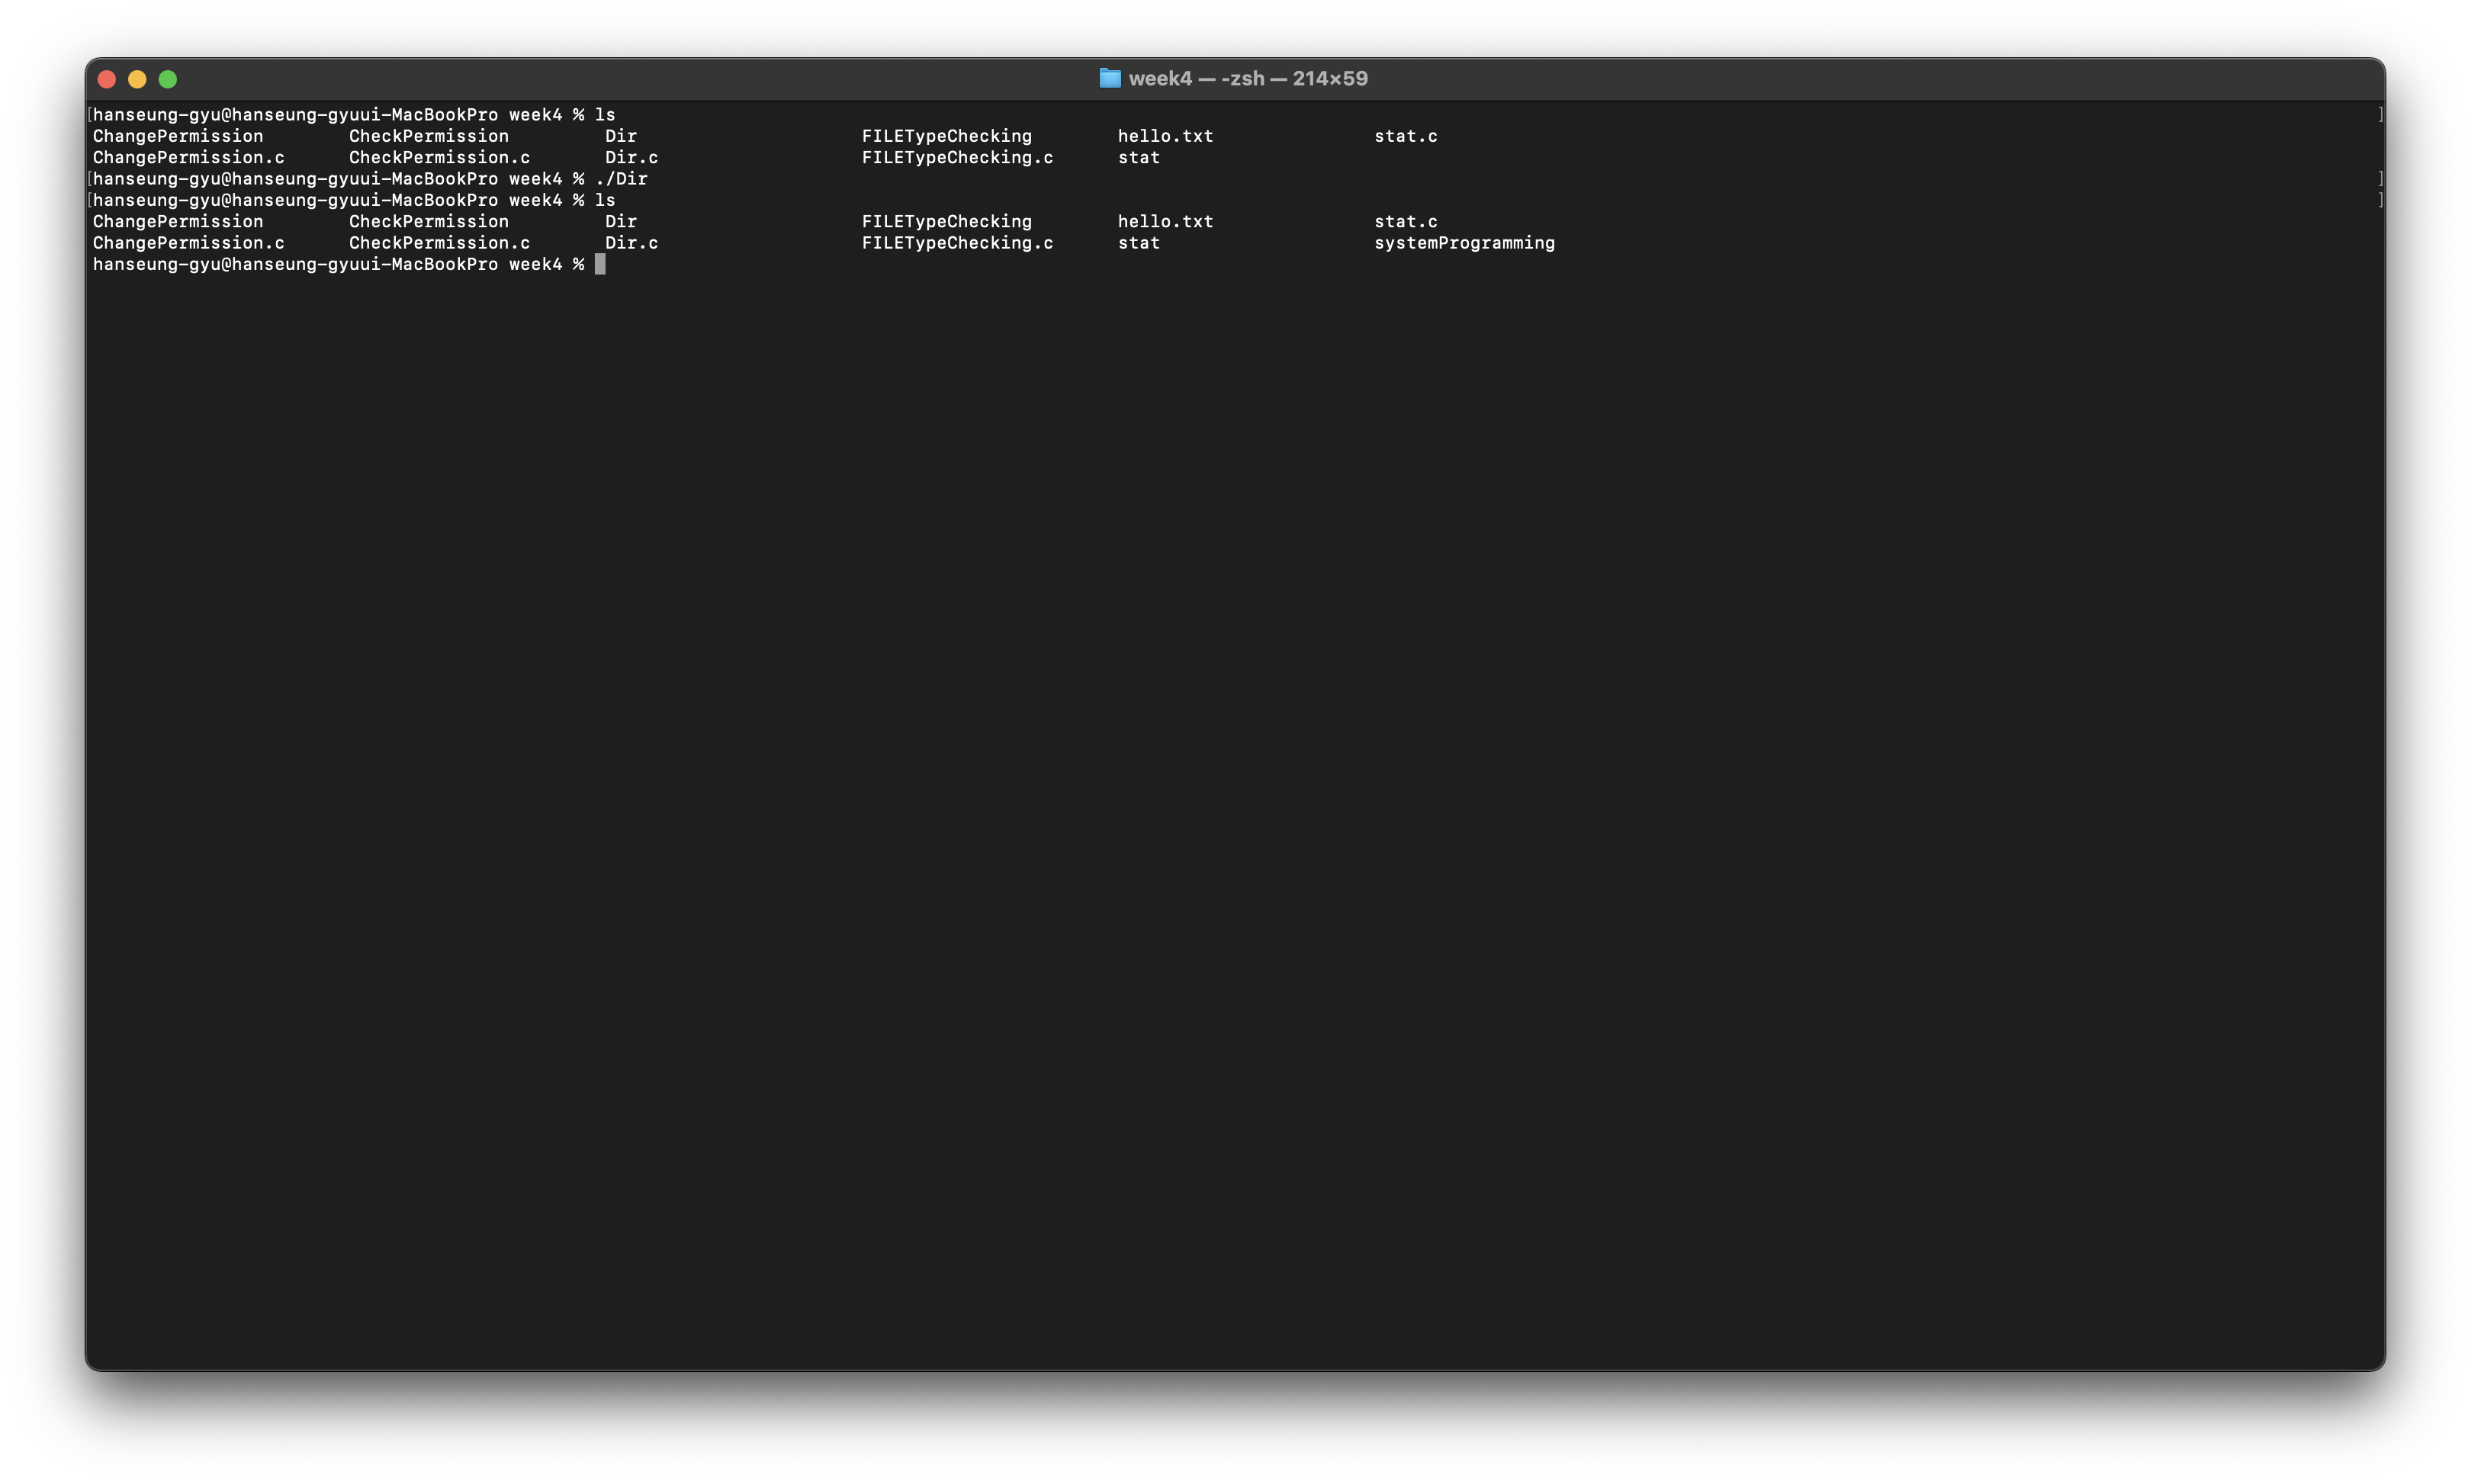
- Directory(윈도우의 파일)

파일의 목록을 저장한 파일이다.

- Symbolic link file

이미 존재하는 파일이나 디렉토리에 접근 할 수 있는 새로운 이름이다.
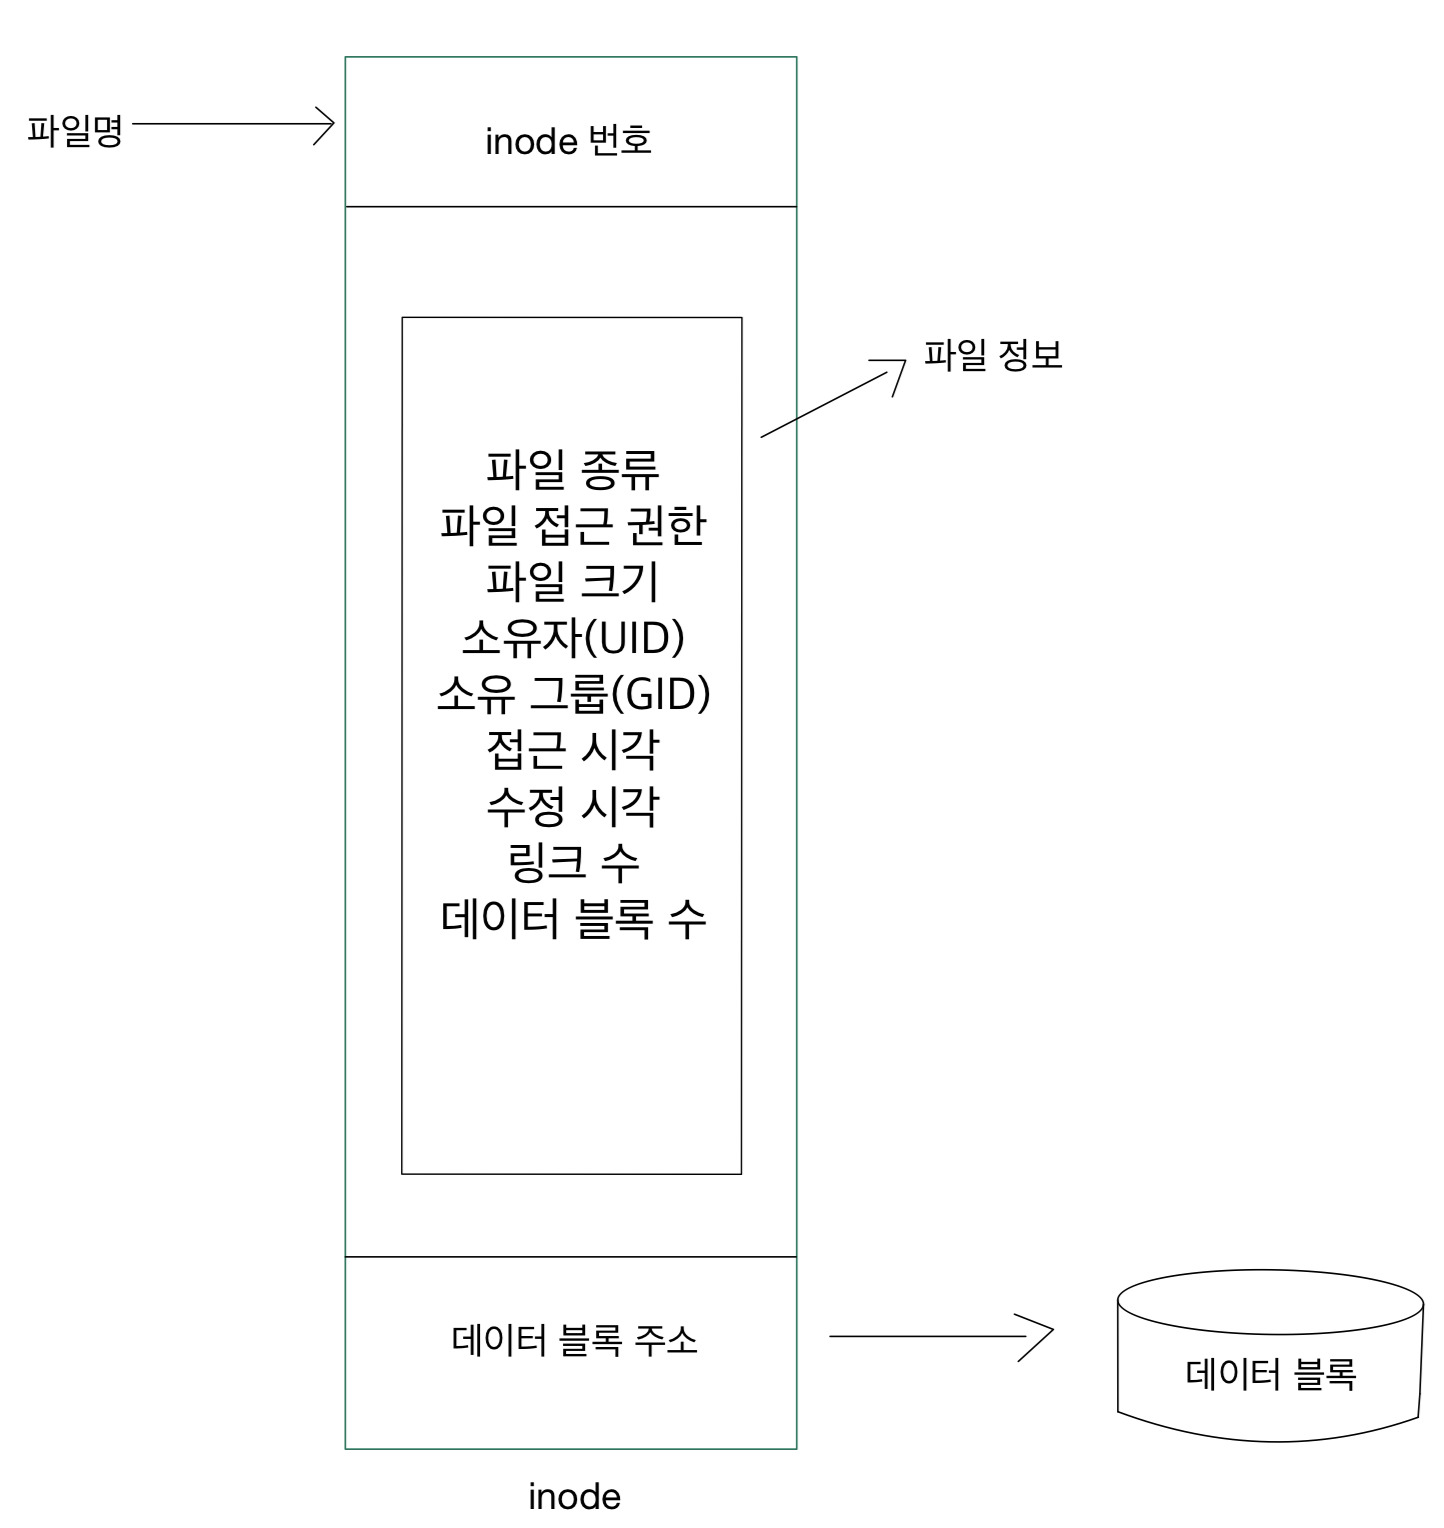
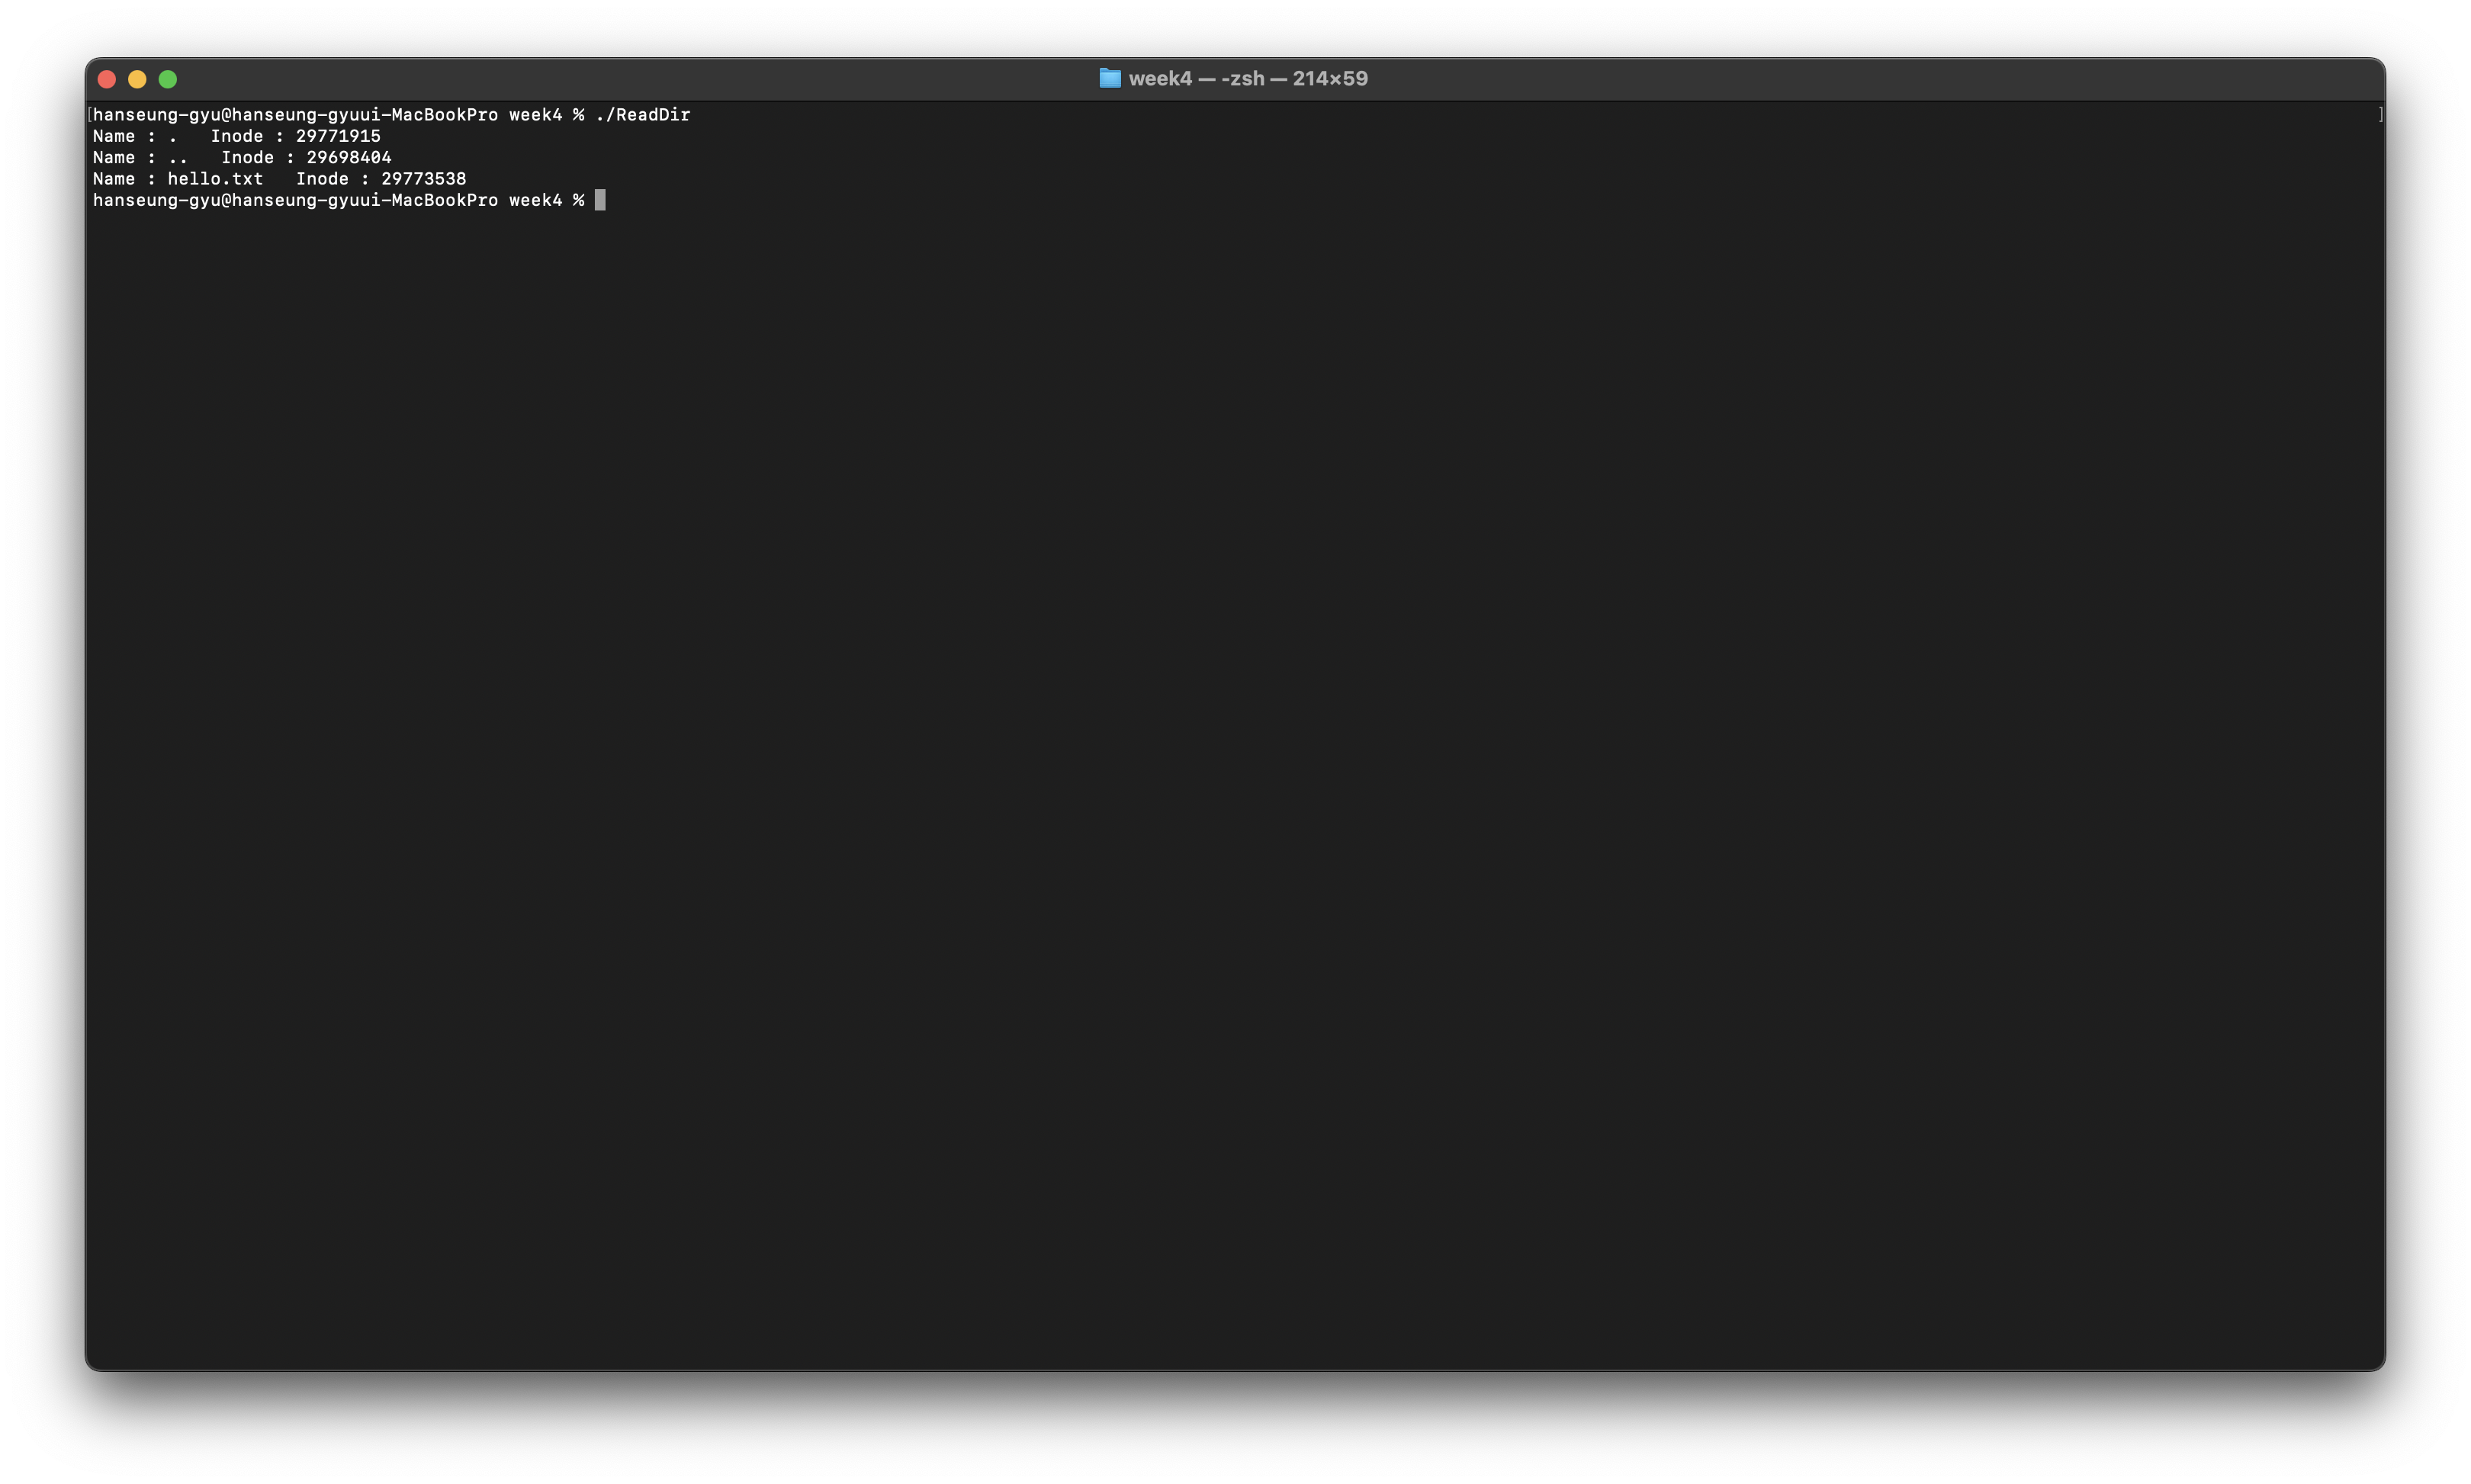
 

  • File organization

파일을 구성하는 요소는 3가지이다.

- File name

파일의 이름으로 사용자가 파일에 접근할 때 사용한다.

- inode

파일에 대한 정보를 저장한다, 번호를 통해 관리/접근 한다.

- Data block

실제 데이터가 저장된 디스크의 공간이다.

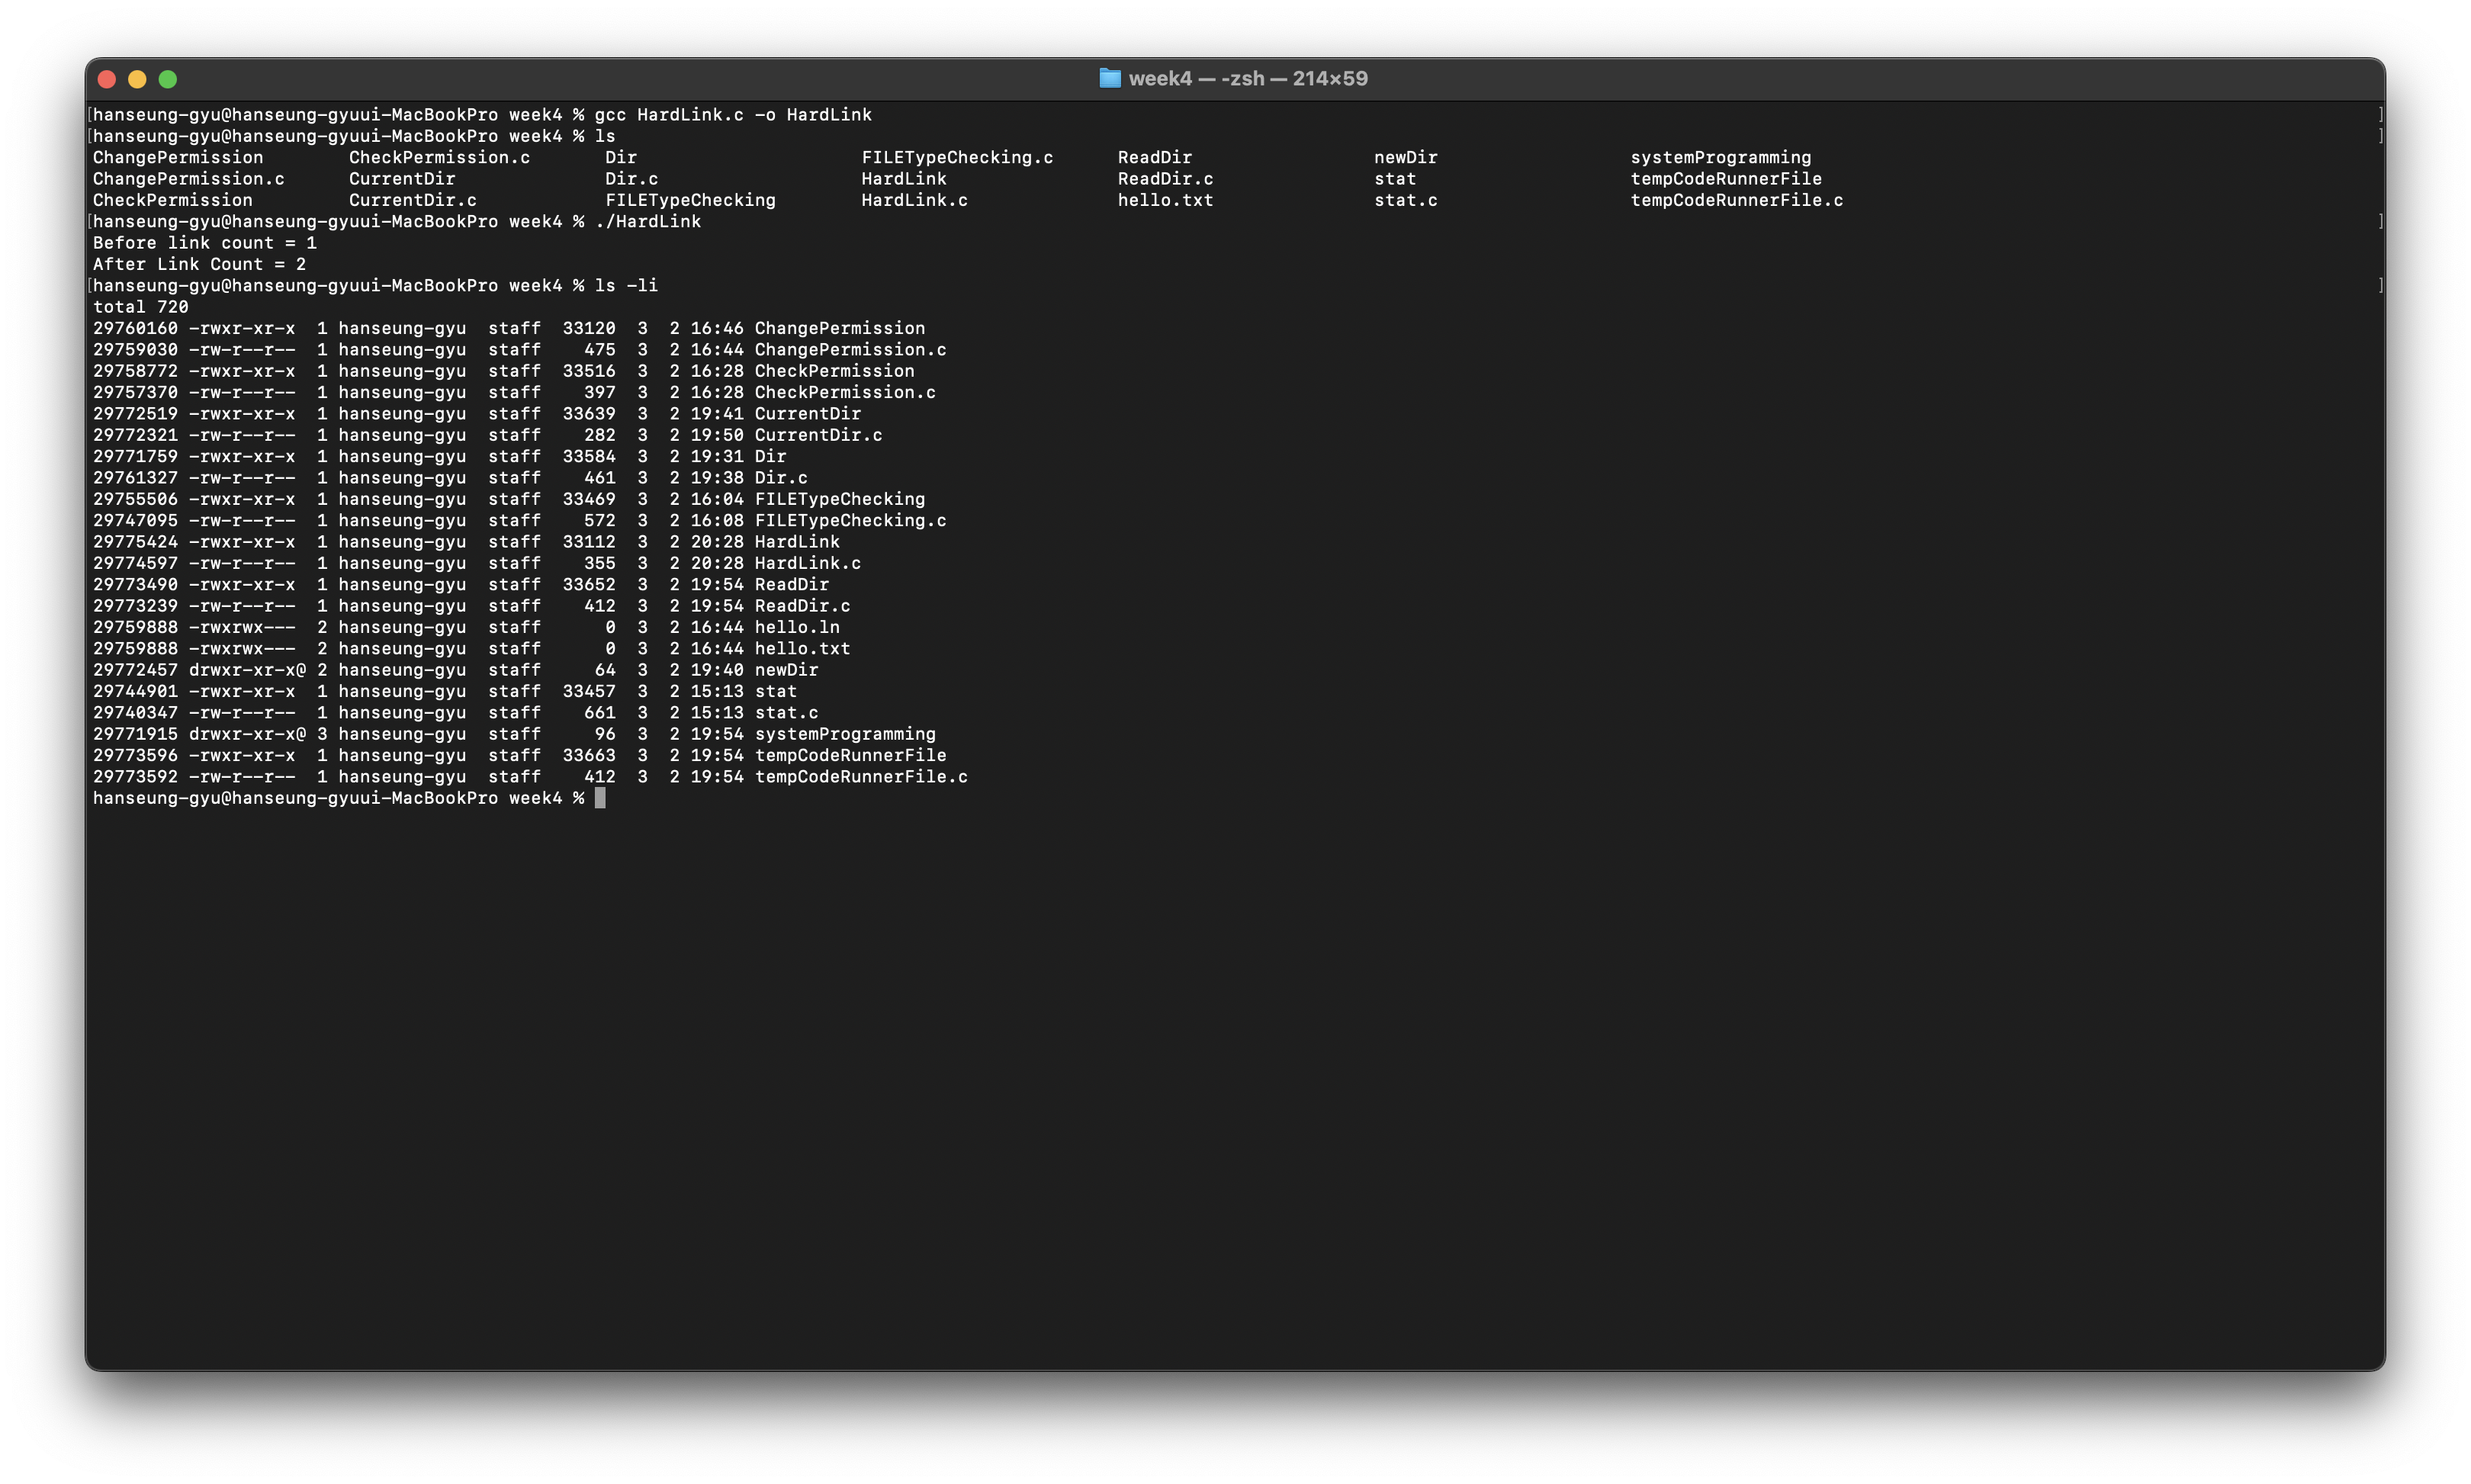
inode는 ls -i로 확인할 수 있다.


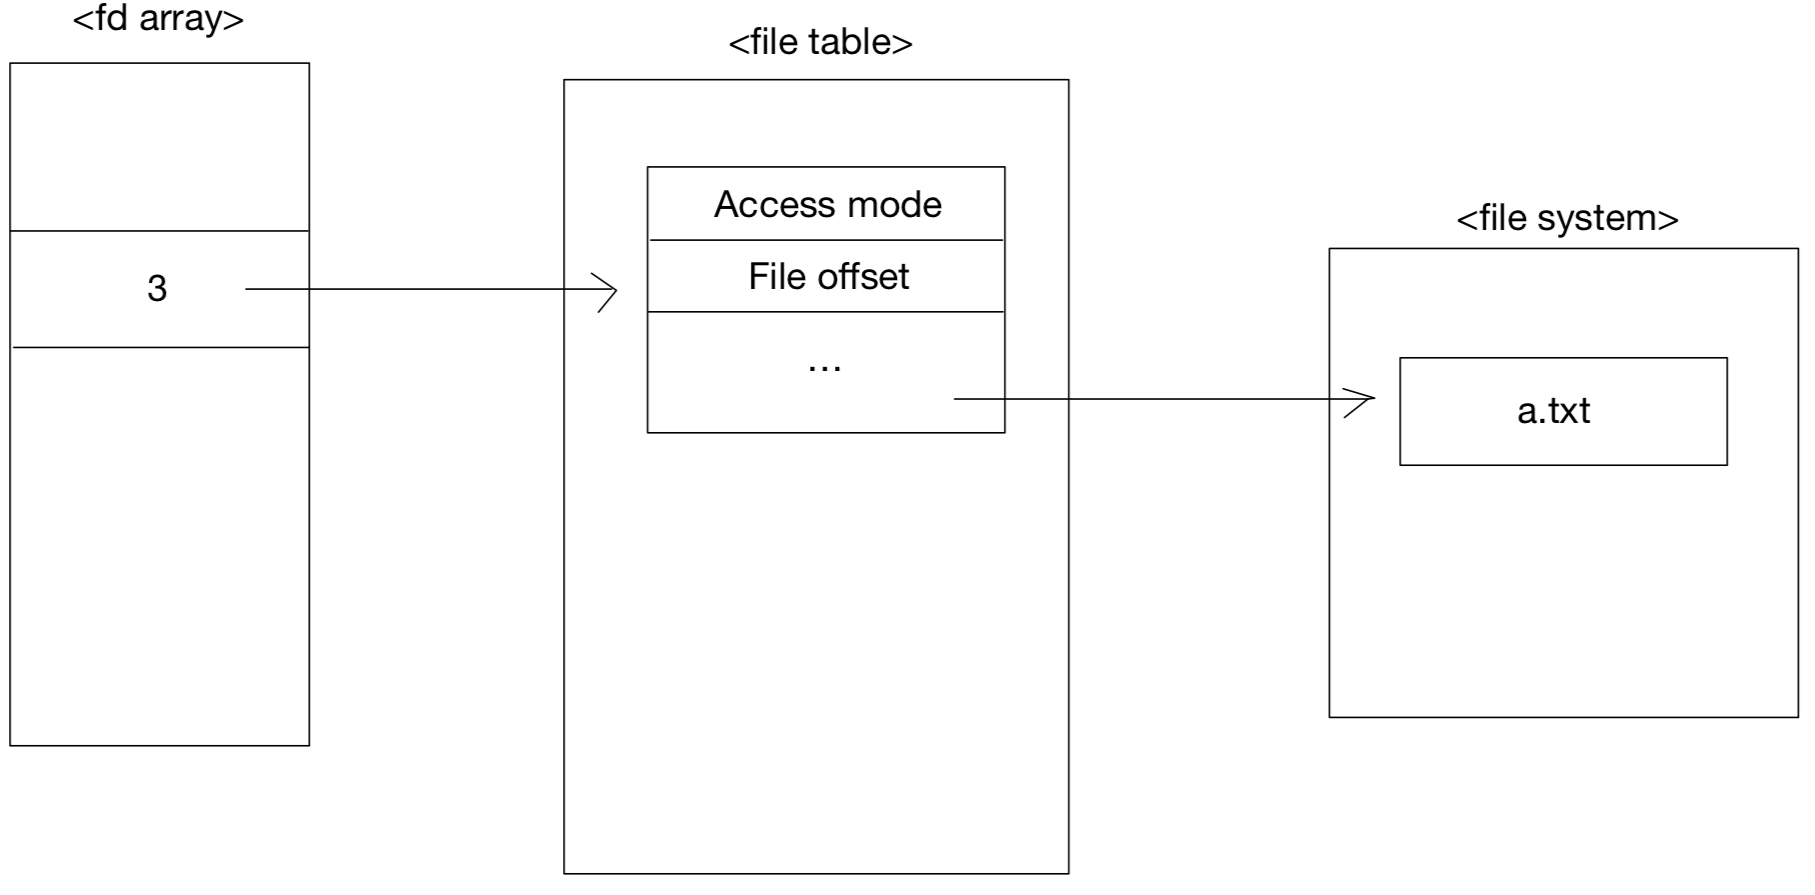
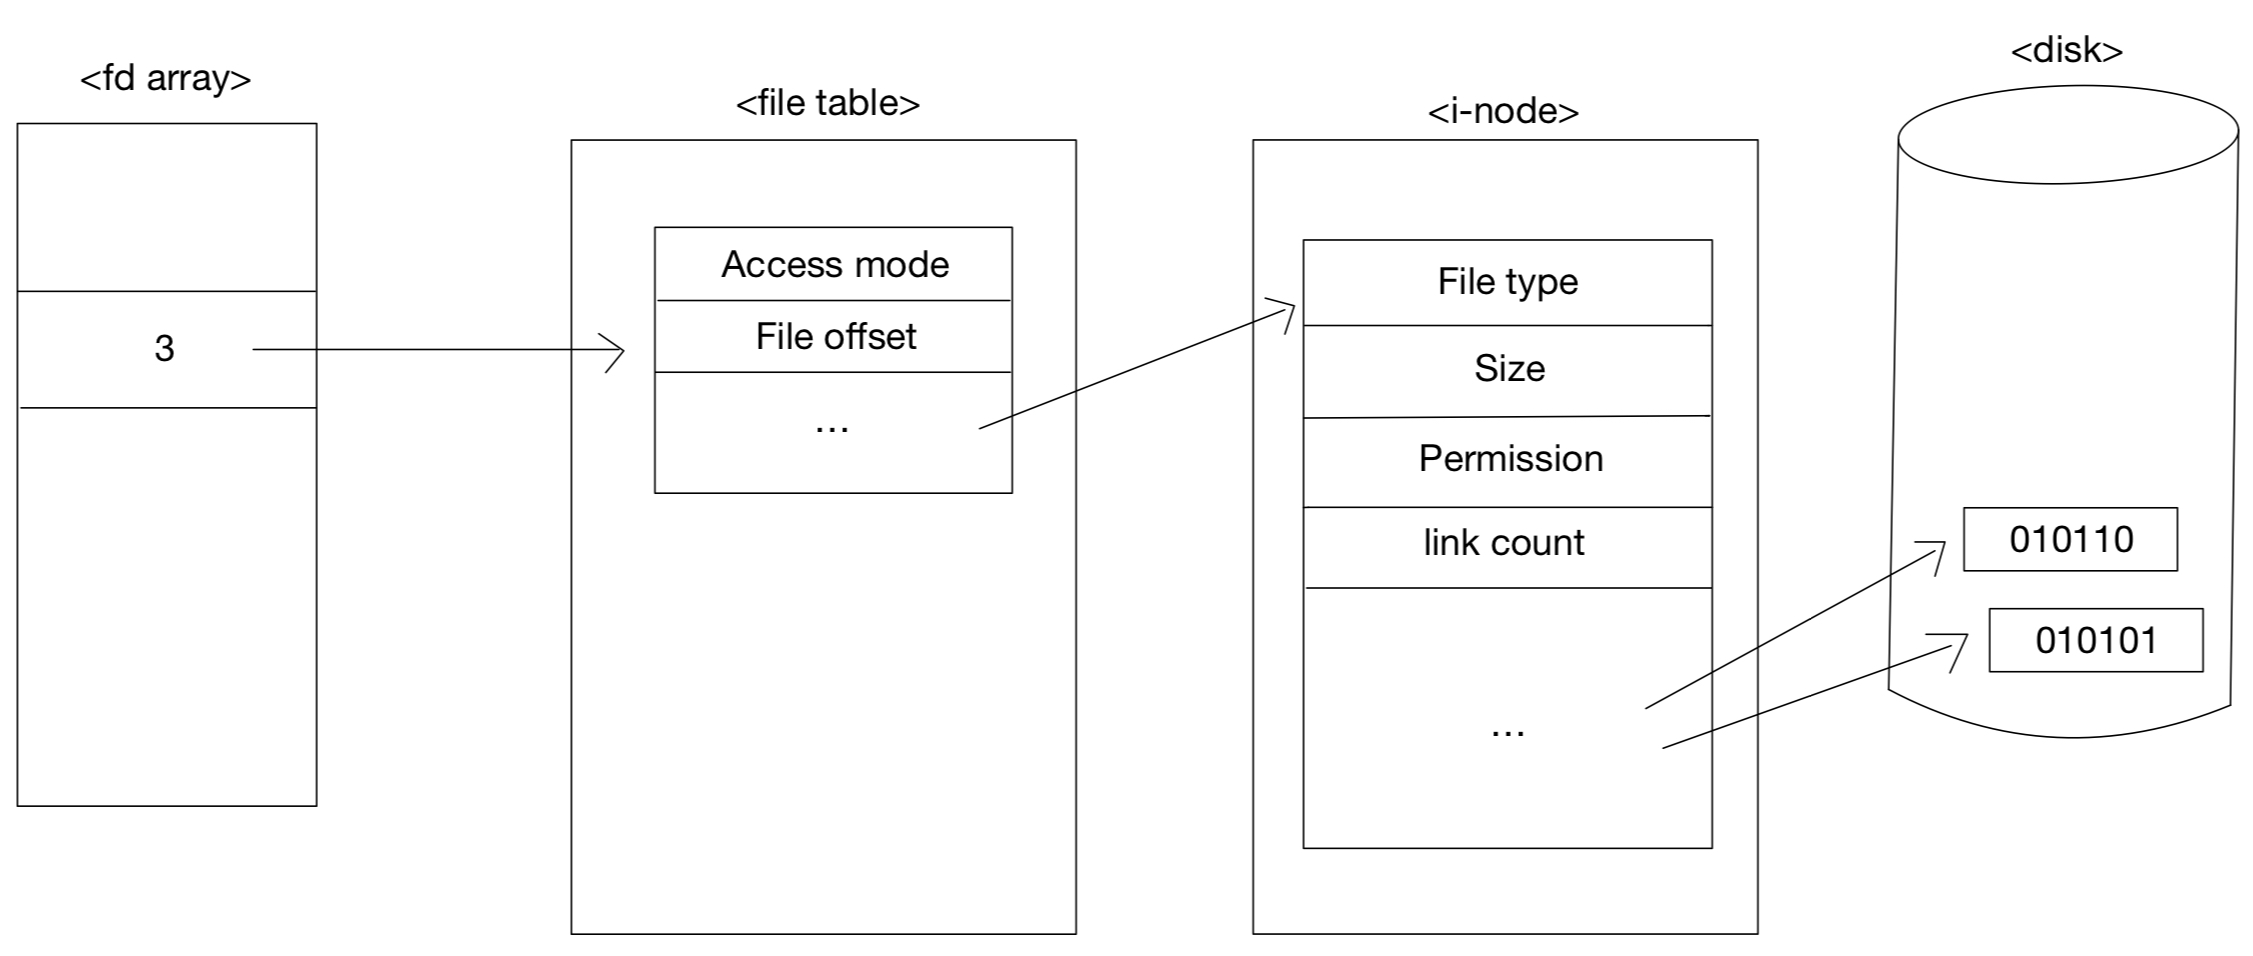
2주차에서 보았던 file table을 다시 보자면

file table은 직접 해당 파일을 가리키는 것이 아니라

i-node를 가리키고 inode에서 해당 파일을 가리키는 것이다.


시스템 콜을 사용을 해서 i-node에 저장되어 있는 파일 정보를 읽어 올 수 있다.
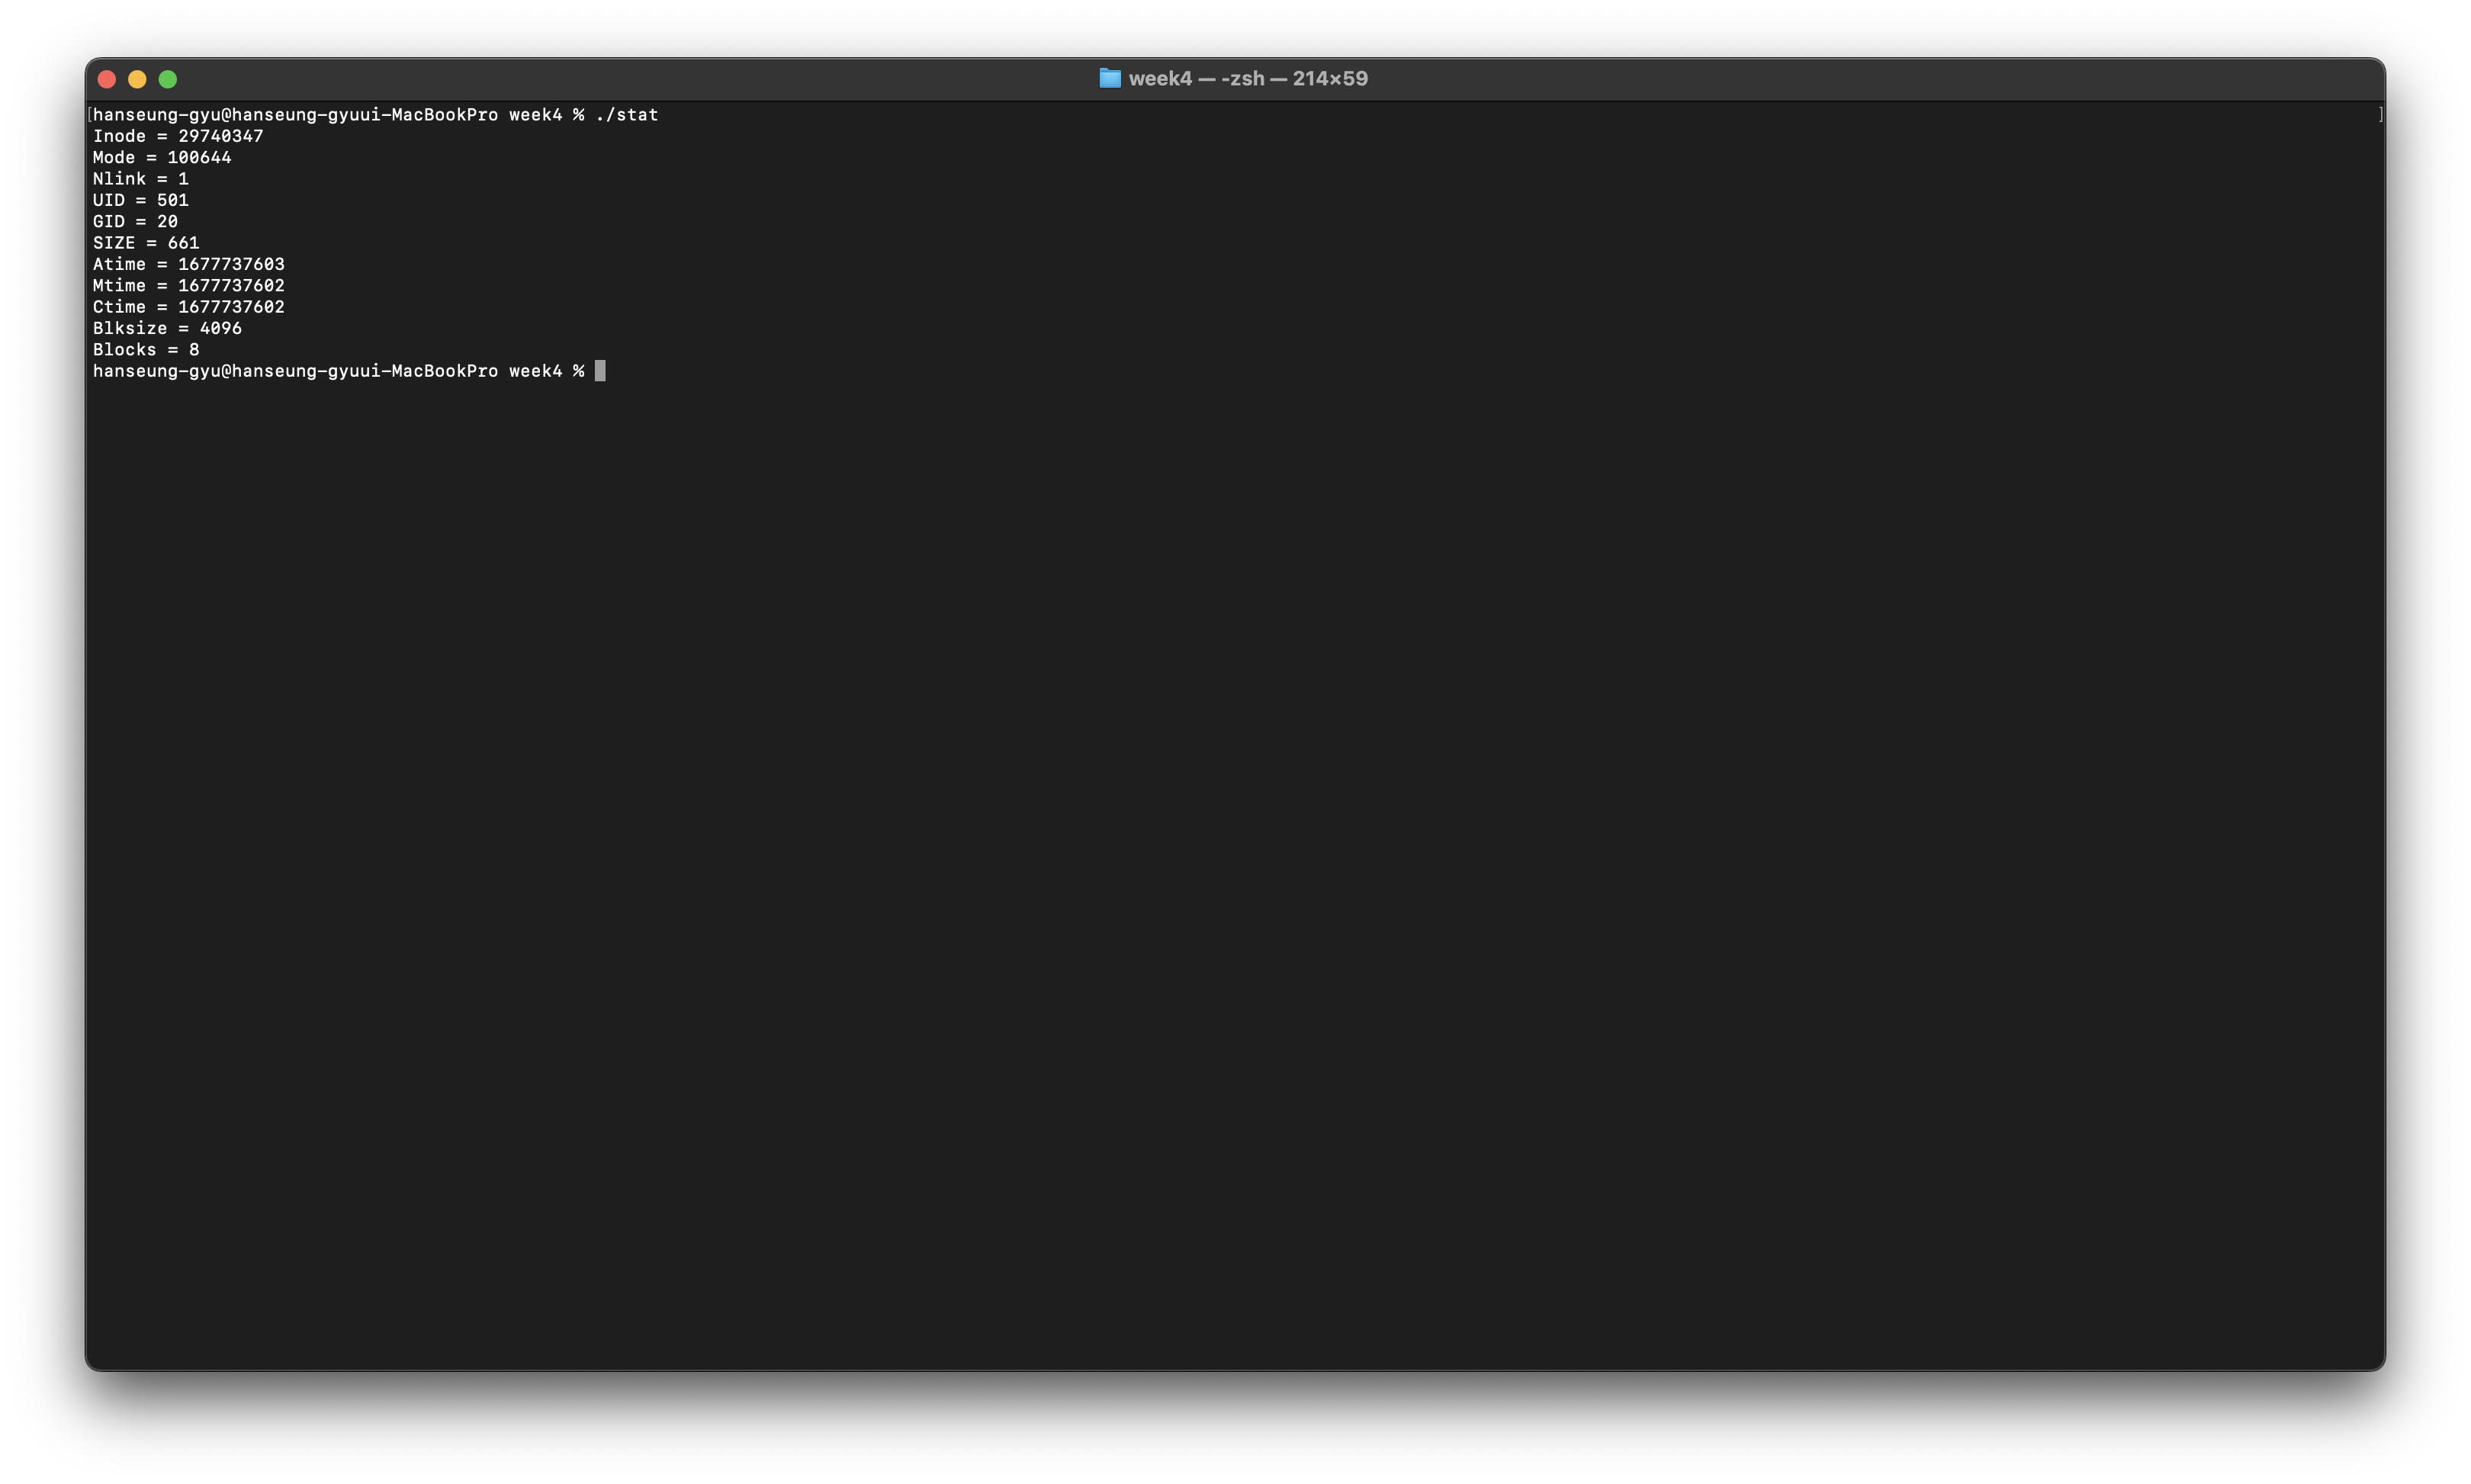
 

File information

#include <fcntl.h>
#include <sys/types.h>
#include <sys/stat.h>

int stat(const char *pathname, struct stat *buf);
int fstat(int fd, struct stat *buf);

file descriptor를 사용하면 fstat를 사용한다.

- pathname(file path or file descriptor)

파일의 경로(파일의 이름을 포함한)

-buf

파일의 정보를 저장한 주소

return: 0(success), -1(error)

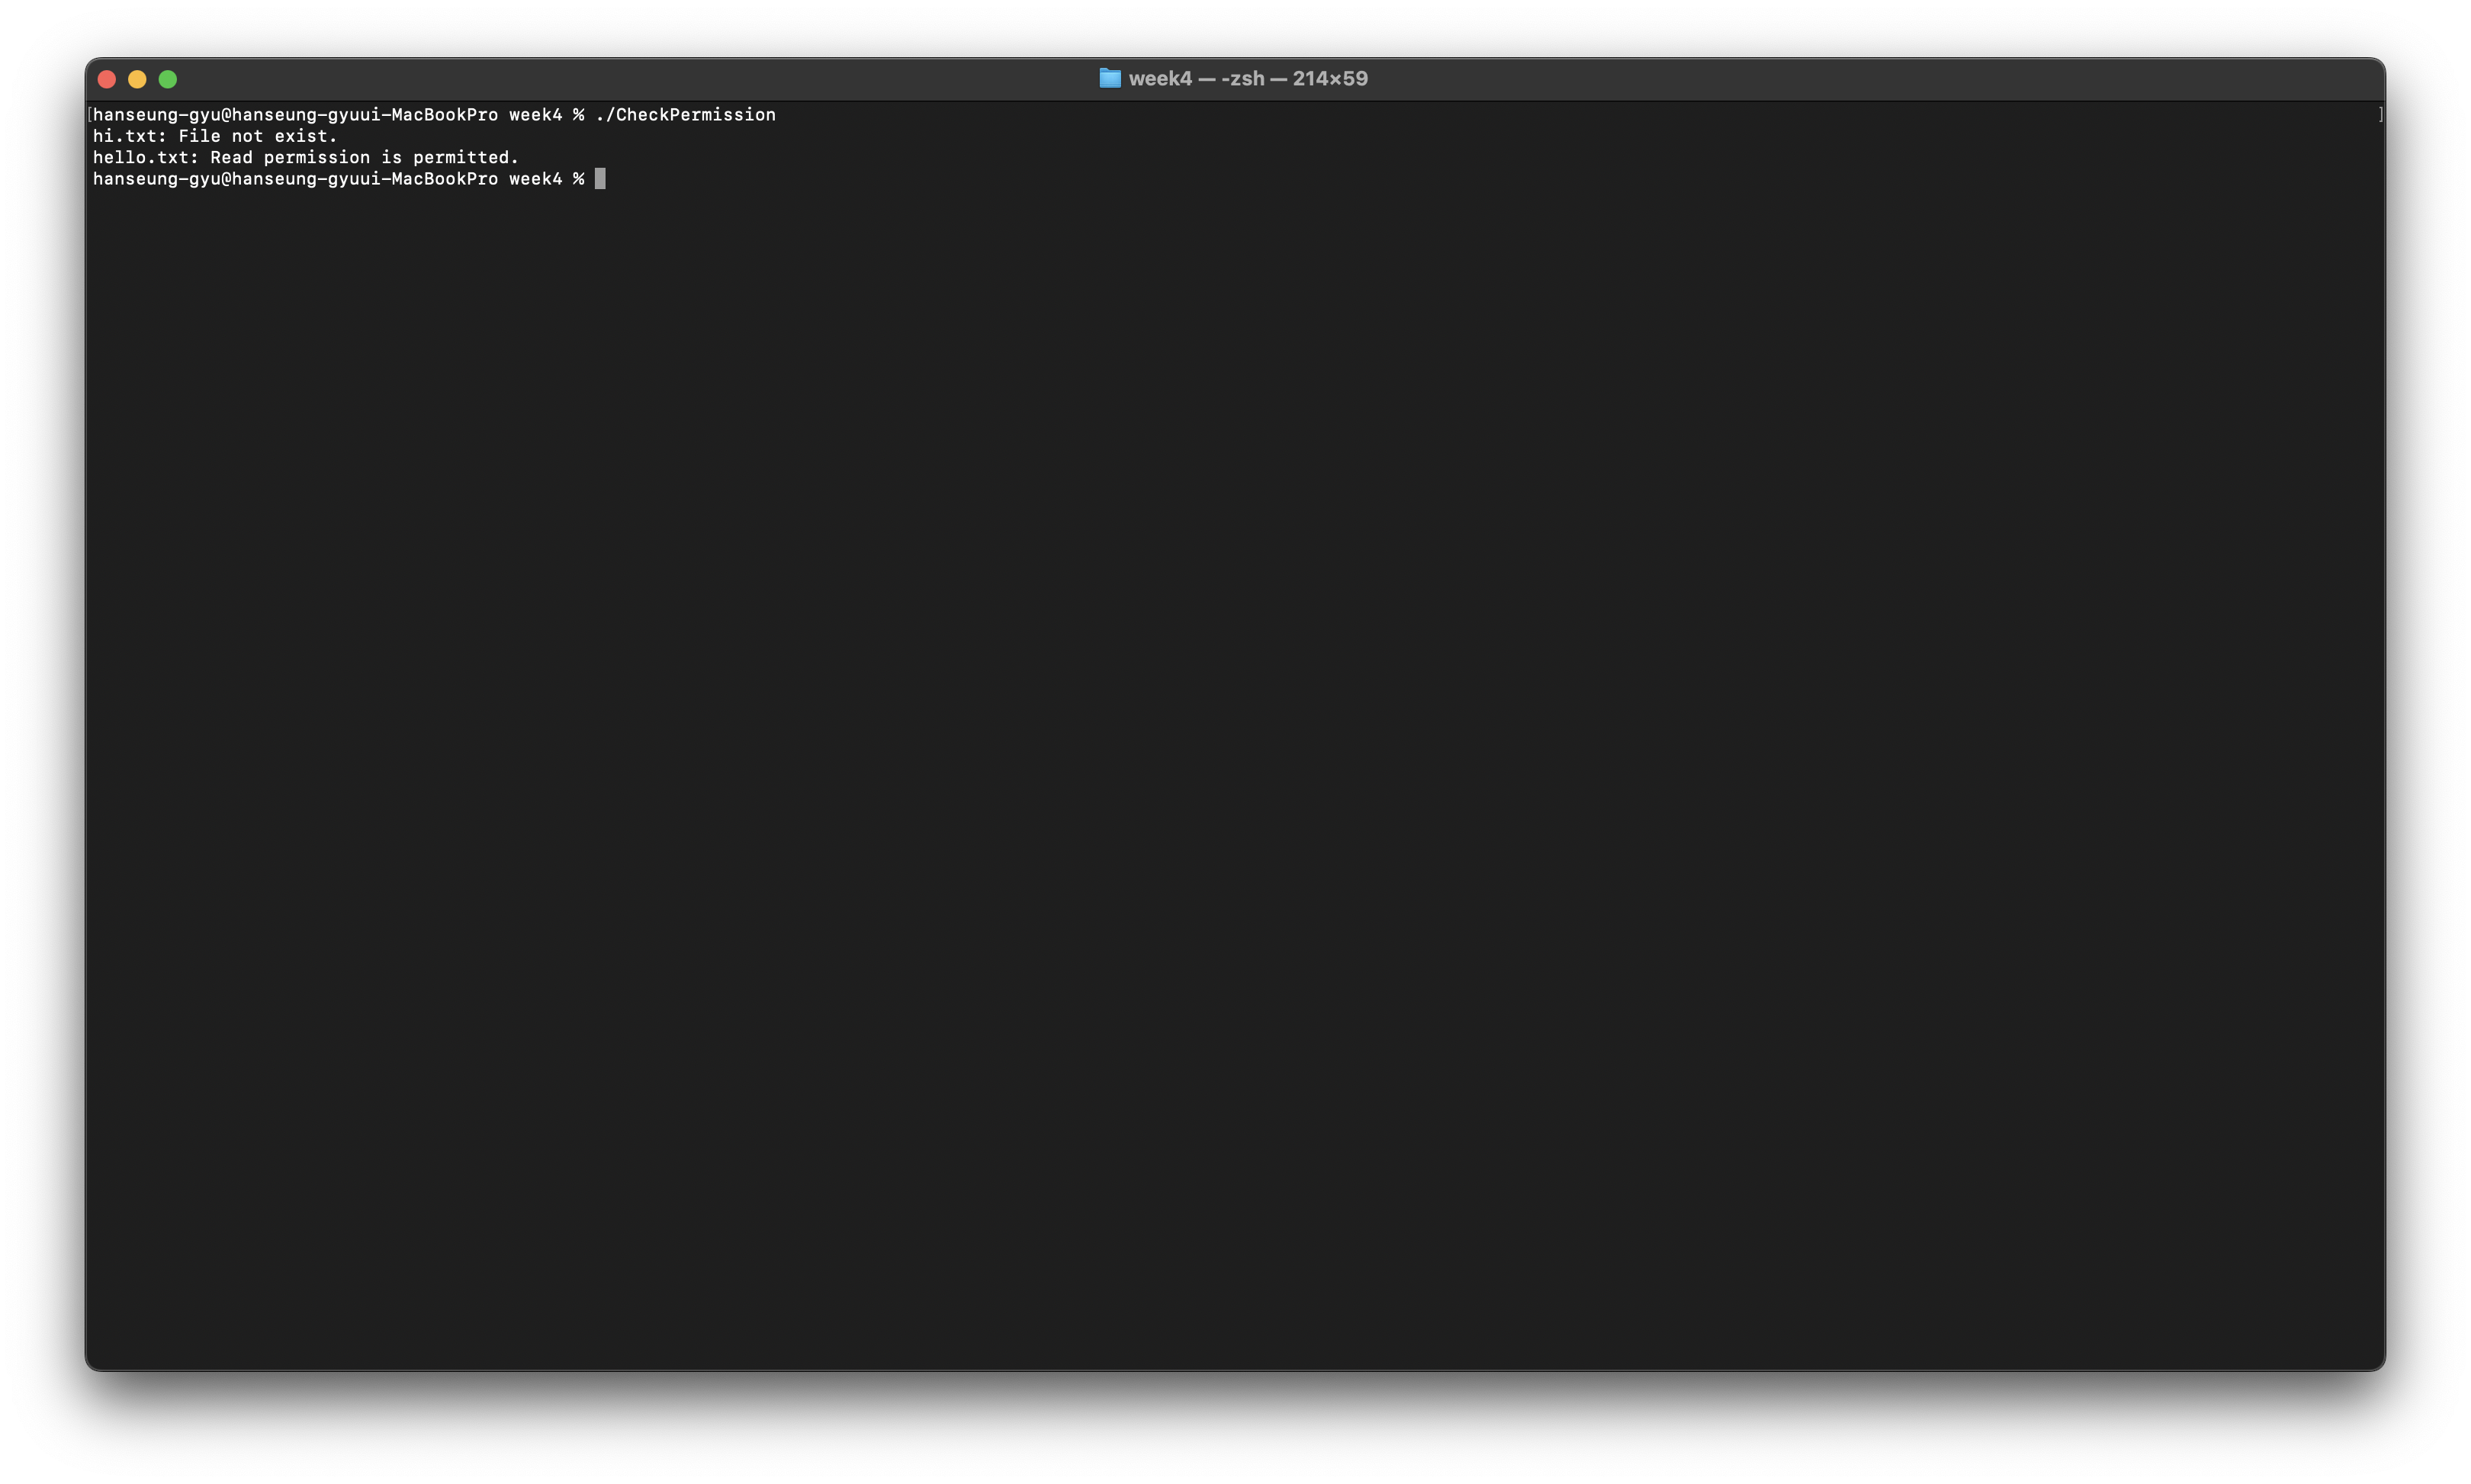
당연히 파일에 읽기 권한이 있어야 한다.


struct stat의 구조체를 살펴보면

struct stat {
	dev_t           st_dev;         /* [XSI] ID of device containing file */
	ino_t           st_ino;         /* [XSI] File serial number */
	mode_t          st_mode;        /* [XSI] Mode of file (see below) */
	nlink_t         st_nlink;       /* [XSI] Number of hard links */
	uid_t           st_uid;         /* [XSI] User ID of the file */
	gid_t           st_gid;         /* [XSI] Group ID of the file */
	dev_t           st_rdev;        /* [XSI] Device ID */
	time_t          st_atime;       /* [XSI] Time of last access */
	long            st_atimensec;   /* nsec of last access */
	time_t          st_mtime;       /* [XSI] Last data modification time */
	long            st_mtimensec;   /* last data modification nsec */
	time_t          st_ctime;       /* [XSI] Time of last status change */
	long            st_ctimensec;   /* nsec of last status change */
	off_t           st_size;        /* [XSI] file size, in bytes */
	blkcnt_t        st_blocks;      /* [XSI] blocks allocated for file */
	blksize_t       st_blksize;     /* [XSI] optimal blocksize for I/O */
	__uint32_t      st_flags;       /* user defined flags for file */
	__uint32_t      st_gen;         /* file generation number */
	__int32_t       st_lspare;      /* RESERVED: DO NOT USE! */
	__int64_t       st_qspare[2];   /* RESERVED: DO NOT USE! */
};

이렇게 작성이 되어 있다.


함수와 구조체를 이용하여 i-node의 정보를 가져오는 코드를 작성해보자.

#include <sys/types.h>
#include <sys/stat.h>
#include <stdio.h>

int main(void){
    struct stat buf;

    stat("stat.c", &buf);

    printf("Inode = %d\n", (int)buf.st_ino);
    printf("Mode = %o\n", (unsigned int)buf.st_mode);
    printf("Nlink = %o\n", (unsigned int)buf.st_nlink);
    printf("UID = %d\n", (int)buf.st_uid);
    printf("GID = %d\n", (int)buf.st_gid);
    printf("SIZE = %d\n", (int)buf.st_size);
    printf("Atime = %ld\n", buf.st_atime);
    printf("Mtime = %ld\n", buf.st_mtime);
    printf("Ctime = %ld\n", buf.st_ctime);
    printf("Blksize = %d\n", (int)buf.st_blksize);
    printf("Blocks = %d\n", (int)buf.st_blocks);

    return 0;
}

이렇게 우리가 작성한 stat.c의 정보를 가져오는 코드이다.

실행을 해보면

i-node 번호부터 시작해서 저장된 정보가 출력되는 것을 볼 수 있다.


st_mode에 저장된 데이터를 이용하면 파일의 타입까지 체크할 수 있다.

상수명 상수값(16진수) 기능
S_IFMT 0XF000 st_mode 값에서 파일의 종류를 정의한 부분을 가져옴
S_IFIFO 0X1000 FIFO 파일
S_IFCHR 0X2000 문자 장치 특수 파일
S_IFDIR 0X4000 디렉토리
S_IFBLK 0X6000 블록 장치 특수 파일
S_IFREG 0X8000 일반 파일
S_IFLNK 0XA000 심볼릭 링크 파일
S_IFSOCK 0XC000 소켓 파일

임시로 파일을 만들고 해당 파일의 타입을 확인해보자.

#include <sys/types.h>
#include <sys/stat.h>
#include <stdio.h>

int main(void){
    struct stat buf;
    int kind;

    stat("hello.txt", &buf);

    printf("Mode = %d (Hexa: %x)\n", (unsigned int)buf.st_mode, (unsigned int)buf.st_mode);

    kind = buf.st_mode & S_IFMT;

    printf("Kind = %x\n", kind);

    switch(kind){
        case S_IFIFO:
            printf("hello.txt : FIFO\n"); break;
        case S_IFDIR:
            printf("hello.txt: Directory\n"); break;
        case S_IFREG:
            printf("hello.txt: Regular File\n"); break;
    }

    return 0;
}

이렇게 and 연산에 의해 해당 파일의 모드가 출력되게 된다.

이렇게 and 연산 말고도 macro 함수를 사용할 수도 있기는 하다.


Checking permission

#include <unistd.h>

int access(const char *pathname, int mode);

-pathname

파일의 경로(파일 이름 포함)

-mode

R_OK, W_OK, X_OK, F_OK(파일의 존재를 확인)

#include <sys/errno.h>
#include <unistd.h>
#include <stdio.h>

extern int errno;

int main(void){
    int per;

    if(access("hi.txt", F_OK) == -1 && errno == ENOENT) printf("hi.txt: File not exist.\n");

    per = access("hello.txt", R_OK);
    if(per == 0) printf("linux.txt: Read permission is permitted.\n");
    else printf("hello.txt: Read permission is not permitted.\n");

    return 0;
}

return: 0(권한 있음), -1(error)

이렇게 파일의 권한이 있다고 보여지는 것을 볼 수 있다.


Changing permission

#include <sys/stat.h>

int chmod(const char *pathname, mode_t mode);
int fchmod(int fd, mode_t mode);

-pathname(file path or file descriptor)

파일의 경로

-mode

적용하려는 접근 권한

return: 0(success), -1(error)


해당 파일의 권한을 변경할 수 있다.

#include <sys/errno.h>
#include <unistd.h>
#include <stdio.h>

extern int errno;

int main(void){
    int per;

    if(access("hi.txt", F_OK) == -1 && errno == ENOENT) printf("hi.txt: File not exist.\n");

    per = access("hello.txt", R_OK);
    if(per == 0) printf("linux.txt: Read permission is permitted.\n");
    else printf("hello.txt: Read permission is not permitted.\n");

    return 0;
}

이렇게 변경되는 것을 볼 수 있다.


  • Directory

이번에는 파일이 아닌 directory를 알아보자.

file name들과 file name이 가리키는 inode 번호를 담고 있는 파일을 directory라고 한다.


Current directory를 기준으로 작성한 파일 경로를 상대 경로라고하고, Root directory를 기준으로 작성한 파일 경로를 root directory라고 한다.


우선 우리가 사용했던 mkdir, rmdir, rename을 만들어보자.

#include <sys/stat.h>
#include <sys/types.h>

int mkdir (const char *pathname, mode_t mode);

-pathname

만들 directory의 이름이다.

-mode

만들 directory의 모드이다.

#include <unistd.h>

int rmdir(const char *pathname);

-pathname

삭제할 directory의 이름이다.

#include <stdio.h>

int rename(const char *oldpath, const char *newpath);

-oldpath

변경하고 싶은 directory의 이름이다.

-newpath

변경할 이름이다.


바로 실습을 해보면

#include <sys/stat.h>
#include <unistd.h>
#include <stdlib.h>
#include <stdio.h>

#define PRINT_ERR_EXIT(_msg) {perror(_msg); exit(1);}

int main(void){
    if(mkdir("system", 0755) == -1) PRINT_ERR_EXIT("system");

    if(mkdir("programming", 0755) == -1) PRINT_ERR_EXIT("programming");

    if(rename("system", "systemProgramming") == -1) PRINT_ERR_EXIT("systemProgramming");

    if(rmdir("programming") == -1) PRINT_ERR_EXIT("programming");

    return 0;
}

mkdir로 system directory와 programming directory를 만들고 system directory의 이름을 systemProgramming으로 변경한다.

그리고 programming directory를 제거하는 프로그램이다.

실습을 해보면 systemProgramming directory가 생성된 것을 볼 수 있다.


getcwd

#include <unistd.h>

char *getcwd(char *buf, size_t size);

현재 directory 주소를 가져오는 함수이다.

-buf

경로를 저장할 buffer의 주소

- size

buffer의 사이즈이다.

return: Path가 저장된 buf의 주소, NULL(error)


chdir

#include <unistd.h>

int chdir(const char *path);

working directory를 변경하는 함수이다.

-path

변경할 directory의 주소

return: 0(success), -1(fail)


#include <stdio.h>
#include <unistd.h>

int main(void){
    char *cwd;
    char wd[BUFSIZ];

    cwd = getcwd(NULL, BUFSIZ);
    printf("1. Current Directory : %s\n", cwd);

    chdir("newDir");

    getcwd(wd, BUFSIZ);
    printf("2. Current Directory: %s\n", wd);

    return 0;
}

이렇게 실습을 진행해보면

첫번째에 현재 디렉토리가 출력되는 것을 볼 수 있고, 두번째에 변경된 디렉토리가 출력되는 것을 볼 수 있다.

Open/Close a directory file

#include <sys/types.h>
#include <dirent.h>

DIR *opendir(const char *name);

-name

열려는 디렉토리의 이름

return: 열린 디렉토리의 DIR 포인터, NULL(error)

#include <sys/types.h>
#include <dirent.h>

int closedir(DIR *dirp);

-dirp

닫으려는 DIR 포인터

return: 0(success), -1(fail)


Reading directory information

#include <dirent.h>

struct dirent *readdir(DIR *dirp);

-drip

읽으려는 directory file의 DIR 포인터

return: 현재 읽어온 항목의 dirent 구조체를 가리키는 포인터, NULL(더 이상 읽어올 항목이 없음)


여기서 dirent 구조체는

struct dirent {
	__uint64_t  d_ino;      /* file number of entry */ \
	__uint64_t  d_seekoff;  /* seek offset (optional, used by servers) */ \
	__uint16_t  d_reclen;   /* length of this record */ \
	__uint16_t  d_namlen;   /* length of string in d_name */ \
	__uint8_t   d_type;     /* file type, see below */ \
	char      d_name[__DARWIN_MAXPATHLEN]; /* entry name (up to MAXPATHLEN bytes) */ \
}

이렇게 구성이 되어 있다.

이 정보들을 하나씩 읽어오는 것이다.


위에서 만들었던 systemProgramming directory에 대충 파일을 하나 만든 후 실습을 해보자면

#include <stdio.h>
#include <dirent.h>
#include <stdlib.h>

int main(void){
    DIR *dp;
    struct dirent *dent;

    if((dp = opendir("systemProgramming")) == NULL){
        perror("opendir: systemProgramming");
        exit(1);
    }

    while((dent = readdir(dp))){
        printf("Name : %s   ", dent -> d_name);
        printf("Inode : %d\n", (int)dent -> d_ino);
    }

    closedir(dp);

    return 0;
}

이렇게 systemProgramming directory에 들어있는 모든 파일들이 순서대로 출력되는 것을 볼 수 있다.


  • Link

이번에는 link에 대해 알아본다.


Hard link

먼저 하드 링크부터 알아본다.

해당 inode에 mapping 된 이름을 말한다.

동일한 file system 내에 여러 개의 hard link를 생성할 수 있고

링크 수 = hard link 수이며, 링크 수 = 0 은 파일 삭제를 의미한다.


Soft link

실제 파일의 경로명을 저장하는 파일이며, 동일한 inode를 사용하는 하드 링크와는 다르게 새로운 inode를 사용한다.


링크는 shell에서 ln을 사용해서도 만들 수 있다.

ln에 -s 명령어를 추가하면 soft link를 만든다.


우리는 이 명령어를 직접 만드는 실습을 해보자.


Making a link

#include <unistd.h>

int link(const char *oldpath, const char *newpath);
//Hard link 생성
#include <unistd.h>

int symlink(const char *target, const char *linkpath);
//soft link 생성

return: 0(success), -1(fail)


바로 하드 링크의 코드를 작성해보면

#include <sys/types.h>
#include <sys/stat.h>
#include <unistd.h>
#include <stdio.h>

int main(void){
    struct stat buf;

    stat("hello.txt", &buf);
    printf("Before link count = %d\n", (int)buf.st_nlink);

    link("hello.txt", "hello.ln");
    
    stat("hello.txt", &buf);
    printf("After Link Count = %d\n", (int)buf.st_nlink);

    return 0;
}

새롭게 hello.ln의 파일이 생성되고 hello.txt의 링크 수가 증가하는 것을 볼 수 있다.

softlink는 매우 간단하다.

이렇게 간단하게 코드를 작성하고

#include <sys/types.h>
#include <unistd.h>

int main(void){
    symlink("hello.txt", "hello.sym");

    return 0;
}

실행을 해보면

화살표로 링크를 나타내는 파일이 생긴 것을 볼 수 있다.


Removing a link

#include <unistd.h>

int unlink(const char *pathname);
#include <stdio.h>

int remove(const char *pathname);

링크를 제거하는 방법에는 이렇게 unlink와 remove 2가지 방법이 있다.

-pathname

삭제하려는 HardLink의 경로

return: 0(success), -1(error)


둘 다 File System에서 이름을 삭제하고 해당 파일이 마지막 Link인 경우, file을 삭제한다.

하지만 차이로는 remove는 directory에도 사용이 가능하지만, unlink는 불가능하다.


Get symbolic link file Info

#include <unistd.h>

ssize_t readlink(const char *pathname, char *buf, size_t bufsiz);

Symbolic link에 저장된 데이터를 읽는 함수이다.

-pathname

읽을 파일의 경로

-buf

데이터를 저장할 buffer

-bufsiz

읽을 크기

return: 읽은 byte의 수, -1(error)


#include <sys/types.h>
#include <sys/stat.h>
#include <unistd.h>
#include <stdio.h>
#define PRINT_CNT_INODE {\
    printf("hello.txt : Link Count = %d\n", (int)buf.st_nlink);\
    printf("hello.txt: Inode = %d\n", (int)buf.st_ino);}

int main(void){
    struct stat buf;

    printf("1. stat : hello.txt ---\n");
    stat("hello.txt", &buf);
    PRINT_CNT_INODE;

    printf("2. stat : hello.sym ---\n");
    stat("hello.sym", &buf);
    PRINT_CNT_INODE;

    printf("3. lstat : hello.sym ---\n");
    lstat("hello.sym", &buf);
    PRINT_CNT_INODE;
}

이렇게 hello.sym가 가진 정보를 출력해보면 lstat로 가져온 정보만 다르다는 것을 볼 수 있다.

#include <limits.h>
#include <stdlib.h>

char *realpath(const char *path, char *resolved_path);

Symbolic link가 가리키는 파일의 절대 경로를 얻는다.

-path

symbolic link file의 경로

-resolved_path

결과 값을 저장할 buffer

return: 결과가 저장된 buffer의 포인터, NULL(error)


#include <sys/stat.h>
#include <unistd.h>
#include <stdlib.h>
#include <stdio.h>
#define PRINT_ERR_EXIT(_msg) {perror(_msg); exit(1);}

int main(void){
    char buf[BUFSIZ];
    int n;

    n = readlink("hello.sym", buf, BUFSIZ);
    if(n == -1) PRINT_ERR_EXIT("readlink");

    buf[n] = '\0';
    printf("hello.sym : READLINK = %s\n", buf);

    realpath("hello.sym", buf);
    printf("hello.sym : READPATH = %s\n", buf);

    return 0;
}

이렇게 link로 가져온 파일의 원래 위치를 가져온다.

728x90

내일이면 개강이다.

22년도 2학기는 복학 후 처음이라는 핑계로 공부를 많이 안 했었다.

그렇게 놀고 막상 학기가 끝난 후 성적표를 받으니 후회를 많이 했다.

학점을 올리지는 못해도... 이렇게 떨어뜨리다니

그래도 다행히 누리관에는 들어올 수 있었다.


방학 동안에도 계절학기 수강한 거 빼고는 스프링 찔끔하고 그냥 한 게 없다.


이번학기부터 프로젝트 가질 수 있는 동아리 활동도 하고, 백엔드 공부도 하고 말아먹었던 학점도 올리고...

이제는 핑계를 댈 수가 없으니 열심히 살도록 해야겠다.


'100년 중 하루' 카테고리의 다른 글

2022년 9월 21일  (0) 2022.09.21
2022년 9월 17일  (0) 2022.09.17
728x90

HTTP 1일 차로 인터넷 네트워크에 대해서 공부한다.


  • 인터넷 통신

만약 컴퓨터 두 대가 직접적으로 연결이 되어 있다면

이렇게 직접 통신을 하면 될 것이다.


하지만 수많을 컴퓨터들이 있는 인터넷 내에서는 어떻게 통신을 할까?

이렇게 수많은 노드들을 거친 후에 서버에 도착해야 할 것이다.

과연 어떤 방법으로 서버를 찾아가게 될까?

  • IP

그 방법으로는 컴퓨터마다 고유의 번호를 부여하고 그 번호로 찾아가게 하는 것이다.

고유의 번호를 IP 주소라고 한다.

지정한 IP 주소에 패킷이라는 통신 단위로 데이터를 저장하게 된다.

이렇게 전송 데이터에 IP 관련된 정보를 넣어서 감싼 단위를 패킷이라고 한다.

패킷 안에는 IP 정보가 들어가 있기 때문에 해당 정보를 이용하여 목적지까지 패킷을 운반한다.

하지만 이 IP 프로토콜에도 한계가 있다. 

- 비연결성

만약 패킷을 받을 대상이 없거나 서비스 불가 상태여도 데이터를 전송한다.


- 비신뢰성

데이터가 중간에 소실될 수 있고, 패킷이 순서대로 오지 않을 수도 있다.


- 프로그램 구분

같은 IP를 사용하는 서버에서 통신하는 애플리케이션이 둘 이상이면 어느 애플리케이션으로 가야 하는지 알 수 없다.

  • TCP, UDP

해당 방법을 TCP에서 해결할 수 있다.


프로토콜 계층을 살펴보면

인터넷 프로토콜 스택의 4계층이다.

애플리케이션 계층 - HTTP, FTP
전송 계층- TCP, UDP
인터넷 계층 - IP
네트워크 인터페이스 계층


    이거를 사용하는 단계까지 같이 표현을 해보자면

이렇게 나타내진다.

데이터를 전송할 때에는 이 모든 과정을 거쳐 전송하게 된다.

IP 패킷으로 포장하기 전에 TCP 하나를 추가하게 되는 것인데

TCP는 이전에 IP 프로토콜에서 생겼던 문제들을 해결할 수 있다.

TCP 특징

- 연결지향(TCP 3 way handshake, 가상연결)

데이터를 전송하기 전에 서버에 접속 요청을 보낸 후, 서버에서 요청 수락을 하고 서버에서 클라이언트로 접속 요청을 보내면 그것에 응답하여 서로 연결이 된 것을 확인한 후 데이터를 전송하는 방법이다.

클라이언트와 서버 간에는 연결이 된 것을 확인할 수 있지만, 그 중간의 노드들은 접속이 된 것을 알지 못하기 때문에 가상 연결이라고도 한다.


- 데이터 전달 보증

데이터를 수신하면 데이터를 수신한 곳에서 송신한 곳으로 수신이 완료되었음을 알리는 신호를 보낸다.

이렇게 하면 데이터가 전달되었다는 것을 보증할 수 있다.


- 순서 보장

순서가 맞지 않는다면, 맞지 않는 곳에서부터 재전송을 요청하여 순서대로 도착함을 보장한다.

이렇게 TCP에 대해 알아보았다.


UDP는 이와 정반대의 특징을 가지는데

연결지향, 데이터 전달 보증, 순서 보장의 특징을 가지지 않아 IP와 거의 비슷하지만 속도가 훨씬 빠르다.

  • PORT

이렇게 한 번에 둘 이상 연결할 경우가 있다.

이럴 때에는 어떤 데이터가 어디에 쓰이는지 어떻게 구별할 수 있을까?


이럴 때에는 위에 같이 포장되어 있는 PORT의 정보를 이용한다.


이렇게 포트 번호를 보고 어디에서 온 데이터인지 구별하여 사용한다.

  • DNS

IP는 숫자로만 구성되어 있어 기억하기 어렵다.

우리가 웹 사이트에 접속할 때마다 저 번호를 기억해서 치고 들어가면 상당히 힘들 것이다.

그렇기 때문에 우리는 DNS(Domain Name System)을 사용한다.

도메인 명을 IP 주소로 변환해 주는 방법이다.

우리가 google에 접속하려고 하면 구글의 google.com을 치고 접속한다.

그러면 도메인 서버에서 해당 도메인명에 일치하는 IP주소를 찾아 접속을 해준다.

그러면 우리는 IP 주소를 몰라도 google에 접속할 수 있게 되는 것이다.

'Devops > HTTP' 카테고리의 다른 글

HTTP 6일차  (0) 2023.03.09
HTTP 5일차  (1) 2023.03.09
HTTP 4일차  (0) 2023.03.08
HTTP 3일차  (0) 2023.03.06
HTTP 2일차  (0) 2023.03.02
728x90

인프런 김영한 님의 강의를 참고했습니다.


스프링 핵심 원리 - 기본편 - 인프런 | 강의

스프링 입문자가 예제를 만들어가면서 스프링의 핵심 원리를 이해하고, 스프링 기본기를 확실히 다질 수 있습니다., - 강의 소개 | 인프런

www.inflearn.com

빈 스코프에 대해서 배워보자.


11일차에 우리는 스프링 빈이 컨테이너가 시작될 때 생성이되어 컨테이너가 종료될 때까지 유지된다고 배웠다.

싱글톤 스코프로 생성이 되기 때문인데, 스코프는 말 그대로 빈이 존재할 수 있는 범위이다.


스프링은 다음과 같은 스코프를 지원한다.

  • 싱글톤

기본 스코프, 스프링 컨테이너의 시작과 종료까지 유지되는 가장 넓은 범위의 스코프이다.

  • 프로토타입

스프링 컨테이너는 프로토타입 빈의 생성과 의존관계까지만 관여하고 더는 관리하지 않는 짧은 범위의 스코프이다.

  • 웹 관련 스코프

웹 요청에 관한 스코프들로 request, session, application이 있다.


빈 스코프는

@Scope("prototype")로 설정할 수 있다.


프로토타입 스코프

기존의 싱글톤을 조회하면 스프링 컨테이너는 항상 같은 인스턴스의 스프링 빈을 반환했다.

하지만 프로토타입 스코프를 조회하면 항상 새로운 인스턴스를 생성해서 반환해준다.


프로토타입 스코프의 빈을 스프링 컨테이너에 요청하면

스프링 컨테이너는 이 시점에 프로토타입 빈을 생성하고, 필요한 의존관계를 주입한다.

그 빈을 스프링 컨테이너는 반환한다.


스프링은 딱 이 과정에만 관여하고, 그 후에는 관리를 하지 않는다.

따라서 @PreDestroy와 같은 종료 메서드도 호출되지 않는다.


늘 하던대로 싱글톤 스코프 빈을 먼저 테스트 해보자

package hello.core.scope;

import jakarta.annotation.PostConstruct;
import jakarta.annotation.PreDestroy;
import org.junit.jupiter.api.Assertions;
import org.junit.jupiter.api.Test;
import org.springframework.context.annotation.AnnotationConfigApplicationContext;
import org.springframework.context.annotation.Scope;

public class SingletonTest {
    
    @Scope("singleton")
    static class SingletonBean{
        @PostConstruct
        public void init(){
            System.out.println("SingletonBean.init");
        }
        
        @PreDestroy
        public void destroy(){
            System.out.println("SingletonBean.destroy");
        }
    }
    
    @Test
    public void singletonBeanFind(){
        AnnotationConfigApplicationContext applicationContext = new AnnotationConfigApplicationContext(SingletonBean.class);
        
        SingletonBean singletonBean1 = applicationContext.getBean(SingletonBean.class);
        SingletonBean singletonBean2 = applicationContext.getBean(SingletonBean.class);

        System.out.println("singletonBean1 = " + singletonBean1);
        System.out.println("singletonBean2 = " + singletonBean2);

        Assertions.assertSame(singletonBean1, singletonBean2);
        
        applicationContext.close();
    }
}

이렇게 같은 인스턴스가 출력이 되는 것을 볼 수 있다.


이번에는 싱글톤이 아닌 프로토타입을 테스트해보자.

package hello.core.scope;

import jakarta.annotation.PostConstruct;
import jakarta.annotation.PreDestroy;
import org.junit.jupiter.api.Assertions;
import org.junit.jupiter.api.Test;
import org.springframework.context.annotation.AnnotationConfigApplicationContext;
import org.springframework.context.annotation.Scope;

public class PrototypeTest {

    @Scope("prototype")
    static class PrototypeBean{
        @PostConstruct
        public void init(){
            System.out.println("PrototypeBean.init");
        }

        @PreDestroy
        public void destroy(){
            System.out.println("PrototypeBean.destroy");
        }
    }

    @Test
    public void prototypeBeanFind(){
        AnnotationConfigApplicationContext applicationContext = new AnnotationConfigApplicationContext(PrototypeBean.class);
        System.out.println("find prototypeBean1");
        PrototypeBean prototypeBean1 = applicationContext.getBean(PrototypeBean.class);

        System.out.println("find prototypeBean2");
        PrototypeBean prototypeBean2 = applicationContext.getBean(PrototypeBean.class);

        System.out.println("prototypeBean1 = " + prototypeBean1);
        System.out.println("prototypeBean2 = " + prototypeBean2);

        Assertions.assertNotSame(prototypeBean1, prototypeBean2);
        applicationContext.close();
    }
}

이렇게 프로토타입을 테스트해보면

다른 인스턴스가 생성이 되는 것을 확인할 수 있다.

그리고 초기화도 2번이 실행된 것을 확인할 수 있다.

또한 프로토타입은 생성, 의존관계주입, 초기화까지만 관여하기에 @PreDestroy의 메서드가 출력되지 않는 것을 볼 수 있다.


프로토타입과 싱글톤을 함께 사용시의 문제점

프로토타입 스코프의 빈을 요청하면 항상 새로운 객체 인스턴스를 반환한다.

하지만 싱글톤 빈에 들어간 프로토타입 빈은 어떻게 될까?


싱글톤 빈이 가지고 있는 프로토타입 빈은 이미 과거에 주입이 끝난 빈일 것이다.

그렇기 때문에 사용할 때마다 생성되는 것이 아니며, 안에 프로토타입 빈이 있더라도 프로토타입 빈으로의 작동을 못하게 될 것이다.

이렇게 사용할 수도 있지만, 아마 이것은 프로토타입을 사용하는 취지에 어긋날 것이다.

그렇기에 항상 새로운 프로토타입 빈을 생성하는 방법에 대해 알아보자.


Provider로 프로토타입 스코프를 사용

프로토타입 빈을 요청받는 방법은 사용할 때마다 스프링 컨테이너에 새로 요청하는 것이다.

package hello.core.scope;

import jakarta.annotation.PostConstruct;
import jakarta.annotation.PreDestroy;
import org.junit.jupiter.api.Assertions;
import org.junit.jupiter.api.Test;
import org.springframework.beans.factory.annotation.Autowired;
import org.springframework.context.ApplicationContext;
import org.springframework.context.annotation.AnnotationConfigApplicationContext;
import org.springframework.context.annotation.Scope;

public class PrototypeProviderTest {

    @Scope("prototype")
    static class PrototypeBean{
        private int count = 0;

        public void addCount(){
            count++;
        }

        public int getCount(){
            return count;
        }

        @PostConstruct
        public void init(){
            System.out.println("PrototypeBean.init" + this);
        }

        @PreDestroy
        public void destroy(){
            System.out.println("PrototypeBean.destroy");
        }
    }

    static class ClientBean{
        @Autowired
        private ApplicationContext applicationContext;

        public int logic(){
            PrototypeBean prototypeBean = applicationContext.getBean(PrototypeBean.class);
            prototypeBean.addCount();
            int count = prototypeBean.getCount();
            return count;
        }
    }

    @Test
    void providerTest(){
        AnnotationConfigApplicationContext applicationContext = new AnnotationConfigApplicationContext(ClientBean.class, PrototypeBean.class);

        ClientBean clientBean1 = applicationContext.getBean(ClientBean.class);
        int count1 = clientBean1.logic();
        Assertions.assertEquals(1, count1);

        ClientBean clientBean2 = applicationContext.getBean(ClientBean.class);
        int count2 = clientBean1.logic();
        Assertions.assertEquals(1, count2);
    }
}

이렇게 의존관계를 찾는 방법을 Dependency Lookup이라고 하는데, 스프링 컨테이너 종속적인 코드가 되고 좋은 코드가 아니다.


따라서 다른 방법들을 사용한다.


ObjectFactory, ObjectProvider

Dependency Lookup 서비스를 제공하는 것이 바로 ObjectProvider이고, 이걸 상속받아 기능을 추가한 것이 ObjectProvider이다.

package hello.core.scope;

import jakarta.annotation.PostConstruct;
import jakarta.annotation.PreDestroy;
import org.junit.jupiter.api.Assertions;
import org.junit.jupiter.api.Test;
import org.springframework.beans.factory.ObjectProvider;
import org.springframework.beans.factory.annotation.Autowired;
import org.springframework.context.ApplicationContext;
import org.springframework.context.annotation.AnnotationConfigApplicationContext;
import org.springframework.context.annotation.Scope;

public class PrototypeProviderTest {

    @Scope("prototype")
    static class PrototypeBean{
        private int count = 0;

        public void addCount(){
            count++;
        }

        public int getCount(){
            return count;
        }

        @PostConstruct
        public void init(){
            System.out.println("PrototypeBean.init" + this);
        }

        @PreDestroy
        public void destroy(){
            System.out.println("PrototypeBean.destroy");
        }
    }

    static class ClientBean{
        @Autowired
        private ObjectProvider<PrototypeBean> prototypeBeanObjectProvider;
        
        public int logic(){
            PrototypeBean prototypeBean = prototypeBeanObjectProvider.getObject();
            prototypeBean.addCount();
            return prototypeBean.getCount();
        }
    }

    @Test
    void providerTest(){
        AnnotationConfigApplicationContext applicationContext = new AnnotationConfigApplicationContext(ClientBean.class, PrototypeBean.class);

        ClientBean clientBean1 = applicationContext.getBean(ClientBean.class);
        int count1 = clientBean1.logic();
        Assertions.assertEquals(1, count1);

        ClientBean clientBean2 = applicationContext.getBean(ClientBean.class);
        int count2 = clientBean1.logic();
        Assertions.assertEquals(1, count2);
    }
}

ClientBean 클래스의 내용을 이렇게 변경하면 된다.

이렇게 다른 인스턴스를 가지는 것을 볼 수 있다.

ObjectProvider의 getObject()를 호출하면 스프링 컨테이너에서 해당 빈을 찾아서 반환한다.


여기에 추가로 자바 표준을 사용하는 방법이 있다.


JSP-330 Provider

스프링 부트 3.0.1을 사용하는 방법이다.

우선 gradle에

implementation 'jakarta.inject:jakarta.inject-api:2.0.1'

을 추가해준다.


그리고 Provider에 맞게 ClientBean의 코드를 수정해준다.

package hello.core.scope;

import jakarta.annotation.PostConstruct;
import jakarta.annotation.PreDestroy;
import jakarta.inject.Provider;
import org.junit.jupiter.api.Assertions;
import org.junit.jupiter.api.Test;
import org.springframework.beans.factory.annotation.Autowired;
import org.springframework.context.annotation.AnnotationConfigApplicationContext;
import org.springframework.context.annotation.Scope;

public class SingletonWithPrototypeTest1 {

    @Scope("prototype")
    static class PrototypeBean{
        private int count = 0;

        public void addCount(){
            count++;
        }

        public int getCount(){
            return count;
        }

        @PostConstruct
        public void init(){
            System.out.println("PrototypeBean.init" + this);
        }

        @PreDestroy
        public void destroy(){
            System.out.println("PrototypeBean.destroy");
        }
    }

    static class ClientBean{
        
        @Autowired
        private Provider<PrototypeBean> provider;
        
        public int logic(){
            PrototypeBean prototypeBean = provider.get();
            prototypeBean.addCount();
            int count = prototypeBean.getCount();
            return count;
        }
    }

    @Test
    void prototypeFind(){
        AnnotationConfigApplicationContext applicationContext = new AnnotationConfigApplicationContext(PrototypeBean.class);
        PrototypeBean prototypeBean1 = applicationContext.getBean(PrototypeBean.class);
        prototypeBean1.addCount();
        Assertions.assertEquals(1, prototypeBean1.getCount());

        PrototypeBean prototypeBean2 = applicationContext.getBean(PrototypeBean.class);
        prototypeBean2.addCount();
        Assertions.assertEquals(1, prototypeBean2.getCount());
    }

    @Test
    void singletonClientUsePrototype(){
        AnnotationConfigApplicationContext applicationContext = new AnnotationConfigApplicationContext(ClientBean.class, PrototypeBean.class);

        ClientBean clientBean1 = applicationContext.getBean(ClientBean.class);
        int count1 = clientBean1.logic();
        Assertions.assertEquals(1, count1);

        ClientBean clientBean2 = applicationContext.getBean(ClientBean.class);
        int count2 = clientBean2.logic();
        Assertions.assertEquals(2, count2);
    }
}

둘 중에 상황에 맞는 DL을 사용하면 된다.


웹 스코프

지금까지는 싱글톤과 프로토타입 스코프를 학습했다.


이번에는 웹 스코프에 대해서도 알아보자.

웹 스코프는 웹 환경에서만 동작한다.

그리고 프로토타입과는 다르게 해당 스코프의 종료시점까지 관리해준다.


종류로는

request: HTTP 요청 하나가 들어오고 나갈 때까지 유지되는 스코프, 요청마다 별도의 인스턴스가 생성된다.

session: HTTP Session과 동일한 생명주기를 가지는 스코프

application: ServletContext와 동일한 생명주기를 가지는 스코프


바로 request 스코프 예제를 만들어보자.

웹 스코프는 웹 환경에서만 동작하기 때문에 해당 라이브러리를 추가해줘야 한다.

implementation 'org.springframework.boot:spring-boot-starter-web'

해당 라이브러리를 추가하면

http://localhost:8080/ 해당 페이지를 통해 접속할 수 있게 된다.


request 요청이 오면 로그를 남기는 예제를 만들어보자.

우선 로그를 출력하기 위한 클래스를 만든다.

package hello.core.web;

import jakarta.annotation.PostConstruct;
import jakarta.annotation.PreDestroy;
import org.springframework.context.annotation.Scope;
import org.springframework.stereotype.Component;

import java.util.UUID;

@Component
@Scope(value = "request")
public class MyLog {
    private String uuid;
    private String requestURL;
    
    public void setRequestURL(String requestURL){
        this.requestURL = requestURL;
    }
    
    public void log(String message){
        System.out.println("UUID: " + uuid + ", requestURL: " + requestURL + ", message: " + message);
    }
    
    @PostConstruct
    public void init(){
        uuid = UUID.randomUUID().toString();
        System.out.println("UUID: " + uuid + ", request scope bean create: " + this);
    }
    
    @PreDestroy
    public void close(){
        System.out.println("UUID: " + uuid + ", request scope bean close: " + this);
    }
}

Scope를 request로 지정해서, HTTP 요청 당 하나씩 생성이 되고, 요청이 끝나는 시점에 소멸이 된다.


이제 Controller를 만든다.

package hello.core.web;

import jakarta.servlet.http.HttpServletRequest;
import lombok.RequiredArgsConstructor;
import org.springframework.beans.factory.ObjectProvider;
import org.springframework.stereotype.Controller;
import org.springframework.web.bind.annotation.RequestMapping;
import org.springframework.web.bind.annotation.ResponseBody;

@Controller
@RequiredArgsConstructor
public class LogController {

    private final LogService logService;
    private final ObjectProvider<MyLog> myLogObjectProvider;

    @RequestMapping("log-demo")
    @ResponseBody
    public String logDemo(HttpServletRequest request){
        String requestURL = request.getRequestURL().toString();
        MyLog myLog = myLogObjectProvider.getObject();
        myLog.setRequestURL(requestURL);

        myLog.log("controller");
        logService.logic("testId");

        return "OK";
    }
}

request를 받아야 URL을 알 수 있기에 이 단계에서 URL을 넣어준다.


package hello.core.web;

import lombok.RequiredArgsConstructor;
import org.springframework.beans.factory.ObjectProvider;
import org.springframework.stereotype.Service;

@Service
@RequiredArgsConstructor
public class LogService {

    private final ObjectProvider<MyLog> myLogObjectProvider;

    public void logic(String id){
        MyLog myLog = myLogObjectProvider.getObject();
        myLog.log("service id = " + id);
    }
}

여기에서 ObjectProvider로 MyLog를 두개 생성하지만, 같은 HTTP 요청이기 때문에 동일한 빈이 들어간다.

ObjectProvider 덕분에 Object.getObject() 호출 전까지, request scope빈의 생성을 지연할 수 있다.


하지만 여기에서 더 나아가


스코프와 프록시

프록시 방식을 사용한다.

프록시 방식은

@Component
@Scope(value = "request", proxyMode = ScopedProxyMode.TARGET_CLASS)
public class MyLog{
}

로 proxyMode를 추가하는게 핵심이다.

적용 대상이 class면 TARGET_CLASS, 적용 대상이 인터페이스면 INTERFACES를 선택한다.

이렇게 하면 MyLog의 가짜 프록시 클래스를 만들어두고 HTTP request와 상관 없이 가짜 프록시 클래스를 다른 빈에 주입해 둘 수 있다.


이렇게 myLog를 출력해보면, 이 객체를 상속받은 다른 객체가 출력되는 것을 볼 수 있다.

'Spring > 스프링' 카테고리의 다른 글

스프링 14일차  (0) 2023.03.26
스프링 13일차  (0) 2023.03.25
스프링 11일차  (0) 2023.02.12
스프링 10일차  (0) 2023.02.11
스프링 9일차  (0) 2023.02.10
728x90

인프런 김영한 님의 강의를 참고했습니다.


스프링 핵심 원리 - 기본편 - 인프런 | 강의

스프링 입문자가 예제를 만들어가면서 스프링의 핵심 원리를 이해하고, 스프링 기본기를 확실히 다질 수 있습니다., - 강의 소개 | 인프런...

www.inflearn.com

빈의 생명주기

객체의 초기화 작업과 종료 작업이 어떻게 진행되는지 알아둘 필요가 있다.

예제 코드로

package hello.core.lifeCycle;

public class LifeCycleClient {

    private String print;

    public LifeCycleClient(){
        System.out.println("생성자 호출, print = " + print);
        beanStart();
        call("생성자!");
    }

    public void setPrint(String print){
        this.print = print;
    }

    //빈 시작시 호출
    public void beanStart(){
        System.out.println("beanStart: " + print);
    }

    public void call(String message){
        System.out.println("call: " + print + " message = " + message);
    }

    //빈 종료시 호출
    public void beanClose(){
        System.out.println("close: " + print);
    }
}

이런 class를 만들어보자.

우리는 이 class로 빈의 생명주기에 대해 알아볼 것이다.

package hello.core.lifecycle;

import hello.core.lifeCycle.LifeCycleClient;
import org.junit.jupiter.api.Test;
import org.springframework.context.ApplicationContext;
import org.springframework.context.ConfigurableApplicationContext;
import org.springframework.context.annotation.AnnotationConfigApplicationContext;
import org.springframework.context.annotation.Bean;
import org.springframework.context.annotation.Configuration;

public class BeanLifeCycleTest {

    @Test
    public void lifeCycleTest(){
        ConfigurableApplicationContext applicationContext = new AnnotationConfigApplicationContext(LifeCycleConfig.class);
        LifeCycleClient client = applicationContext.getBean(LifeCycleClient.class);
        applicationContext.close();
    }

    @Configuration
    static class LifeCycleConfig{

        @Bean//(initMethod = "init", destroyMethod = "close")
        public LifeCycleClient lifeCycleClient(){
            LifeCycleClient networkClient = new LifeCycleClient();
            networkClient.setPrint("hello!");
            return networkClient;
        }
    }
}

그리고 테스트코드로 해당 빈을 열고 닫아보자.

실행해 보면

이렇게 print에 값이 들어가 있지 않은 것을 볼 수 있다.

생성자를 통해 생성하는 단계에는 print에 대한 값이 들어가있지 않고, 모두 생성이 된 후에 setter를 통해 값이 들어가기 때문이다.

스프링 빈은 객체를 생성하고, 의존관계 주입이 다 끝난 다음에야 필요한 데이터를 사용할 준비가 된다.

그렇기에 스프링은 의존관계 주입이 완료되면 스프링 빈에게 초기화 시점을 알려주는 기능을 제공한다. 당연히 스프링 컨테이너가 종료되기 직전에 소멸을 알려주는 기능도 제공한다.


스프링 빈의 LifeCycle

스프링 컨테이너 생성 -> 스프링 빈 생성 -> 의존관계 주입 -> 초기화 콜백 -> 사용 -> 소멸 전 콜백 -> 스프링 종료

의 주기를 가진다.


물론 생성자에서 로직들을 추가하여 초기화를 할 수도 있지만, 유지보수를 위해 객체를 생성하는 부분과 초기화하는 부분을 분리는 것이 좋다.


생명주기 콜백

스프링은 3가지 방법으로 빈 생명주기 콜백을 지원한다.

InitializingBean, DisposableBean 인터페이스

설정 정보에 초기화 메서드, 종료 메서드를 지정

@PostConstruct, @PreDestroy annotation


  • InitializingBean, DisposableBean 인터페이스

InitializingBean, DisposableBean 인터페이스를 implements 하고 해당 인터페이스들에 있는 메서드들을 afterPropertiesSet(), destroy() 메서드들을 구현하는것이다.

package hello.core.lifeCycle;

import org.springframework.beans.factory.DisposableBean;
import org.springframework.beans.factory.InitializingBean;

public class LifeCycleClient implements InitializingBean, DisposableBean {
    private String print;

    public LifeCycleClient() {
        System.out.println("생성자 호출, url = " + print);
    }

    public void setPrint(String print) {
        this.print = print;
    }

    //서비스 시작시 호출
    public void beanStart() {
        System.out.println("LifeCycleClient.beanStart, print = " + print);
    }

    public void call(String message) {
        System.out.println("call: " + print + " message = " + message);
    }

    //서비스 종료시 호출
    public void beanClose() {
        System.out.println("LifeCycleClient.disConnect, print = " + print);
    }


    public void afterPropertiesSet() throws Exception{
        System.out.println("NetworkClient.init");
        beanStart();
        call("초기화 연결 메시지");
    }

    public void destroy() throws Exception{
        System.out.println("NetworkClient.close");
        beanClose();
    }
}

이렇게 해당 메서드들을 구현하고 테스트를 진행해보자.

이렇게 생성자가 먼저 호출이 되고, 그 후에 초기화 콜백 메서드가 실행이 된다.

빈의 로직들이 실행이 되고, 소멸 전 콜백 실행 해 소멸이 되는 것을 볼 수 있다.

이 방법은 메서드의 이름을 변경할 수 없고 내가 코드를 고칠 수 없는 외부 라이브러리에는 적용이 불가능하여 스프링 초기에 사용하던 방법이고 최근에는 사용하지 않는다고 한다.


  • 설정 정보에 초기화 메서드, 종료 메서드를 지정

설정 정보에 @Bean(initMethod = "init", destroyMethod = "close")를 입력해 메서드들을 지정할 수 있다.

바로 해보도록 하자, 우선 LifeCycleClient를 좀 수정하고

package hello.core.lifeCycle;

public class LifeCycleClient{
    private String print;

    public LifeCycleClient() {
        System.out.println("생성자 호출, url = " + print);
    }

    public void setPrint(String print) {
        this.print = print;
    }

    //서비스 시작시 호출
    public void beanStart() {
        System.out.println("LifeCycleClient.beanStart, print = " + print);
    }

    public void call(String message) {
        System.out.println("call: " + print + " message = " + message);
    }

    //서비스 종료시 호출
    public void beanClose() {
        System.out.println("LifeCycleClient.disConnect, print = " + print);
    }

    public void init(){
        System.out.println("LifeCycleClient.init");
        beanStart();
        call("init!");
    }
    
    public void close(){
        System.out.println("LifeCycleClient.close");
        beanClose();
    }
}

@Bean에 initMethod와 DestroyMethod를 추가한다.

package hello.core.lifeCycle;

import hello.core.lifeCycle.LifeCycleClient;
import org.junit.jupiter.api.Test;
import org.springframework.context.ApplicationContext;
import org.springframework.context.ConfigurableApplicationContext;
import org.springframework.context.annotation.AnnotationConfigApplicationContext;
import org.springframework.context.annotation.Bean;
import org.springframework.context.annotation.Configuration;

public class BeanLifeCycleTest {

    @Test
    public void lifeCycleTest(){
        ConfigurableApplicationContext applicationContext = new AnnotationConfigApplicationContext(LifeCycleConfig.class);
        LifeCycleClient client = applicationContext.getBean(LifeCycleClient.class);
        applicationContext.close();
    }

    @Configuration
    static class LifeCycleConfig{

        @Bean(initMethod = "init", destroyMethod = "close")
        public LifeCycleClient lifeCycleClient(){
            LifeCycleClient networkClient = new LifeCycleClient();
            networkClient.setPrint("hello!");
            return networkClient;
        }
    }
}

그러면

이렇게 생명주기에 맞게 실행이 되는 것을 볼 수 있다.

@DestroyMethod에 추록기능이 있어 close, shutdown을 찾아가지만 그래도 지정해주도록 하자.


  • @PostConstruct, @PreDestroy annotation

가장 많이 사용하는 방법이라고 한다, 하지만 외부 라이브러리에는 적용하지 못하기 때문에 외부 라이브러리에 사용하려면 위의 방법을 사용해야 한다고 한다.

예상했던대로

package hello.core.lifeCycle;

import jakarta.annotation.PostConstruct;
import jakarta.annotation.PreDestroy;

public class LifeCycleClient{
    private String print;

    public LifeCycleClient() {
        System.out.println("생성자 호출, url = " + print);
    }

    public void setPrint(String print) {
        this.print = print;
    }

    //서비스 시작시 호출
    public void beanStart() {
        System.out.println("LifeCycleClient.beanStart, print = " + print);
    }

    public void call(String message) {
        System.out.println("call: " + print + " message = " + message);
    }

    //서비스 종료시 호출
    public void beanClose() {
        System.out.println("LifeCycleClient.disConnect, print = " + print);
    }

    @PostConstruct
    public void init(){
        System.out.println("LifeCycleClient.init");
        beanStart();
        call("init!");
    }

    @PreDestroy
    public void close(){
        System.out.println("LifeCycleClient.close");
        beanClose();
    }
}

그냥 이렇게 @PostConstruct, @PreDestroy annotation을 달아주는 방법이다.


'Spring > 스프링' 카테고리의 다른 글

스프링 13일차  (0) 2023.03.25
스프링 12일차  (0) 2023.02.15
스프링 10일차  (0) 2023.02.11
스프링 9일차  (0) 2023.02.10
스프링 8일차  (0) 2023.02.07

+ Recent posts