728x90

개발을 할 때는 그저 Docker로 MySQL 띄우고, 거기다가 아이디 패스워드 만들어서 연결하고 그랬어서, 그 내부의 구조를 고민을 해본적은 없다.

하지만 프로젝트의 사용자가 많아진다는 말을 들으면, 어떻게 쿼리를 작성해야 더 빠른 서비스를 제공할 수 있을까... 이런 고민을 하곤 했다.


이번에 DB를 더 깊이 공부하면서 스토리지 엔진에 대해 공부하게 되었다.

MySQL에서 가장 많이 사용하는 스토리지 엔진인 InnoDB와 MyISAM을 알아보도록 하자.


스토리지 엔진이란?

MySQL은 일단 두부분으로 나뉜다.

MySQL 엔진(머리): SQL 파싱, 쿼리 최적화, 접속 관리, 커넥션 풀 등 요청을 해석하고 계획을 세우는 역할

스토리지 엔진(손): MySQL 엔진이 전달한 명령에 따라 실제 디스크나 메모리에서 데이터를 읽고 쓰는 역할


스토리지 엔진은 데이터를 디스크에 어떻게 저장하고, 어떻게 꺼내올 것인가?를 전담하는 친구이다.

-- 테이블 생성 할 때 스토리지 엔진 지정 예시
CREATE TABLE user (
	id INT PRIMARY KEY,
    name VARCHAR(50)
) ENGINE = InnoDB;


스토리지 엔진의 핵심 역할 5가지

  • 물리적 저장 방식 관리: 테이블 구조, index, 데이터 파일 등의 실제 저장 방식을 관리합니다.
  • 데이터 Read/Write: Disk(or Memory)에 데이터를 효율적으로 읽고 쓴다.
  • 트랜잭션 관리: ACID를 보장하며, commit/rollback을 처리한다.
  • 데이터 무결성 보장: 외래키 제약조건등을 통해 데이터 결함을 방지한다.
  • 저장공간 및 메모리 관리: 버퍼 불 등을 통해 Memory 공간과 Disk I/O를 효율적으로 제어한다.


InnoDB vs MyISAM 비교

MySQL 5.5 이전에는 MyISAM을 기본으로 사용했지만, 지금은 InnoDB가 국룰이라고 한다.

구분 InnoDB MyISAM
트랜잭션 지원(ACID 보장) 미지원
Locking 행 단위 lock 테이블 단위 lock
외래키 지원 미지원
장애복구 자동복구(Redo/Undo 로그 활용) 수동 복구
주요 용도 보통 사용 Read 위주의 데이터베이스


핵심 기능 비교

1) 트랜잭션과 ACID 보장

사실 가장 중요한 부분이라고 생각한다.

- InnoDB: start transaction, commit, rollback을 완벽하게 지원한다.

- MyISAM: 트랜잭션 개념이 없다. 데이터 불일치가 발생할 가능성이 있다.


2) 동시성 처리와 Lock

- InnoDB: 변경하는 경우에 해당 Row만 lock을 건다. 다른 Row에는 접근이 가능하기에 동시성 처리에 유리하다.

- MyISAM: 변경하는 경우에 테이블 전체 lock을 걸기에, 동시성 처리에서 병목현상이 많이 발생한다.


3) 클러스터링 인덱스

- InnoDB: Primary Key 순서대로 실제 데이터가 디스크에 물리적으로 정렬되어 저장되는 Clustered Index 구조를 사용한다. 그렇기에 PK를 통한 범위 검색 및 조회가 매우 빠르다.

- MyISAM: 데이터 파일과 인덱스 파일이 분리되어 있으며, Primary Key도 단순한 Non Clustered Index로 관리된다.


결론은 그냥 InnoDB 쓴다.

Read만 무조건 하는 경우에는 MyISAM을 고려...해볼 수도 있겠지만, 최근에는 Read 성능조차 InnoDB가 유리한 경우가 많다고 한다.

728x90

https://seungkyu-han.tistory.com/294


nest에서 redis로 msa 통신해보기

https://seungkyu-han.tistory.com/293 nest에서 grpc 사용해보기grpc가 굉장히 매력적인 기술이라고 생각한다.뭔가 http를 사용해서 서버끼리 통신을 하려고 하면, 꼭 schema의 정의에 관해서 문제가 생겼었다.

seungkyu-han.tistory.com

이번에는 Redis가 아닌 진짜 메시지 큐인 rabbitmq이다.

kafka도 많이 사용하지만, 우선 rabbitmq로 사용해보았다.


  • 패키지 설치

다음과 같이 npm 패키지들을 설치했다.

{
  "dependencies": {
    "@nestjs/common": "^11.0.1",
    "@nestjs/core": "^11.0.1",
    "@nestjs/microservices": "^11.1.28",
    "@nestjs/platform-express": "^11.0.1",
    "amqp-connection-manager": "^5.0.0",
    "amqplib": "^2.0.1",
    "reflect-metadata": "^0.2.2",
    "rxjs": "^7.8.1"
  }
}


  • subscriber 생성
import { NestFactory } from '@nestjs/core';
import { UserLogModule } from './user-log.module';
import { MicroserviceOptions, Transport } from '@nestjs/microservices';

async function bootstrap() {
  const app = await NestFactory.create(UserLogModule);

  app.connectMicroservice<MicroserviceOptions>({
    transport: Transport.RMQ,
    options: {
      urls: ['amqp://user:pw@localhost:5672'],
      queue: 'user_log_queue',
      queueOptions: {
        durable: true,
      },
    },
  });

  await app.startAllMicroservices();

  await app.listen(process.env.port ?? 30001);
}
bootstrap();


나머지 코드는 그냥 저번과 같다.

저 microservices 옵션만 rabbitmq로 변경해줬다.


  • publisher 생성

이 부분도 변함은 없을 것이다.

그냥 option만 변경해주자.

import { Module } from '@nestjs/common';
import { ClientsModule, Transport } from '@nestjs/microservices';
import { UserController } from './user.controller';
import { UserService } from './user.service';

@Module({
  imports: [
    ClientsModule.register([
      {
        name: 'USER_LOG_PACKAGE',
        transport: Transport.RMQ,
        options: {
          urls: ['amqp://user:pw@localhost:5672'],
          queue: 'user_log_queue',
          queueOptions: {
            durable: true,
          },
        },
      },
    ]),
  ],
  controllers: [UserController],
  providers: [UserService],
})
export class UserModule {}


이러고 한 번 요청을 보내보도록 하자.

이렇게 redis 시절처럼 요청이 쉽게 주고 받아지는 것을 볼 수 있다.

728x90

https://seungkyu-han.tistory.com/293


nest에서 grpc 사용해보기

grpc가 굉장히 매력적인 기술이라고 생각한다.뭔가 http를 사용해서 서버끼리 통신을 하려고 하면, 꼭 schema의 정의에 관해서 문제가 생겼었다.그거 하나만 해결해준다고 하더라도 굉장히 좋은 기

seungkyu-han.tistory.com

저번에는 다른 서버간에 grpc를 통해서 정보를 주고 받았었다.


이번에는 동기 통신이 아닌, 비동기 통신인 메시지 큐를 사용해서 정보를 보내보도록 하자.

사실 redis도 메시지 큐가 아닌 그냥 메모리 데이터베이스이지만, 뭔가 메시지 큐로도 많이 사용한다.

redis로 먼저 해보고, 다음에는 다른 메시지큐를 사용해보도록 하자.


  • 패키지 설치

우선 필요한 패키지들을 먼저 설치해보도록 하자.

다음과 같이 라이브러리들을 설치했다.

{
  "dependencies": {
    "@nestjs/common": "^11.0.1",
    "@nestjs/core": "^11.0.1",
    "@nestjs/microservices": "^11.1.28",
    "@nestjs/platform-express": "^11.0.1",
    "ioredis": "^6.0.0",
    "reflect-metadata": "^0.2.2",
    "rxjs": "^7.8.1"
  }
}


  • subscriber 생성

redis를 통해서 이벤트를 받고, 작업을 처리하는 서버부터 만들어보도록 하자.


우선 main.ts에 redis microservices를 명시해준다.

import { NestFactory } from '@nestjs/core';
import { UserLogModule } from './user-log.module';
import { MicroserviceOptions, Transport } from '@nestjs/microservices';

async function bootstrap() {
  const app = await NestFactory.create(UserLogModule);

  app.connectMicroservice<MicroserviceOptions>({
    transport: Transport.REDIS,
    options: {
      host: '',
      port: 6379,
      password: '',
    },
  });

  await app.startAllMicroservices();

  await app.listen(process.env.port ?? 30001);
}
bootstrap();


이렇게 하고, 어떤 이벤트를 받을건지를 작성해보자.

import { Controller } from '@nestjs/common';
import { UserLogService } from './user-log.service';
import { EventPattern, Payload } from '@nestjs/microservices';
import { UserActivityRequest } from './dto/user-activity.request';
import { UserActivityResponse } from './dto/user-activity.response';

@Controller()
export class UserLogController {
  constructor(private readonly userLogService: UserLogService) {}

  @EventPattern('user.log')
  grpcTest(
    @Payload() userActivityRequest: UserActivityRequest,
  ): UserActivityResponse {
    return this.userLogService.grpcTest(userActivityRequest);
  }
}

user.log로 들어오는 이벤트를 받는다고 명시를 해주고, 받는 데이터 쪽으로는 @Payload()를 사용해 이벤트로 어떤 데이터가 들어오는지를 명시해줘야 한다.


  • publisher

우선 어떤 redis를 사용해서 이벤트를 전송할건지, redis의 정보를 적어준다.

import { Module } from '@nestjs/common';
import { ClientsModule, Transport } from '@nestjs/microservices';
import { UserController } from './user.controller';
import { UserService } from './user.service';

@Module({
  imports: [
    ClientsModule.register([
      {
        name: 'USER_LOG_PACKAGE',
        transport: Transport.REDIS,
        options: {
          host: '',
          port: 6379,
          password: '',
        },
      },
    ]),
  ],
  controllers: [UserController],
  providers: [UserService],
})
export class UserModule {}

그리고 service에서 이 패키지를 주입받아보자.


microservices의 ClientProxy로 주입을 받고, 거기에 이벤트를 명시해서 전송하면 된다.

import { Inject, Injectable } from '@nestjs/common';
import * as microservices from '@nestjs/microservices';
import { firstValueFrom } from 'rxjs';

@Injectable()
export class UserService {
  constructor(
    @Inject('USER_LOG_PACKAGE')
    private readonly redisClient: microservices.ClientProxy,
  ) {}

  async userLogin(email: string, password: string): Promise<boolean> {
    console.log('UserLogin called with email:', email, 'password:', password);

    const userActivityRequest = {
      userId: email,
      timestamp: Date.now(),
    };

    const result: unknown = await firstValueFrom(
      this.redisClient.send('user.log', userActivityRequest),
    );

    console.log('수신 서버 응답:', result);

    return true;
  }
}

우선 다 작성해보니 이벤트가 잘 전송되는지 먼저 보도록 하자.


우선 이렇게 데이터 전송은 잘 되는 것을 볼 수 있다.


다시 publisher의 service로 돌아가보자.

지금은 이렇게 send를 통해서 이벤트를 전송하고 있다.

하지만, 이벤트의 전송에는 send 뿐만 아니라 emit이라는 것도 존재한다.


send는 지금처럼 subscriber가 응답을 보내면, 그 응답을 기다렸다가 받고 후의 작업을 처리한다.

이해하기 쉽도록 subscriber에서 1초 후에 응답을 처리하도록 해보자.

import { Injectable } from '@nestjs/common';
import { UserActivityRequest } from './dto/user-activity.request';
import { UserActivityResponse } from './dto/user-activity.response';

@Injectable()
export class UserLogService {
  async grpcTest(
    userActivityRequest: UserActivityRequest,
  ): Promise<UserActivityResponse> {
    await new Promise((resolve) => setTimeout(resolve, 1000));

    console.log('userActivityRequest', userActivityRequest);
    console.log(
      `${new Date().toLocaleTimeString('ko-KR', { hour12: false })}시간에 이벤트를 처리했습니다.`,
    );
    return { success: true };
  }
}


그리고 보내는 쪽에서 위 아래로 시간을 찍어보자.

import { Inject, Injectable } from '@nestjs/common';
import * as microservices from '@nestjs/microservices';
import { firstValueFrom } from 'rxjs';

@Injectable()
export class UserService {
  constructor(
    @Inject('USER_LOG_PACKAGE')
    private readonly redisClient: microservices.ClientProxy,
  ) {}

  async userLogin(email: string, password: string): Promise<boolean> {
    console.log('UserLogin called with email:', email, 'password:', password);

    const userActivityRequest = {
      userId: email,
      timestamp: Date.now(),
    };

    console.log(
      `${new Date().toLocaleTimeString('ko-KR', { hour12: false })}시간에 이벤트를 전송했습니다.`,
    );

    const result: unknown = await firstValueFrom(
      this.redisClient.send('user.log', userActivityRequest),
    );

    console.log(
      `${new Date().toLocaleTimeString('ko-KR', { hour12: false })}시간에 이벤트를 응답받았습니다.`,
    );
    console.log('Received result from UserLogService:', result);

    return true;
  }
}


이러고 이벤트를 전송하면

이벤트 전송 -> 이벤트 처리 -> 이벤트 응답이 차례대로 실행되는 것을 볼 수 있다.


만약 이것을 send가 아닌 emit으로 바꾼다면

import { Inject, Injectable } from '@nestjs/common';
import * as microservices from '@nestjs/microservices';
import { firstValueFrom } from 'rxjs';

@Injectable()
export class UserService {
  constructor(
    @Inject('USER_LOG_PACKAGE')
    private readonly redisClient: microservices.ClientProxy,
  ) {}

  async userLogin(email: string, password: string): Promise<boolean> {
    console.log('UserLogin called with email:', email, 'password:', password);

    const userActivityRequest = {
      userId: email,
      timestamp: Date.now(),
    };

    console.log(
      `${new Date().toLocaleTimeString('ko-KR', { hour12: false })}시간에 이벤트를 전송했습니다.`,
    );

    const result: unknown = await firstValueFrom(
      this.redisClient.emit('user.log', userActivityRequest),
    );

    console.log(
      `${new Date().toLocaleTimeString('ko-KR', { hour12: false })}시간에 이벤트를 응답받았습니다.`,
    );
    console.log('Received result from UserLogService:', result);

    return true;
  }
}

이렇게 일단 응답을 받고, 이벤트를 나중에 처리하는 것을 볼 수 있다.

이렇게 emit을 사용하면, 비동기로 이벤트를 처리할 수 있다.


728x90

grpc가 굉장히 매력적인 기술이라고 생각한다.

뭔가 http를 사용해서 서버끼리 통신을 하려고 하면, 꼭 schema의 정의에 관해서 문제가 생겼었다.

그거 하나만 해결해준다고 하더라도 굉장히 좋은 기술이라고 생각한다.

물론 grpc가 그것만 좋은 것은 아니지만...


해당 글에서는 user 서버와 user log 서버 이렇게 만들어서 두 서버 간의 통신을 바탕으로 글을 써보도록 하겠다.

user서버에서 누군가 로그인을 한다면, grpc를 통해서 user log를 작성하도록

(이렇게 글은 쓰지만, 막상 개발을 한다면 저 도메인을 분리할 거 같지는 않다.)


  • proto 정의하기

가장 먼저 schema에 해당하는 proto를 정의해보자.

syntax = "proto3";

package userlog;

service UserLogService {
  rpc LogUserActivity (UserActivityRequest) returns (UserActivityResponse);
}

message UserActivityRequest {
  string user_id = 1;
  int64 timestamp = 2;
}

message UserActivityResponse {
  bool success = 1;
}


그냥 간단하게 서비스와 모델을 정의해보았다.


  • 패키지 설치

필요한 npm 패키지들을 설치해보자.

{
  "dependencies": {
    "@grpc/grpc-js": "^1.14.4",
    "@grpc/proto-loader": "^0.8.1",
    "@nestjs/common": "^11.0.1",
    "@nestjs/core": "^11.0.1",
    "@nestjs/microservices": "^11.1.28",
    "@nestjs/platform-express": "^11.0.1",
    "reflect-metadata": "^0.2.2",
    "rxjs": "^7.8.1"
  }
}

설치한 의존성은 다음과 같다.


  • grpc producer 생성

gprc 서버를 먼저 만들어보자.


우선 dto부터 정의하고

export class UserActivityRequest {
  userId: string;
  timestamp: number;
}

export class UserActivityResponse {
  success: boolean;
}


서비스를 작성하는데, 서비스는 그냥 데이터베이스 쓰지 말고 콘솔에 유저 아이디를 찍고 true만 반환해보자.

import { Injectable } from '@nestjs/common';
import { UserActivityRequest } from './dto/user-activity.request';
import { UserActivityResponse } from './dto/user-activity.response';

@Injectable()
export class UserLogService {
  grpcTest(userActivityRequest: UserActivityRequest): UserActivityResponse {
    console.log('userActivityRequest', userActivityRequest);
    return { success: true };
  }
}

로직이 필요하면 나중에 구현하는걸로~


이제 grpc controller이다.

@GrpcMethod 데코레이터를 사용한다.

파라미터는 각각 서비스의 이름, 해당 서비스의 함수 이름이다.


service 뒤의 UserLogService, 해당 서비스의 함수 LogUserActivity를 가져온다.

import { Controller } from '@nestjs/common';
import { UserLogService } from './user-log.service';
import { GrpcMethod } from '@nestjs/microservices';
import { UserActivityRequest } from './dto/user-activity.request';
import { UserActivityResponse } from './dto/user-activity.response';

@Controller()
export class UserLogController {
  constructor(private readonly userLogService: UserLogService) {}

  @GrpcMethod('UserLogService', 'LogUserActivity')
  grpcTest(userActivityRequest: UserActivityRequest): UserActivityResponse {
    return this.userLogService.grpcTest(userActivityRequest);
  }
}


이제 grpc 자체를 해당 app에 등록해야 한다.


main.ts로 가보자.

import { NestFactory } from '@nestjs/core';
import { UserLogModule } from './user-log.module';
import { MicroserviceOptions, Transport } from '@nestjs/microservices';
import { join } from 'path';

async function bootstrap() {
  const app = await NestFactory.create(UserLogModule);

  const protoDir = join(process.cwd(), 'proto');

  app.connectMicroservice<MicroserviceOptions>({
    transport: Transport.GRPC,
    options: {
      package: 'userlog',
      protoPath: join(protoDir, 'user-log.proto'),
      url: '0.0.0.0:50051',
    },
  });

  await app.startAllMicroservices();

  await app.listen(process.env.port ?? 30001);
}
bootstrap();

microservice를 연결해주고

transport는 GRPC를 사용하기에 Transport.GRPC

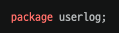
package는

proto에 적어둔 이거를 넣고

protoPath는 그 proto의 주소, url은 해당 grpc를 열 주소를 말한다.


옵션들을 작성하면, startAllMicroservices로 저거도 켜줘야 한다.


이러면 일단 producer는 만들었으니 이제 요청하는 쪽을 만들어보자.


  • grpc consumer 생성

여기서는 우선 microservice부터 연결해주도록 하자.

어디로 요청하는지를 먼저 명시하고 들어가는 것이 좋다.


우선 만들 모듈에

import { Module } from '@nestjs/common';
import { ClientsModule, Transport } from '@nestjs/microservices';
import { join } from 'path';
import { UserController } from './user.controller';
import { UserService } from './user.service';

const protoDir = join(process.cwd(), 'proto');

@Module({
  imports: [
    ClientsModule.register([
      {
        name: 'USER_LOG_PACKAGE',
        transport: Transport.GRPC,
        options: {
          package: ['userlog'],
          protoPath: [join(protoDir, 'user-log.proto')],
          url: 'localhost:50051',
        },
      },
    ]),
  ],
  controllers: [UserController],
  providers: [UserService],
})
export class UserModule {}

이렇게 끌어올 모듈을 등록해주고


service layer로 가서, 해당 모듈을 주입 받도록 해보자.

import { Inject, Injectable, OnModuleInit } from '@nestjs/common';
import * as microservices from '@nestjs/microservices';
import { firstValueFrom, Observable } from 'rxjs';

interface UserLogGrpcService {
  logUserActivity(data: {
    userId: string;
    timestamp: number;
  }): Observable<{ success: boolean }>;
}

@Injectable()
export class UserService implements OnModuleInit {
  private userLogGrpcService!: UserLogGrpcService;

  constructor(
    @Inject('USER_LOG_PACKAGE')
    private readonly userLogClientGrpc: microservices.ClientGrpc,
  ) {}

  onModuleInit() {
    this.userLogGrpcService =
      this.userLogClientGrpc.getService<UserLogGrpcService>('UserLogService');
  }

  async userLogin(email: string, password: string): Promise<boolean> {
    console.log('UserLogin called with email:', email, 'password:', password);

    const userActivityRequest = {
      userId: email,
      timestamp: Date.now(),
    };

    const response = await firstValueFrom(
      this.userLogGrpcService.logUserActivity(userActivityRequest),
    );

    return response.success;
  }
}

onModuleInit까지 써서, 생성 시점에서 해당 서비스를 grpc client에서 가져와준다.


나도 실수한 부분인데, 저기서 호출하는 서비스의 함수 이름은 proto에서 작성한 함수와 일치해야 한다.


  • grpc 테스트

이제 2개의 서버를 켜서 grpc를 요청해보자.

이렇게 2개를 동시에 켜두고 http 요청을 한쪽으로 보내면

http -> user -> userlog로 요청이 쭉 이어지는 것을 볼 수 있다.


728x90

요즘 typeorm보다 prisma에 좀 더 관심이 간다.

하지만 typeorm은 transaction을 쉽게 적용 할 수 있지만, prisma는 좀 어려웠다.


우선 npm 패키지는 다음과 같이 설치했다.


{
  "dependencies": {
    "@nestjs-cls/transactional": "^3.2.1",
    "@nestjs-cls/transactional-adapter-prisma": "^1.3.5",
    "@nestjs/common": "^11.0.1",
    "@nestjs/config": "^4.0.4",
    "@nestjs/core": "^11.0.1",
    "@nestjs/platform-express": "^11.0.1",
    "@prisma/adapter-pg": "^7.9.0",
    "@prisma/client": "^7.9.0",
    "dotenv": "^17.4.2",
    "nestjs-cls": "^6.2.1",
    "pg": "^8.22.0",
    "reflect-metadata": "^0.2.2",
    "rxjs": "^7.8.1"
  }
}


바로 prisma schema부터 작성해보자.


// This is your Prisma schema file,
// learn more about it in the docs: https://pris.ly/d/prisma-schema

// Get a free hosted Postgres database in seconds: `npx create-db`

generator client {
  provider = "prisma-client-js"
}

datasource db {
  provider = "postgresql"
}

schema.prisma


enum Role {
  admin
  user
}

model User {
  id        Int      @id @default(autoincrement())
  email     String   @unique
  password  String
  role      Role     @default(user)
  createdAt DateTime @default(now())
  updatedAt DateTime @updatedAt
  details   UserDetail?
}

user.prisma


model UserDetail {
  id          String   @id @default(uuid()) @db.Uuid
  bio         String?  @db.Text
  profileImg  String?
  phoneNumber String?
  address     String?
  
  user        User     @relation(fields: [userId], references: [id], onDelete: Cascade)
  userId      Int      @unique

  createdAt   DateTime @default(now())
  updatedAt   DateTime @updatedAt
}

user-detail.prisma


그 다음에 migration과 generate를 실행해주자.


다음 파일을 바탕으로

import 'dotenv/config';
import { defineConfig } from 'prisma/config';

export default defineConfig({
  schema: 'prisma/schemas',
  migrations: {
    path: 'prisma/migrations',
  },
  datasource: {
    url: process.env['DATABASE_URL'],
  },
});


npx prisma migrate dev --name init

npx prisma generate


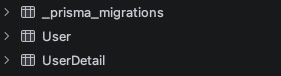
이러면 데이터베이스에 다음과 같이 테이블이 생기고


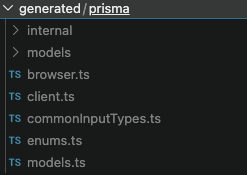
다음과 같이 ts 파일들이 생긴다.


그리고 prisma service를 다음과 같이 만들어서, repositor layer에서 주입 받을 수 있도록 해주자.

import { OnModuleDestroy, OnModuleInit } from '@nestjs/common';
import { PrismaPg } from '@prisma/adapter-pg';
import { PrismaClient } from '@prisma/client';
import { Pool } from 'pg';

export class PrismaService
  extends PrismaClient
  implements OnModuleInit, OnModuleDestroy
{
  constructor() {
    const pool = new Pool({
      connectionString: process.env.DATABASE_URL,
    });

    const adapter = new PrismaPg(pool);

    super({ adapter });
  }

  async onModuleDestroy() {
    await this.$connect();
  }
  async onModuleInit() {
    await this.$disconnect();
  }
}


우선 @transactional을 적용하지 않고 controller, service, repository를 작성해본다.


import { Injectable } from '@nestjs/common';
import { PrismaService } from '../config/prisma/prisma.service';
import { User } from '@prisma/client';

@Injectable()
export class UserRepository {
  constructor(private readonly prisma: PrismaService) {}

  async save(email: string, password: string): Promise<User> {
    return await this.prisma.user.create({
      data: {
        email: email,
        password: password,
      },
    });
  }
}


import { Injectable } from '@nestjs/common';
import { UserRepository } from './user.repository';
import { randomUUID } from 'crypto';

@Injectable()
export class UserService {
  constructor(private readonly userRepository: UserRepository) {}

  async transactionTest() {
    await this.userRepository.save(randomUUID(), randomUUID());

    throw new Error('Transaction Test Error');

    await this.userRepository.save(randomUUID(), randomUUID());
  }
}


이렇게 하면 아마 하나의 유저만 저장이 될 것이다.


이제 커밋을 에러가 뜨면 하지 않도록 바꿔보도록 하자.

Spring처럼 @transactional()을 사용하도록 해볼것이다.


import { Module } from '@nestjs/common';
import { PrismaModule } from './prisma/prisma.module';
import { ClsModule } from 'nestjs-cls';
import { TransactionalAdapterPrisma } from '@nestjs-cls/transactional-adapter-prisma';
import { ClsPluginTransactional } from '@nestjs-cls/transactional';
import { PrismaService } from './prisma/prisma.service';

@Module({
  imports: [
    PrismaModule,
    ClsModule.forRoot({
      global: true,
      middleware: {
        mount: true,
      },
      plugins: [
        new ClsPluginTransactional({
          imports: [PrismaModule],
          adapter: new TransactionalAdapterPrisma({
            prismaInjectionToken: PrismaService,
            sqlFlavor: 'postgresql',
          }),
        }),
      ],
    }),
  ],
})
export class ConfigModule {}

이렇게 ClsModule을 등록을 해주고


import { Injectable } from '@nestjs/common';
import { User } from '@prisma/client';
import { TransactionalAdapterPrisma } from '@nestjs-cls/transactional-adapter-prisma';
import { TransactionHost } from '@nestjs-cls/transactional';

@Injectable()
export class UserRepository {
  constructor(
    private readonly txHost: TransactionHost<TransactionalAdapterPrisma>,
  ) {}

  async save(email: string, password: string): Promise<User> {
    return await this.txHost.tx.user.create({
      data: {
        email: email,
        password: password,
      },
    });
  }
}

여기서 주입 받는 것을 prismaService에서 TransactionHost로 변경한 후


service에 가서 @transactional을 붙여준다.

import { Injectable } from '@nestjs/common';
import { User } from '@prisma/client';
import { TransactionalAdapterPrisma } from '@nestjs-cls/transactional-adapter-prisma';
import { TransactionHost } from '@nestjs-cls/transactional';

@Injectable()
export class UserRepository {
  constructor(
    private readonly txHost: TransactionHost<TransactionalAdapterPrisma>,
  ) {}

  async save(email: string, password: string): Promise<User> {
    return await this.txHost.tx.user.create({
      data: {
        email: email,
        password: password,
      },
    });
  }
}


그러고 실행을 해보면, 둘 다 생성이 되지 않은 것을 볼 수 있다.

728x90

mongodb 준비하기

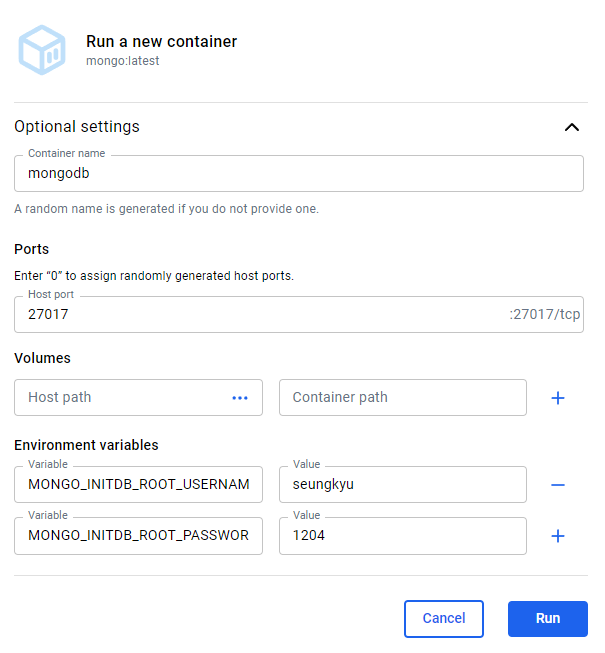
늘 그렇듯 이번 데이터베이스도 docker로 준비한다.

이렇게 준비를 해두고, 실행한다.


mongodb 연결하기

우선 다음과 같이 라이브러리들을 설치한다.

npm install morgan nunjucks mongoose

이 mongoose가 node에 굉장히 잘맞는거로 기억이 난다.


import mongoose from 'mongoose';

export async function connect() {
    if (process.env.NODE_ENV !== 'production') {
        mongoose.set('debug', true);
    }

    try {
        await mongoose.connect(
            'mongodb://seungkyu:1204@localhost:27017/express?authSource=admin',
        );

        console.log('MongoDB Connected');
    } catch (err) {
        console.error(err);
    }

    mongoose.connection.on('error', (err) => console.log(err));
}

그리고 위와 같이 데이터베이스 연결을 생성하는 함수를 만들고


import express from 'express';
import dotenv from 'dotenv';
import { connect } from './schemas/index.js';

dotenv.config();

const app = express();
app.set('port', process.env.PORT || 3000);

async function start() {
    try {
        await connect();

        app.listen(app.get('port'), () => {
            console.log(`Server on port ${app.get('port')}`);
        });
    } catch (error) {
        console.error('MongoDB 연결 실패:', error);
        process.exit(1);
    }
}

start();

이렇게 app.ts를 수정해준다.


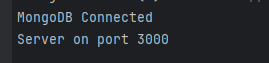
그리고 실행해보면 아래와 같이 연결이 잘 생성되는 것을 볼 수 있다.


Schema 정의하기

이제 데이터를 저장하기 위한 판인 Schema를 정의해보자.

모든 테이블에 id를 습관적으로 만들었는데, mongodb는 알아서 _id로 만들어주기에 생성할 필요가 없다고 한다.

schema는 다음과 같이 작성한다.

import mongoose, { Schema } from 'mongoose';

export interface IUser {
    name: string;
    age: number;
    email: string;
    password: string;
    createdAt: Date;
    updatedAt: Date;
}

const userSchema = new Schema<IUser>(
    {
        name: {
            type: String,
            required: true,
            trim: true,
        },
        age: {
            type: Number,
            required: true,
            min: 0,
        },
        email: {
            type: String,
            required: true,
            unique: true,
            lowercase: true,
            trim: true,
        },
        password: {
            type: String,
            required: true,
        },
    },
    {
        timestamps: true, // createdAt, updatedAt 자동 생성
    },
);

export default mongoose.model<IUser>('User', userSchema);


import mongoose, { Schema } from 'mongoose';

export interface ILecture {
    name: string;
    code: string;
    user: mongoose.Types.ObjectId;
}

const lectureSchema = new Schema<ILecture>(
    {
        name: {
            type: String,
            required: true,
        },
        code: {
            type: String,
            required: true,
            unique: true,
        },
        user: {
            type: Schema.Types.ObjectId,
            ref: 'User',
            required: true,
        },
    },
    {
        timestamps: true,
    },
);

export default mongoose.model<ILecture>('Lecture', lectureSchema);


쿼리 작성하기

쿼리는 작성한 스키마를 가져와서 다음과 같이 함수를 호출하는 것으로 사용한다.

import express, { Request } from 'express';
import User from '../schemas/user.js';

const router = express.Router();

interface CreateUserRequest {
    name: string;
    age: number;
    email: string;
    password: string;
}

interface UpdateUserRequest {
    id: string;
    name: string;
    age: number;
    email: string;
    password: string;
}

router.get('/', async (_req, res) => {
    const users = await User.find({});
    res.json(users);
});

router.get('/:id', async (req, res) => {
    try {
        const user = await User.findById(req.params.id);

        if (!user) {
            return res.status(404).json({
                message: 'User not found',
            });
        }

        return res.json(user);
    } catch (_err: any) {
        return res.status(400).json({
            message: 'Invalid ObjectId',
        });
    }
});

router.post(
    '/',
    async (req: Request<object, object, CreateUserRequest>, res) => {
        const user = await User.create({
            name: req.body.name,
            age: req.body.age,
            email: req.body.email,
            password: req.body.password,
        });

        return res.status(201).json(user);
    },
);

router.patch(
    '/:id',
    async (req: Request<object, object, UpdateUserRequest>, res) => {
        const id = req.body.id;

        const user = await User.updateMany(
            {
                _id: id,
            },
            {
                name: req.body.name,
                age: req.body.age,
                email: req.body.email,
                password: req.body.password,
            },
        );

        return res.status(20).json(user);
    },
);

router.delete('/:id', async (req, res) => {
    const result = await User.deleteOne({ _id: req.params.id });

    res.json(result);
});

export default router;


우선 POST부터 테스트를 해보면

POST http://localhost:3000/users
Content-Type: application/json

{
  "name": "김승규",
  "age": 25,
  "email": "test@test.com",
  "password": "1234"
}


이렇게 잘 생성이 된 것을 볼 수 있다.


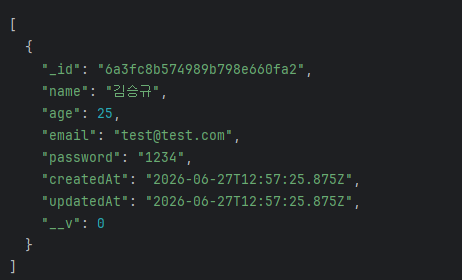
이제 GET을 테스트 해보자.

전체 조회는

GET http://localhost:3000/users
Content-Type: application/json


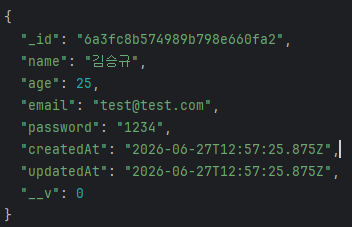
id를 사용한 조회는

GET http://localhost:3000/users/6a3fc8b574989b798e660fa2
Content-Type: application/json

이렇게 잘 조회가 되며


PATCH, DELETE를 테스트해보면

PATCH http://localhost:3000/users/6a3fc8b574989b798e660fa2
Content-Type: application/json

{
  "name": "한승규",
  "age": 25,
  "email": "test@test.com",
  "password": "1234"
}


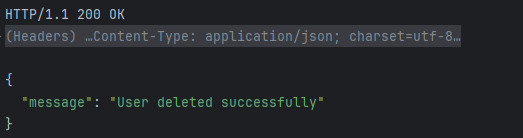
DELETE http://localhost:3000/users/6a3fc8b574989b798e660fa2
Content-Type: application/json


이렇게 삭제가 성공적으로 되는 것을 볼 수 있다.

'Node > Node.js' 카테고리의 다른 글

express로 pg 사용하기  (0) 2026.06.27
express 시작하기  (0) 2026.06.27
노드 패키지 매니저  (0) 2026.06.24
노드로 http 서버 만들어보기  (0) 2026.06.23
노드 사용해보기  (0) 2026.06.22
728x90

데이터베이스 설정하기

우선 데이터베이스는 postgresql를 사용할 것이며, 늘 그렇듯 docker 위에서 돌릴 것이다.


우선 테이블을 좀 만들어두고, 들어가도록 하자.

create table public.users
(
    id     uuid not null
        constraint users_pk
            primary key,
    name   text not null,
    age    integer,
    remark text
);


sequelize

일단 ORM의 한 종류라고 한다.

객체와 데이터베이스의 Relatiuon을 Mapping해준다.

우선 Sequelize, Postgresql 라이브러리들을 설치해주자.

{
  "name": "express",
  "version": "0.0.1",
  "type": "module",
  "description": "study express",
  "main": "dist/index.js",
  "scripts": {
    "dev": "tsx watch src/index.ts",
    "build": "tsc",
    "start": "node dist/index.js"
  },
  "dependencies": {
    "@eslint/js": "^10.0.1",
    "body-parser": "^2.3.0",
    "cookie-parser": "^1.4.7",
    "dotenv": "^17.4.2",
    "eslint": "^10.5.0",
    "eslint-config-prettier": "^10.1.8",
    "eslint-plugin-prettier": "^5.5.6",
    "express": "^5.2.1",
    "express-session": "^1.19.0",
    "morgan": "^1.11.0",
    "multer": "^2.2.0",
    "nunjucks": "^3.2.4",
    "pg": "^8.22.0",
    "pg-hstore": "^2.3.4",
    "sequelize": "^6.37.8"
  },
  "devDependencies": {
    "@types/cookie-parser": "^1.4.10",
    "@types/express": "^5.0.6",
    "@types/express-session": "^1.19.0",
    "@types/morgan": "^1.9.10",
    "@types/multer": "^2.1.0",
    "@types/node": "^26.0.1",
    "@types/nunjucks": "^3.2.6",
    "@types/pg": "^8.20.0",
    "globals": "^17.7.0",
    "prettier": "^3.8.4",
    "sequelize-cli": "^6.6.5",
    "tsx": "^4.22.4",
    "typescript": "^5.5.3",
    "typescript-eslint": "^8.62.0"
  },
  "private": true
}


그 다음에 다시 콘솔에

 npx sequelize init

다음과 같이 입력해주면 models,mirgrations,seeders라는 폴더들이 생긴다.


models의 index.ts를 다음과 같이 작성해주고

import { Sequelize } from 'sequelize';
import config from '../config/config.json' with { type: 'json' };

const env = process.env.NODE_ENV ?? 'development';

const dbConfig = config[env as keyof typeof config];

export const sequelize = new Sequelize(
    dbConfig.database,
    dbConfig.username,
    dbConfig.password ?? '',
    {
        host: dbConfig.host,
        dialect: dbConfig.dialect as 'postgres',
        logging: false,
    },
);

app.ts를 다음과 같이 수정한 후 시작해보면

import express from 'express';
import dotenv from 'dotenv';
import nunjucks from 'nunjucks';
import { sequelize } from './models/index.js';

dotenv.config();

const app = express();
app.set('port', process.env.PORT || 3000);

nunjucks.configure('views', {
    express: app,
    watch: true,
});

sequelize
    .sync({ force: false })
    .then(() => {
        console.log('connect to database');
    })
    .catch(console.error);

app.listen(app.get('port'), () => console.log('Server on'));

데이터베이스에 연결되었다고 뜨는 것을 볼 수 있다.


모델 정의하기

이제 저 위에 작성했던 테이블을 express의 모델로도 작성해보자.

import { DataTypes, Model, Sequelize } from 'sequelize';

export class User extends Model {
    declare id: string;
    declare name: string;
    declare age: number | null;
    declare remark: string | null;

    static initModel(sequelize: Sequelize) {
        return User.init(
            {
                id: {
                    type: DataTypes.UUID,
                    primaryKey: true,
                    allowNull: false,
                },
                name: {
                    type: DataTypes.TEXT,
                    allowNull: false,
                },
                age: {
                    type: DataTypes.INTEGER,
                    allowNull: true,
                },
                remark: {
                    type: DataTypes.TEXT,
                    allowNull: true,
                },
            },
            {
                sequelize,
                modelName: 'User',
                tableName: 'users',
                timestamps: false,
                underscored: false,
            },
        );
    }
}

여기서는 init을 사용했는데 init 메서드에서는 테이블에 대한 설정을 한다.

이제 관계를 만들어보기 위해 다음과 같은 테이블을 만들어보자.

create table public.lecture
(
    id         uuid      not null
        constraint lecture_pk
            primary key,
    user_id    uuid      not null
        constraint lecture_users_id_fk
            references public.users,
    name       text      not null,
    created_at timestamp not null
);


이거도 model로 정의하면

import { DataTypes, Model, Sequelize } from 'sequelize';

export class Lecture extends Model {
    declare id: string;
    declare userId: string;
    declare name: string;
    declare createdAt: Date;

    static initModel(sequelize: Sequelize) {
        return Lecture.init(
            {
                id: {
                    type: DataTypes.UUID,
                    primaryKey: true,
                    allowNull: false,
                    defaultValue: DataTypes.UUIDV4,
                },
                userId: {
                    field: 'user_id',
                    type: DataTypes.UUID,
                    allowNull: false,
                },
                name: {
                    type: DataTypes.TEXT,
                    allowNull: false,
                },
                createdAt: {
                    field: 'created_at',
                    type: DataTypes.DATE,
                    allowNull: false,
                },
            },
            {
                sequelize,
                modelName: 'Lecture',
                tableName: 'lecture',
                timestamps: false,
                underscored: true,
            },
        );
    }
}


이제 관계를 정의해보자, 현재 user와 lecture는 1:N의 관계이다.


여기서 1에 해당하는 친구가 hasMany를 통해 관계를 정의하고, N에 해당하는 친구가 belongsTo에 해당하는 관계를 정의한다.

해당 코드를 index.ts에 추가하자.

User.initModel(sequelize);
Lecture.initModel(sequelize);

User.hasMany(Lecture, {
    foreignKey: 'userId',
    as: 'lectures',
});

Lecture.belongsTo(User, {
    foreignKey: 'userId',
    as: 'user',
});

만약 1:1의 관계면 여기서 hasMany가 아닌 hasOne을 사용하며, N:M은 알아서 매핑 테이블 만들도록 하자.


쿼리

자 이제 모델을 모두 정의했으니 ORM을 통해 데이터베이스를 조작해보자.


  • insert
import { User } from "./models/user.js";

const user = await User.create({
  id: crypto.randomUUID(),
  name: "홍길동",
  age: 25,
  remark: "테스트 사용자",
});
  • select

전체조회는 그냥 다 가져오면 된다.

const users = await User.findAll();


가장 많이 사용하는 pk를 통한 조회는 다음과 같다.

const user = await User.findByPk("5d75d713-46bb-48fd-9a53-cbbda442ff3d");


조건을 많이 쓰고 싶다면 이렇게 where에 조건을 나열하면 되고

const users = await User.findAll({
  where: {
    age: 25,
    remark: "학생",
  },
});


하나만 조회하고 싶다면 findAll이 아닌 findOne을 사용한다.

const user = await User.findOne({
  where: {
    name: "홍길동",
  },
});
  • update

where에 조건을 작성하고, 그 위에 바꿀 값들을 작성한다.

await User.update(
  {
    age: 30,
    remark: "수정됨",
  },
  {
    where: {
      id: "사용자 UUID",
    },
  }
);


몇개가 업데이트 되었는지도 조회가 가능하다.

const [count] = await User.update(
  {
    age: 30,
  },
  {
    where: {
      name: "홍길동",
    },
  }
);
  • delete

삭제는 다음과 같은 코드로 작성하며

await User.destroy({
  where: {
    id,
  },
});


여기서도 삭제된 데이터의 개수를 알 수 있다.

const count = await User.destroy({
  where: {
    id,
  },
});


관계를 통해 조회하기

만약 특정 강의를 듣는 사용자를 검색하고 싶으면, join을 사용해야 한다.

강의를 조회하고, 그 안에 include로 사용자들을 넣어서 가져오면 된다.

const lectures = await Lecture.findAll({
  where: {
    name: "Express",
  },
  include: [
    {
      model: User,
      as: "user",
    },
  ],
});

'Node > Node.js' 카테고리의 다른 글

express로 mongodb 사용하기  (0) 2026.06.27
express 시작하기  (0) 2026.06.27
노드 패키지 매니저  (0) 2026.06.24
노드로 http 서버 만들어보기  (0) 2026.06.23
노드 사용해보기  (0) 2026.06.22
728x90

익스프레스로 프로젝트 만들어보기

{
  "name": "study",
  "version": "0.0.1",
  "description": "study",
  "license": "ISC",
  "author": "",
  "type": "module",
  "main": "index.js",
  "scripts": {
    "test": "echo \"Error: no test specified\" && exit 1",
    "build": "tsc",
    "start": "ts-node src/app.ts"
  },
  "dependencies": {
    "express": "^5.2.1"
  },
  "devDependencies": {
    "@types/express": "^5.0.6",
    "@types/node": "^26.0.1",
    "nodemon": "^3.1.14",
    "ts-node": "^10.9.2",
    "typescript": "^6.0.3"
  }
}

위와 같이 package.json을 작성해주고, src/app.ts에 아래와 같이 작성하고 실행을 해보면 일단 된다.


import express from 'express';

const app = express();
app.set('port', process.env.PORT || 3000);

app.get('/', (req: express.Request, res: express.Response) =>
    res.send('Hello Seungkyu'),
);

app.listen(app.get('port'), () => console.log('Server on'));


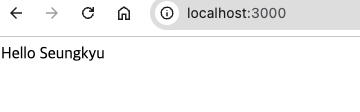
그러고 3000번 포트로 적솝해보면 다음과 같이 나온다.

app.get으로 get요청만 처리했지만 다른 메서드들도 당연히 사용이 가능하다.


여기에 이전처럼 html을 읽어서 전송하고 싶다면

path를 사용해서 파일을 읽고, res.sendFile로 파일을 전송해버린다.

import express from 'express';
import { fileURLToPath } from 'url';
import { dirname } from 'path';

const __filename = fileURLToPath(import.meta.url);
const __dirname = dirname(__filename);

const app = express();
app.set('port', process.env.PORT || 3000);

app.get('/file', (req: express.Request, res: express.Response) =>
    res.sendFile(__dirname + '/test.html'),
);

app.get('/', (req: express.Request, res: express.Response) =>
    res.send('Hello Seungkyu'),
);

app.listen(app.get('port'), () => console.log('Server on'));


미들웨어

미들웨어는 요청과 응답 그 중간에 들어가서, express의 사실상 핵심의 역할을 한다고 한다.

저 app을 가져가서 app.use로 사용한다고 한다.

import express from 'express';

const app = express();
app.set('port', process.env.PORT || 3000);

app.use((req: express.Request, res: express.Response, next: express.NextFunction) => {
  console.log('미들 웨어 지나갑니다~');
  next();
});

app.get(
  '/',
  (req: express.Request, res: express.Response, next: express.NextFunction) => {
  console.log('get 요청 지나갑니다~');
});

app.listen(app.get('port'), () => {
  console.log(app.get('port'), '번 포트에서 대기 중');
})

이렇게 next도 파라미터로 받고, 미들웨어에서 무언가의 작업을 처리 한 후 next()를 호출해서 다음 어딘가로 흘려준다.

만약 next()를 호출하지 않으면, 그냥 거기서 멈춰버린다.


미들웨어는 3가지 경우에 실행이 되는데

app.use(미들웨어) -> 모든 요청에서 실행

app.use('/한승규', 미들웨어) ->  /한승규로 들어오는 요청에서 미들웨어를 실행

app.get('/한승규', 미들웨어) -> /한승규로 들어오는 get 요청에서 미들웨어를 실행


자 그럼 많이 사용하는 미들웨어 라이브러리들을 살펴보자.

우선 다음친구들을 설치한다.

{
  "name": "study",
  "version": "0.0.1",
  "description": "study",
  "license": "ISC",
  "author": "",
  "type": "module",
  "main": "index.js",
  "scripts": {
    "test": "echo \"Error: no test specified\" && exit 1",
    "build": "tsc",
    "start": "tsx src/app.ts"
  },
  "dependencies": {
    "cookie-parser": "^1.4.7",
    "dotenv": "^17.4.2",
    "express": "^5.2.1",
    "express-session": "^1.19.0",
    "morgan": "^1.11.0"
  },
  "devDependencies": {
    "@types/cookie-parser": "^1.4.10",
    "@types/express": "^5.0.6",
    "@types/express-session": "^1.19.0",
    "@types/morgan": "^1.9.10",
    "@types/node": "^26.0.1",
    "nodemon": "^3.1.14",
    "ts-node": "^10.9.2",
    "tsx": "^4.22.4",
    "typescript": "^6.0.3"
  }
}


다음과 같이 코드를 작성해보고, 여기에 들어있는 라이브러리들을 하나씩 확인해보자.

import express from 'express';
import morgan from 'morgan';
import cookieParser from 'cookie-parser';
import session from 'express-session';
import dotenv from 'dotenv';
import { fileURLToPath } from 'url';
import { dirname } from 'path';
import path from 'node:path';

const __filename = fileURLToPath(import.meta.url);
const __dirname = dirname(__filename);

dotenv.config();

const app = express();
app.set('port', process.env.PORT || 3000);

app.use(morgan('dev'));
app.use('/', express.static(path.join(__dirname, 'public')));
app.use(express.json());
app.use(express.urlencoded({ extended: false }));
app.use(cookieParser(process.env.COOKIE_SECRET || 'secret'));
app.use(
    session({
        resave: false,
        saveUninitialized: false,
        secret: process.env.SESSION_SECRET || 'secret',
        cookie: {
            httpOnly: true,
            secure: false,
        },
        name: 'session',
    }),
);

console.log(
    (
        req: express.Request,
        _res: express.Response,
        _next: express.NextFunction,
    ) => console.log(req.sessionID),
);

app.listen(app.get('port'), () => console.log('Server on'));

morgan

서버로 들어오는 클라이언트들의 로그를 남긴다.

어떤 ip로 들어왔는지까지는 안남기고 fastapi초럼 시간, 어디로 들어왔는지 이 정도만 남긴다.

morgan()안에 파라미터로 어떤 환경인지 넣으면 된다.


static

static 미들웨어는 spring의 resources와 같은 역할을 한다.

실제 서버에 있는 정적 파일들(html, css)등의 파일들을 해당 경로로 제공한다.


cookie-parser

cookie-parser는 요청에 들어있는 쿠키들을 조회해서 req.cookies 객체로 만들어준다고 한다.

아래와 같이 사용한다고 한다.

// 미들웨어 등록 시 비밀키를 넣어줍니다.
app.use(cookieParser('my_secret_key_1234'));

// 암호화된 쿠키 설정
app.get('/set-signed-cookie', (req, res) => {
    res.cookie('user_id', '12345', {
        maxAge: 60 * 60 * 1000, // 1시간
        httpOnly: true,
        signed: true // <-- 암호화 옵션 활성화
    });
    res.send('암호화된 쿠키 설정 완료!');
});

// 암호화된 쿠키 읽기
app.get('/get-signed-cookie', (req, res) => {
    // 암호화된 쿠키는 req.cookies 대신 req.signedCookies로 읽습니다.
    const userId = req.signedCookies.user_id;

    if (userId) {
        res.send(`인증된 유저 ID: ${userId}`);
    } else {
        res.send('쿠키가 없거나 위변조되었습니다.');
    }
});


미들웨어의 특성

미들웨어를 사용해보니, 일단 (req, res, next) 이렇게 오는 것을 볼 수 있었다.

next를 사용하면 다른 미들웨어로 보내주는거고, next를 사용하지 않는다면 send와 같은 마무리 함수를 호출해줘야 했다.


next에 인수를 넣을 수도 있다.

만약 인수를 넣는다면, 그 문자열의 다음 라우터 미들웨어로 이동한다.

또한 req.{이름} 등으로 req안에 데이터를 넣어둘 수도 있다.


multer

기존에는 json과 같은 데이터만 받았지만, 이번에는 multipartFile을 받아보도록 하자.

nest에서도 많이 봤던 친구라 익숙하다.

import express from 'express';
import morgan from 'morgan';
import cookieParser from 'cookie-parser';
import session from 'express-session';
import dotenv from 'dotenv';
import { fileURLToPath } from 'url';
import { dirname } from 'path';
import path from 'node:path';
import multer from 'multer';
import fs from 'node:fs';

const __filename = fileURLToPath(import.meta.url);
const __dirname = dirname(__filename);

dotenv.config();

const uploadDir = path.join(__dirname, 'public/uploads');
if (!fs.existsSync(uploadDir)) {
    fs.mkdirSync(uploadDir, { recursive: true });
}
const upload = multer({
    storage: multer.diskStorage({
        destination(req, file, cb) {
            cb(null, uploadDir);
        },
        filename(req, file, cb) {
            const ext = path.extname(file.originalname);
            cb(null, `${Date.now()}${ext}`);
        },
    }),
    limits: {
        fileSize: 5 * 1024 * 1024,
    },
});
const app = express();
app.set('port', process.env.PORT || 3000);

app.use(morgan('dev'));
app.use('/', express.static(path.join(__dirname, 'public')));
app.use(express.json());
app.use(express.urlencoded({ extended: false }));
app.use(cookieParser(process.env.COOKIE_SECRET || 'secret'));
app.use(
    session({
        resave: false,
        saveUninitialized: false,
        secret: process.env.SESSION_SECRET || 'secret',
        cookie: {
            httpOnly: true,
            secure: false,
        },
        name: 'session',
    }),
);

app.use((req, res, next) => {
    console.log('미들웨어 지나갑니다.');
    next();
});

app.post("/file", upload.single("file"), (req, res) => {
    console.log(req.file);
    res.send(req.file);
})

app.listen(app.get('port'), () => console.log('Server on'));

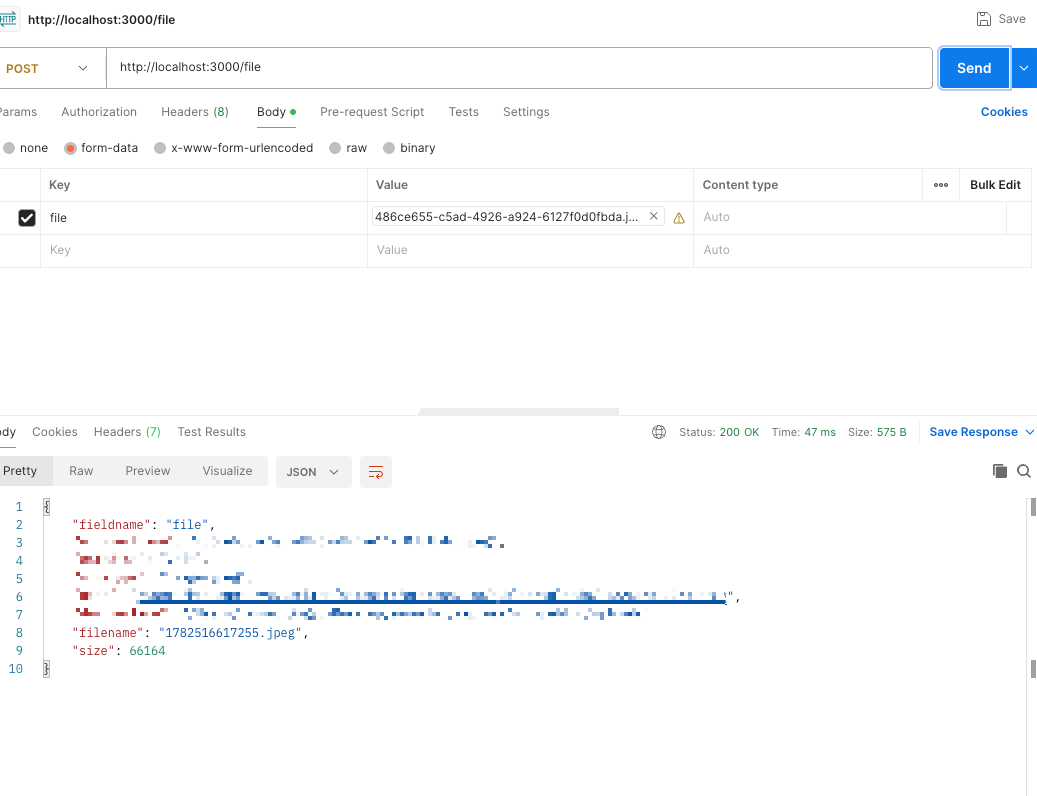
이렇게 postman으로 파일을 업로드해보니 잘 되는 것을 볼 수 있다.


파일을 제외한 나머지 정보는 req.body에서 가져오면 된다.


Router로 라우팅 주소 지정하기

그냥 이거도 fastapi에서의 라우터이다.

당연히 도메인바다 라우팅을 분리해야 하니, 라우터를 사용해 주소를 분리해보자.

우선 아래와 같이 router를 만들고

import express from 'express';

export const router = express.Router();

router.get('/', (req, res) => res.send('user'));
import express from 'express';
import dotenv from 'dotenv';
import { router as userRouter } from './routers/user.js';

dotenv.config();

const app = express();
app.set('port', process.env.PORT || 3000);

app.use('/user', userRouter);

app.listen(app.get('port'), () => console.log('Server on'));

이건 이제 가장 상위의 app.js이다.


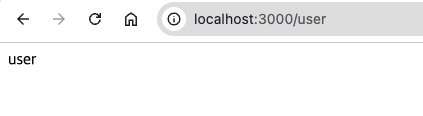
이렇게 app.use로 라우터를 넣어주고, 그 경로를 지정하면 거기로 들어가는 요청이 다시 앞에 띠고 저 라우터로 들어간다.

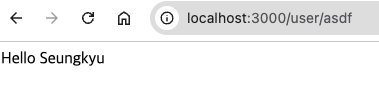
이렇게 나오게 된다.

여기서 query, path param을 사용해보자.

다음과 같이 user.ts를 수정하고

import express from 'express';

export const router = express.Router();

router.get('/:id', (req, res) => {
    console.table(req.params);
    console.table(req.query);
    res.send('Hello Seungkyu');
});


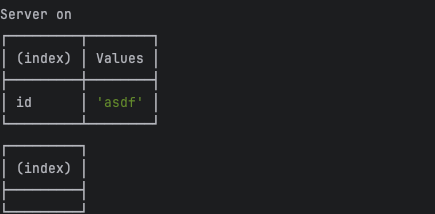
여기에 path부터 테스트를 해보면

이렇게 나오고


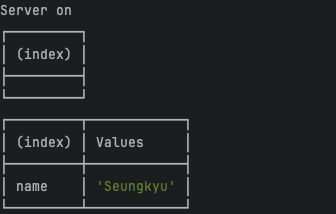
다시 path variable을 빼고

import express from 'express';

export const router = express.Router();

router.get('/', (req, res) => {
    console.table(req.params);
    console.table(req.query);
    res.send('Hello Seungkyu');
});

다시 아래와 같이 요청해보면 잘 나오는 것을 볼 ㅜㅅ 있다.


express 세상의 req, res

계속 사용하는 req, res는 저번에 보았던 http를 다듬은 것이다.

많이 사용하는 것들만 대충 일단 표로 알아보고 가자.

req.app 맨날 사용하는 app 객체 자체를 접근 가능하다.
req.body body-parser가 만드는 request의 본문이 담겨있다.
req.cookies cookie-parser가 만드는 cookie의 객체가 담겨있다.
req.ip 클라이언트의 ip 주소가 담겨있다.
req.params path variable의 정보가 담겨있다.
req.query 쿼리 파라미터의 정보가 담겨있다.
req.signedCookies 서명된 쿠키들이 담겨있다.
req.get('헤더') 특정 헤더를 가져온다.


res.app 이거도 app 객체 자체에 접근한다.
res.cookie(key, value, option) 응답에 쿠키를 넣어서 보낸다.
res.clearCookie(key, value, option) 해당 쿠키를 제거한다.
res.end() 데이터없이 그냥 응답만 보낸다.
res.json(value) json 형식으로 응답을 보낸다.
res.redirect(주소) 해당 주소로 리다이렉트 응답을 보낸다.
res.send(value) 데이터를 넣어서 응답을 보낸다.
res.set(header, value) 응답의 헤더를 설정한다.
res.staus(httpStatus) http 코드를 지정한다.
res.sendFile(경로) 해당 경로의 파일로 응답한다.

'Node > Node.js' 카테고리의 다른 글

express로 mongodb 사용하기  (0) 2026.06.27
express로 pg 사용하기  (0) 2026.06.27
노드 패키지 매니저  (0) 2026.06.24
노드로 http 서버 만들어보기  (0) 2026.06.23
노드 사용해보기  (0) 2026.06.22

+ Recent posts