2주차에는 파일 입출력에 대해 공부한다.
- File
Unix/Linux에서의 file 타입은 이렇게 있다.
Regular file(일반 파일)
- text or binary data file
Directory
- 윈도우의 폴더이며 Unix/Linux에서는 directory도 하나의 파일로 본다
Special file(특수 파일)
- 파일 형태로 표현된 커널 내 객체
- 데이터 전송, 장치 접근 시 사용하는 파일
Basic commands for file
ls
현재 directory 내의 파일 목록 출력
주요 Option
-l : 상세 파일 정보 출력
-a: 모든 파일(숨겨진 파일 포함 목록 출력)

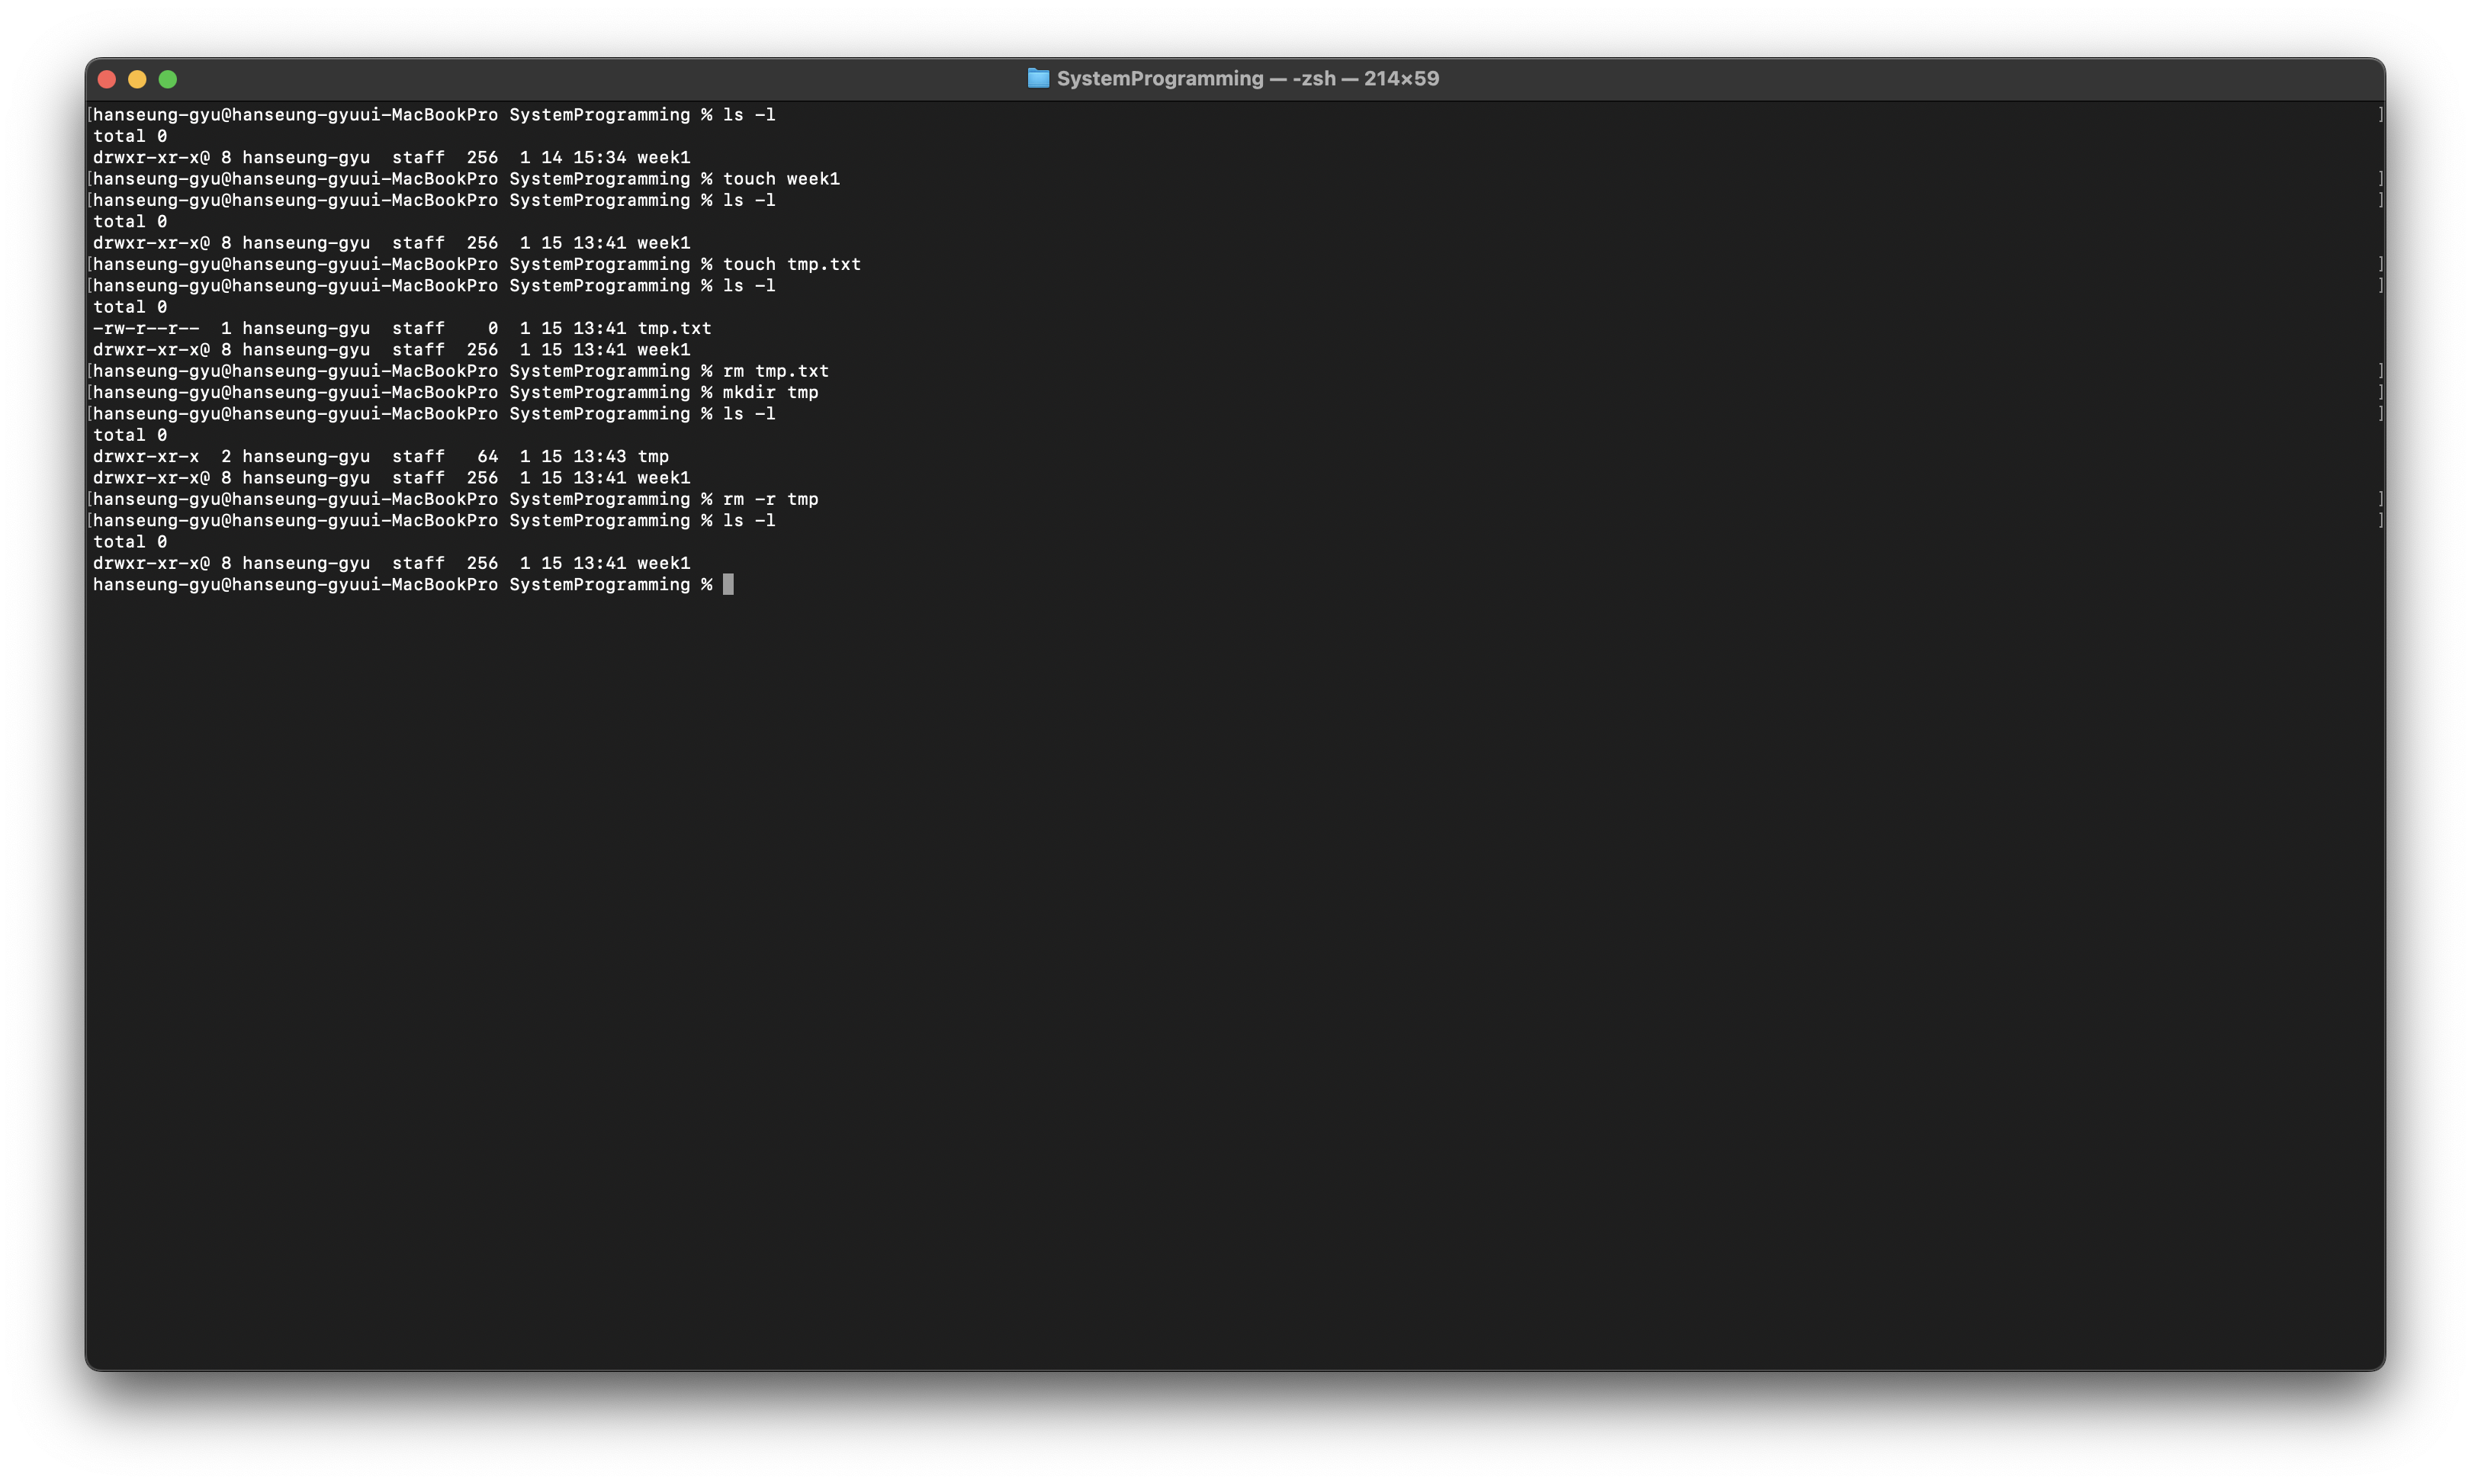
touch
빈 파일을 생성하거나 해당 파일이 있다면 time stamp를 변경해준다.

rm
파일 삭제
주요 Option
-r: directory 삭제
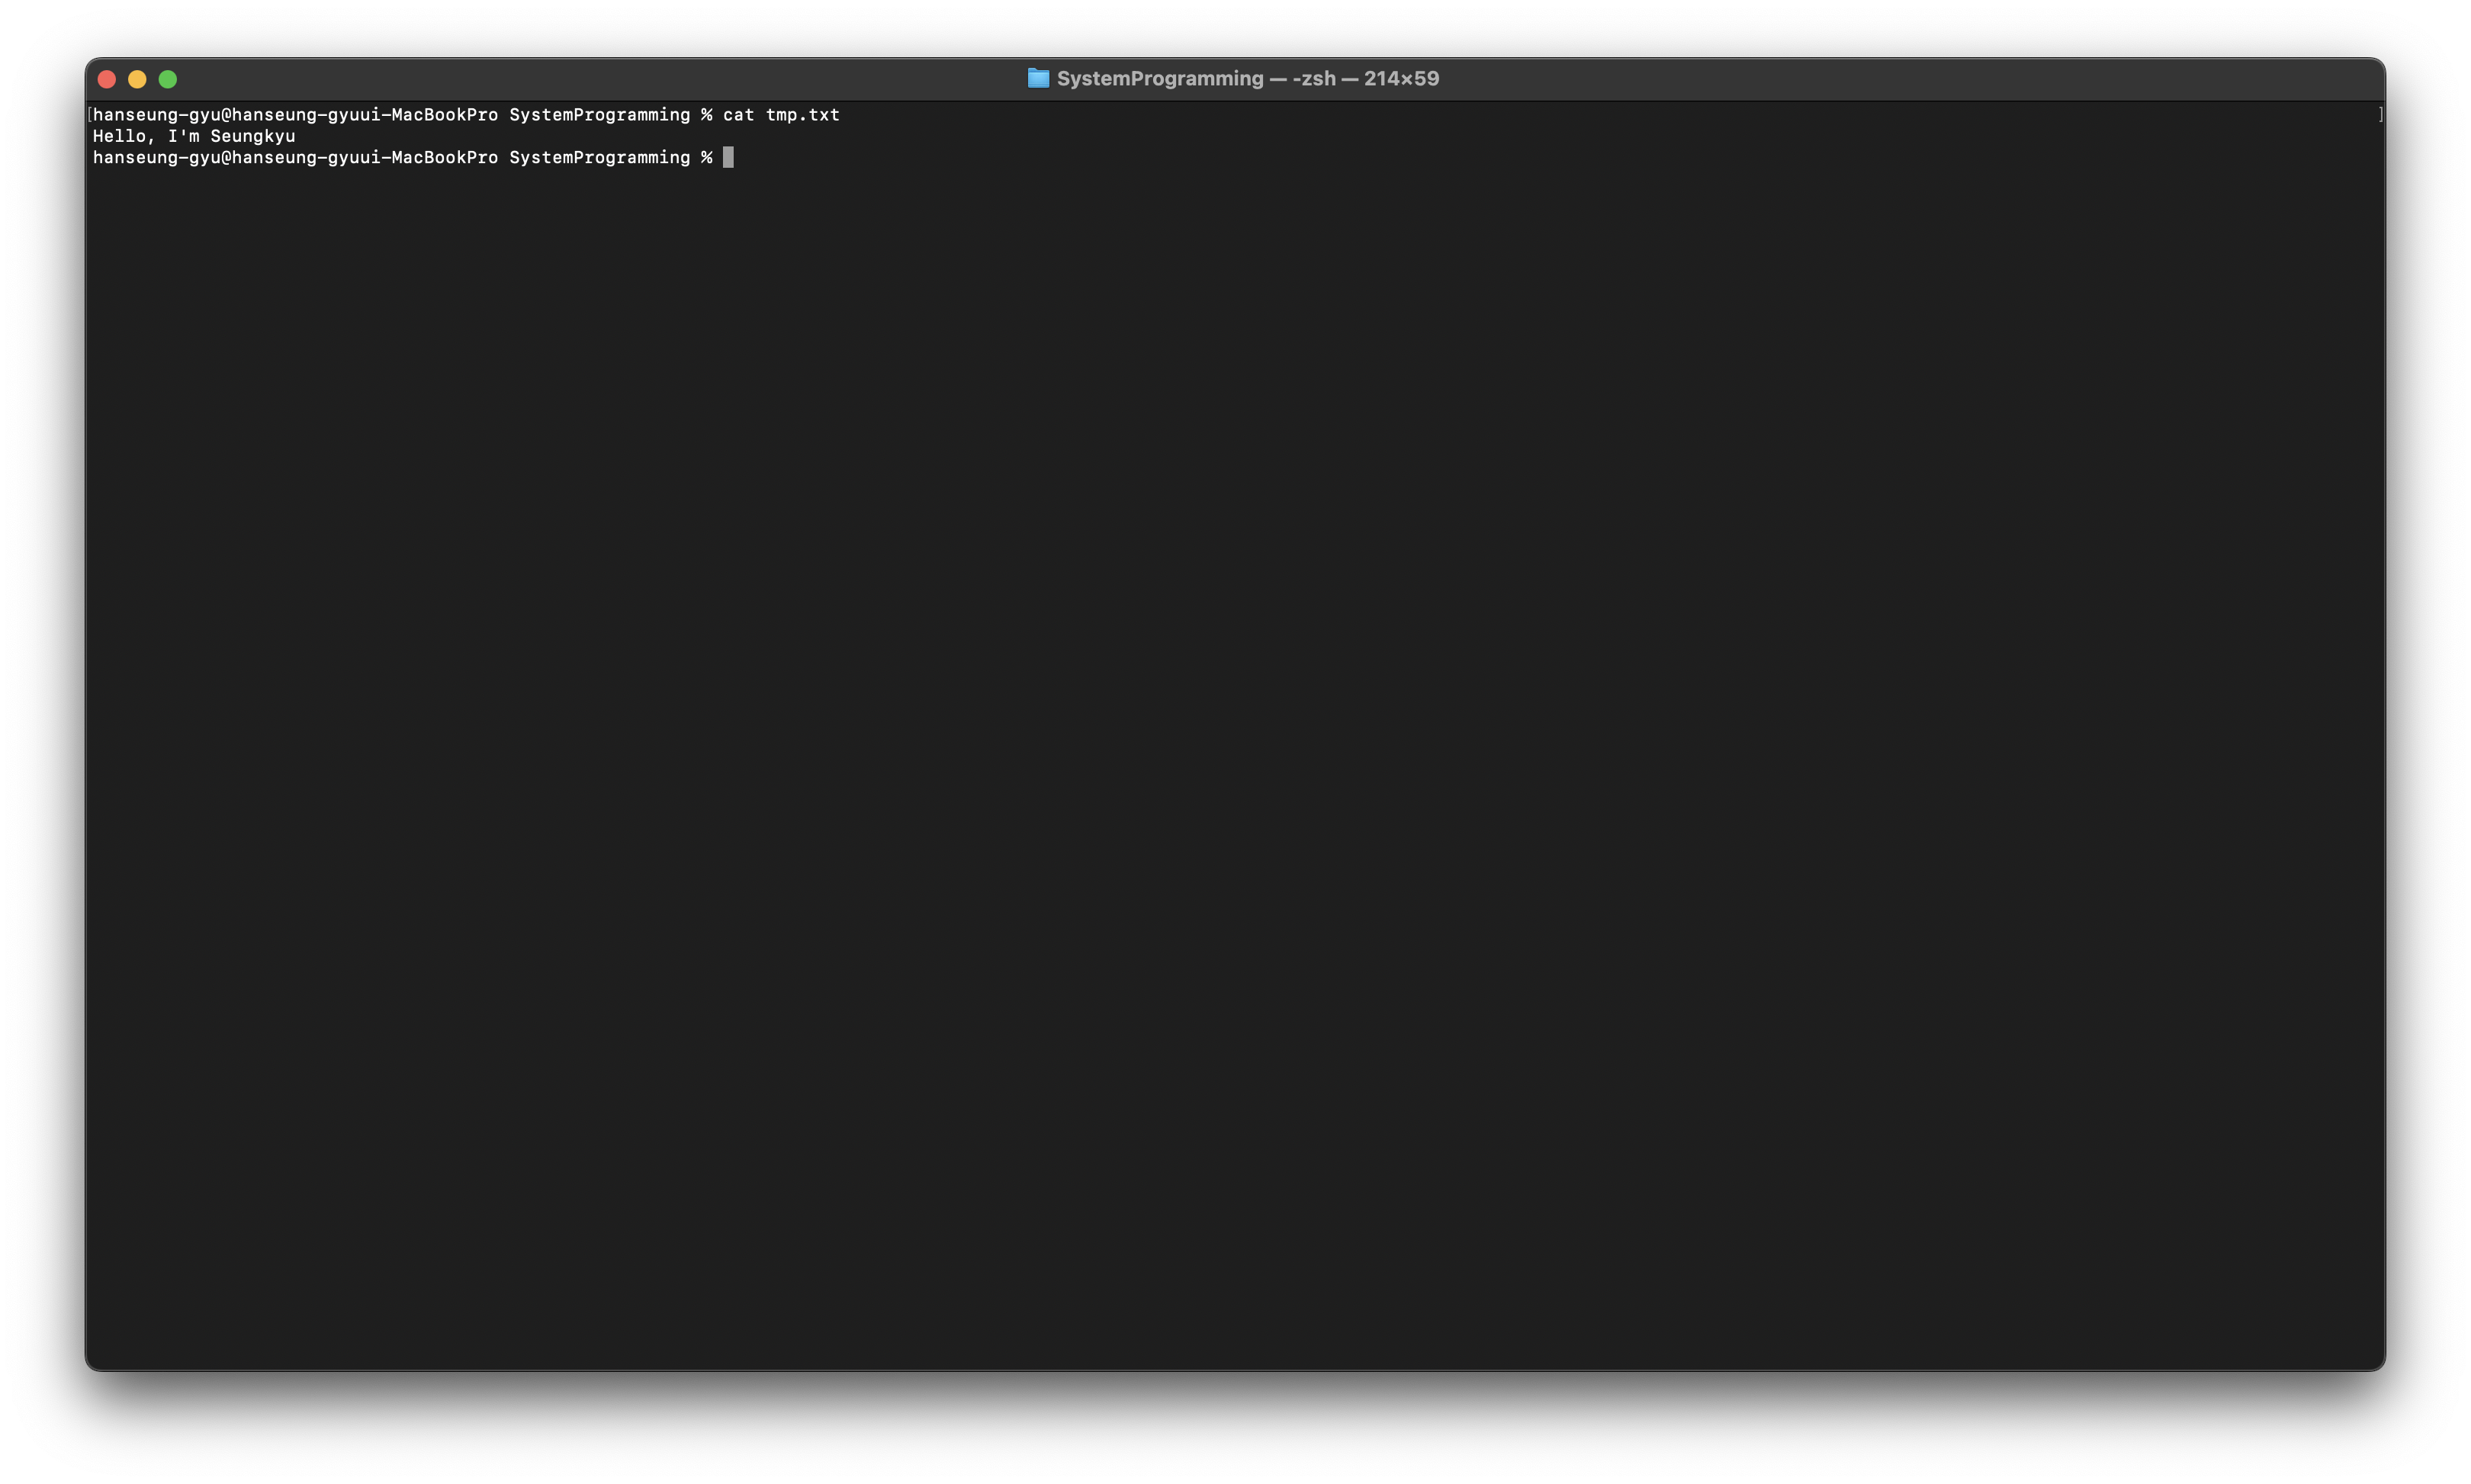
cat
파일 내용 출력
copy
파일 복사
주요 Option
-r: directory 복사

mv
파일을 이동하거나 이름을 변경

File access permission
Owner, Group, others 사용자에 따라
읽기(r), 쓰기(w), 실행(x) 권한을 가짐
| 3비트 | 3비트 | 3비트 | ||||||
| 소유자 접근 권한 | 그룹 접근 권한 | 기타 사용자 접근 권한 | ||||||
| r | w | x | r | w | x | r | w | x |
| Bit | Octal value | Text value | Corresponding permission |
| 8 | 400 | r - - - - - - - - | Owner may read |
| 7 | 200 | - w - - - - - - - | Owner may write |
| 6 | 100 | - - x - - - - - - | Owner may execute |
| 5 | 040 | - - - r - - - - - | Group may read |
| 4 | 020 | - - - - w - - - - | Group may write |
| 3 | 010 | - - - - - x - - - | Group may execute |
| 2 | 004 | - - - - - - r - - | Everyone else may read |
| 1 | 002 | - - - - - - - w - | Everyone else may write |
| 0 | 001 | - - - - - - - - x | Everyone else may execute |
권한은 이렇게 주어지며 권한은 변경할 수도 있다.
chmod
파일 권한 변경

가운데 권한을 비트연산으로 넣어준다.
- Open and Close a file
Low-level file IO vs High-level file IO
| Low-Level File IO(System call) | High-Level File IO(Buffered IO) |
| System call을 이용해서 파일 입출력 수행 | C Standard library를 사용해서 파일 입출력 수행 |
| File descriptor 사용 | File Pointer 사용 |
| Byte 단위로 디스크에 입출력 | 버퍼(block) 단위로 디스크에 입출력 |
| 특수 파일에 대한 입출력 가능 |
Opening files
#include <sys/types.h>
#include <sys/stat.h>
#include <fcntl.h>

int open(const char *pathname, int flags [, mode_t mode]);
- pathname (file path)
열려는 파일의 경로 (파일 이름 포함)
- flags(file state flags)
파일을 여는 방법 설정
-mode (file access permission)
파일을 새로 생성할 때만 유효
return: file descriptor
아래는 flags이며 여러 플래그들을 조합 가능하다 (OR bit operation인 |을 사용)
자주 사용하는 flag들만 소개하겠다.
| 종류 | 기능 |
| O_RDONLY | 파일을 읽기 전용으로 연다 |
| O_WRONLY | 파일을 쓰기 전용으로 연다 |
| O_RDWR | 파일을 읽기와 쓰기가 가능하게 연다 |
| O_CREAT | 파일이 없으면 파일을 생성한다. |
아래는 mode이다, flag와 마찬가지로 조합이 가능하며 파일 권한 설정 값을 사용한다.
| 플래그 | 모드 | 설명 |
| S_IRWXU | 0700 | 소유자 읽기/쓰기/실행 권한 |
| S_IRUSR | 0400 | 소유자 읽기 권한 |
| S_IWUSR | 0200 | 소유자 쓰기 권한 |
| S_IXUSR | 0100 | 소유자 실행 권한 |
| S_IRWXG | 0070 | 그룹 읽기/쓰기/실행 권한 |
| S_IRGRP | 0040 | 그룹 읽기 권한 |
| S_IWGRP | 0020 | 그룹 쓰기 권한 |
| S_IXGRP | 0010 | 그룹 실행 권한 |
| S_IRWXO | 0007 | 기타 사용자 읽기/쓰기/실행 권한 |
| S_IROTH | 0004 | 기타 사용자 읽기 권한 |
| S_IWOTH | 0002 | 기타 사용자 쓰기 권한 |
| S_IXOTH | 0001 | 기타 사용자 실행 권한 |
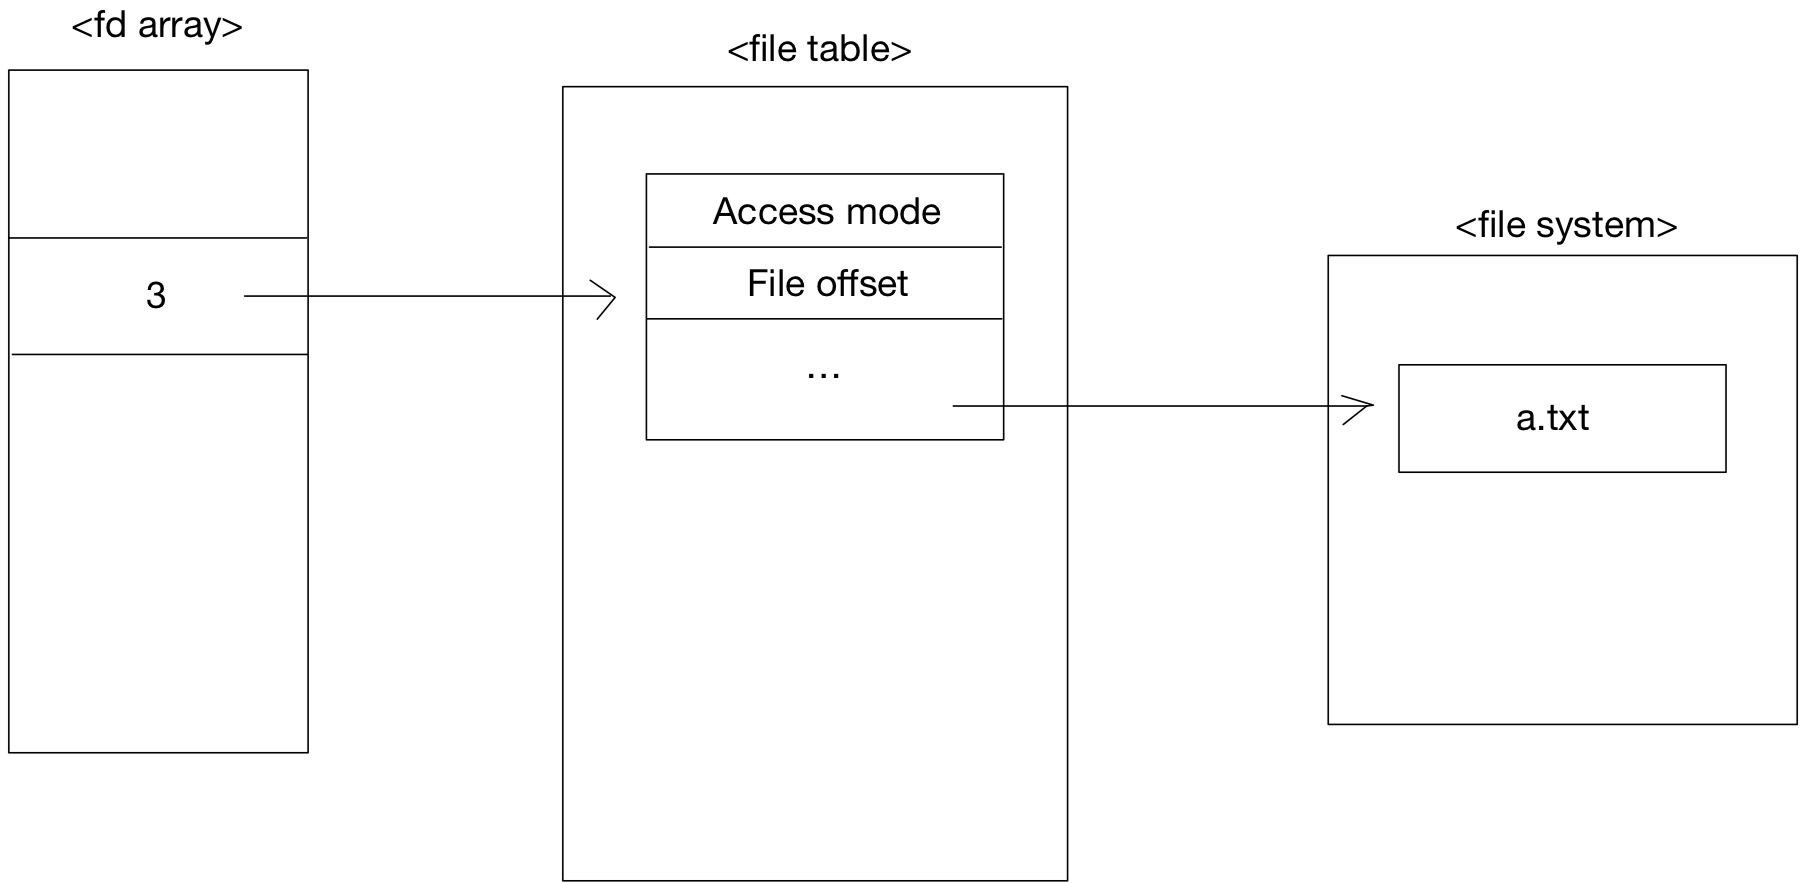
file descriptor
여기서 file descriptor는 열려 있는 파일을 구분하는 정수 값이다.
파일을 열 때 순차적으로 할당이 되며
Default fds
0: stdin
1: stdout
2: stderr
이기 때문에 보통 3번부터 할당이 된다.
File table
열린 파일을 관리 하는 표이다.
kernel이 process 별로 유지하며 열린 파일에 대한 각종 정보를 관리한다.
Access mode, file offset, pointer to files
Closing files
#include <unistd.h>

int close(int fd);
- fd(file descriptor)
닫으려는 file descriptor
return: 0(success), -1(error)
file descriptor를 끊어주는 역할을 한다.
그럼 open과 close를 이용하여 간단하게 파일을 열고 닫는 프로그램을 만들어보자
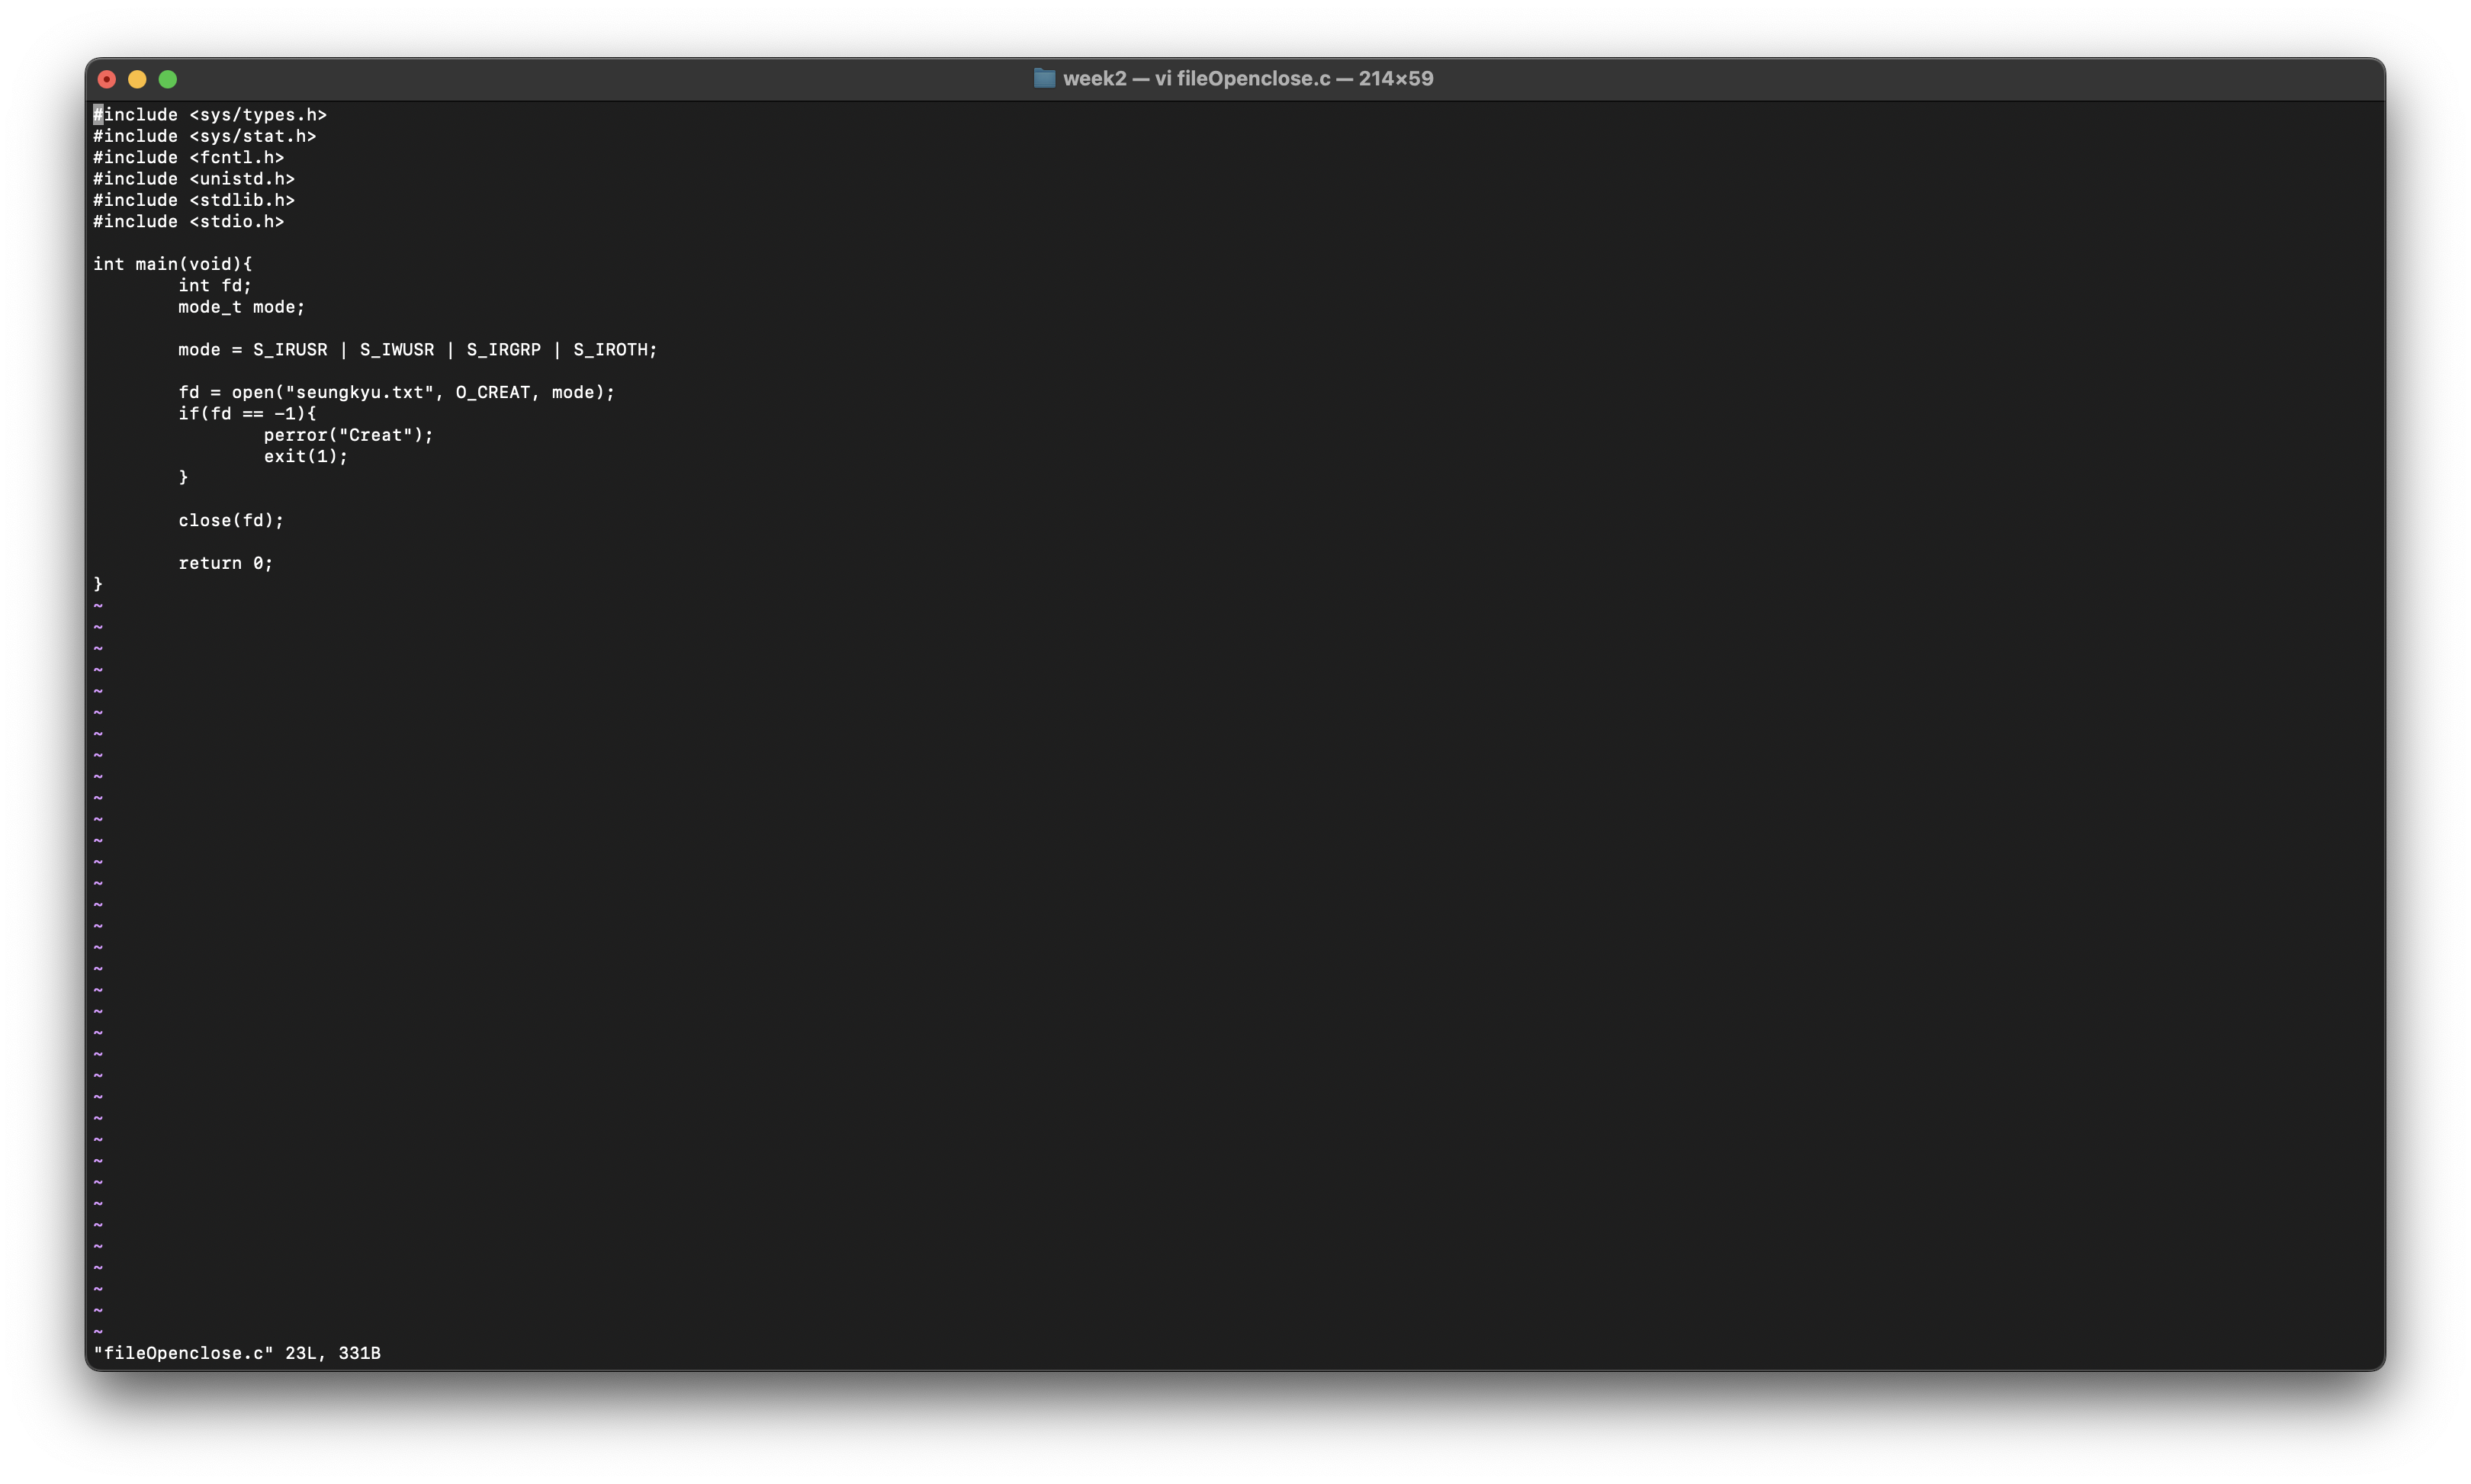
이렇게 작성을 하고 컴파일을 해본다면

이렇게 새로운 파일이 생성되는 것을 볼 수 있다.
Error handling for System call
System call은 실패 시 -1을 반환
Error code는 errno에 저장 되며
perror를 활용해 error message를 출력 할 수 있다.
#include <stdio.h>

void perror(const char *str);
Reading a file
#include <stdio.h>

ssize_t read(int fd, void *buf, size_t count);
-fd(file descriptor)
읽으려는 파일의 file descriptor
-buf(buffer)
읽은 내용을 저장할 buffer의 시작 주소
-count
읽을 byte의 수
return: 실제로 읽은 byte의 수 (0: 파일의 끝인 EOF에 도달, -1: 에러)
Writing to a file
#include <unistd.h>

ssize_t write(int fd, const void *buf, size_t count);
-fd(file descriptor)
기록하려는 파일의 file descriptor
-buf(buffer)
기록할 내용이 저장된 buffer의 시작 주소
-count
기록할 byte의 수
return: 실제로 기록한 byte의 수 (-1: 에러)
File offset(File position)
File operation을 적용할 위치
파일의 시작점부터 현재 위치까지의 byte 수
Read/Write 수행시, 읽은/기록한 byte 수 만큼 순차적으로 이동
file offset을 이용해 해당 파일을 어디까지 읽었는지, 어디까지 작성했는지 기억한다.
그럼 한 번 Read와 Write까지 활용해서 파일을 작성해보자
#include <fcntl.h>
#include <unistd.h>
#include <stdlib.h>
#include <stdio.h>

int main(void){
	int rfd, wfd, n;
	char buf[10];

	rfd = open("hello.txt", O_RDONLY);
	if(rfd == -1){
		perror("Open hello.txt");
		exit(1);
	}

	wfd = open("hello.bak", O_CREAT | O_WRONLY | O_TRUNC, 0644);
	if(wfd == -1){
		perror("Open hello.bak");
		exit(1);
	}

	while((n = read(rfd, buf, 6)) > 0)
		if(write(wfd, buf, n) != n) perror("wrote");

	if(n == -1) perror("Read");

	close(rfd);
	close(wfd);

	return 0;
}
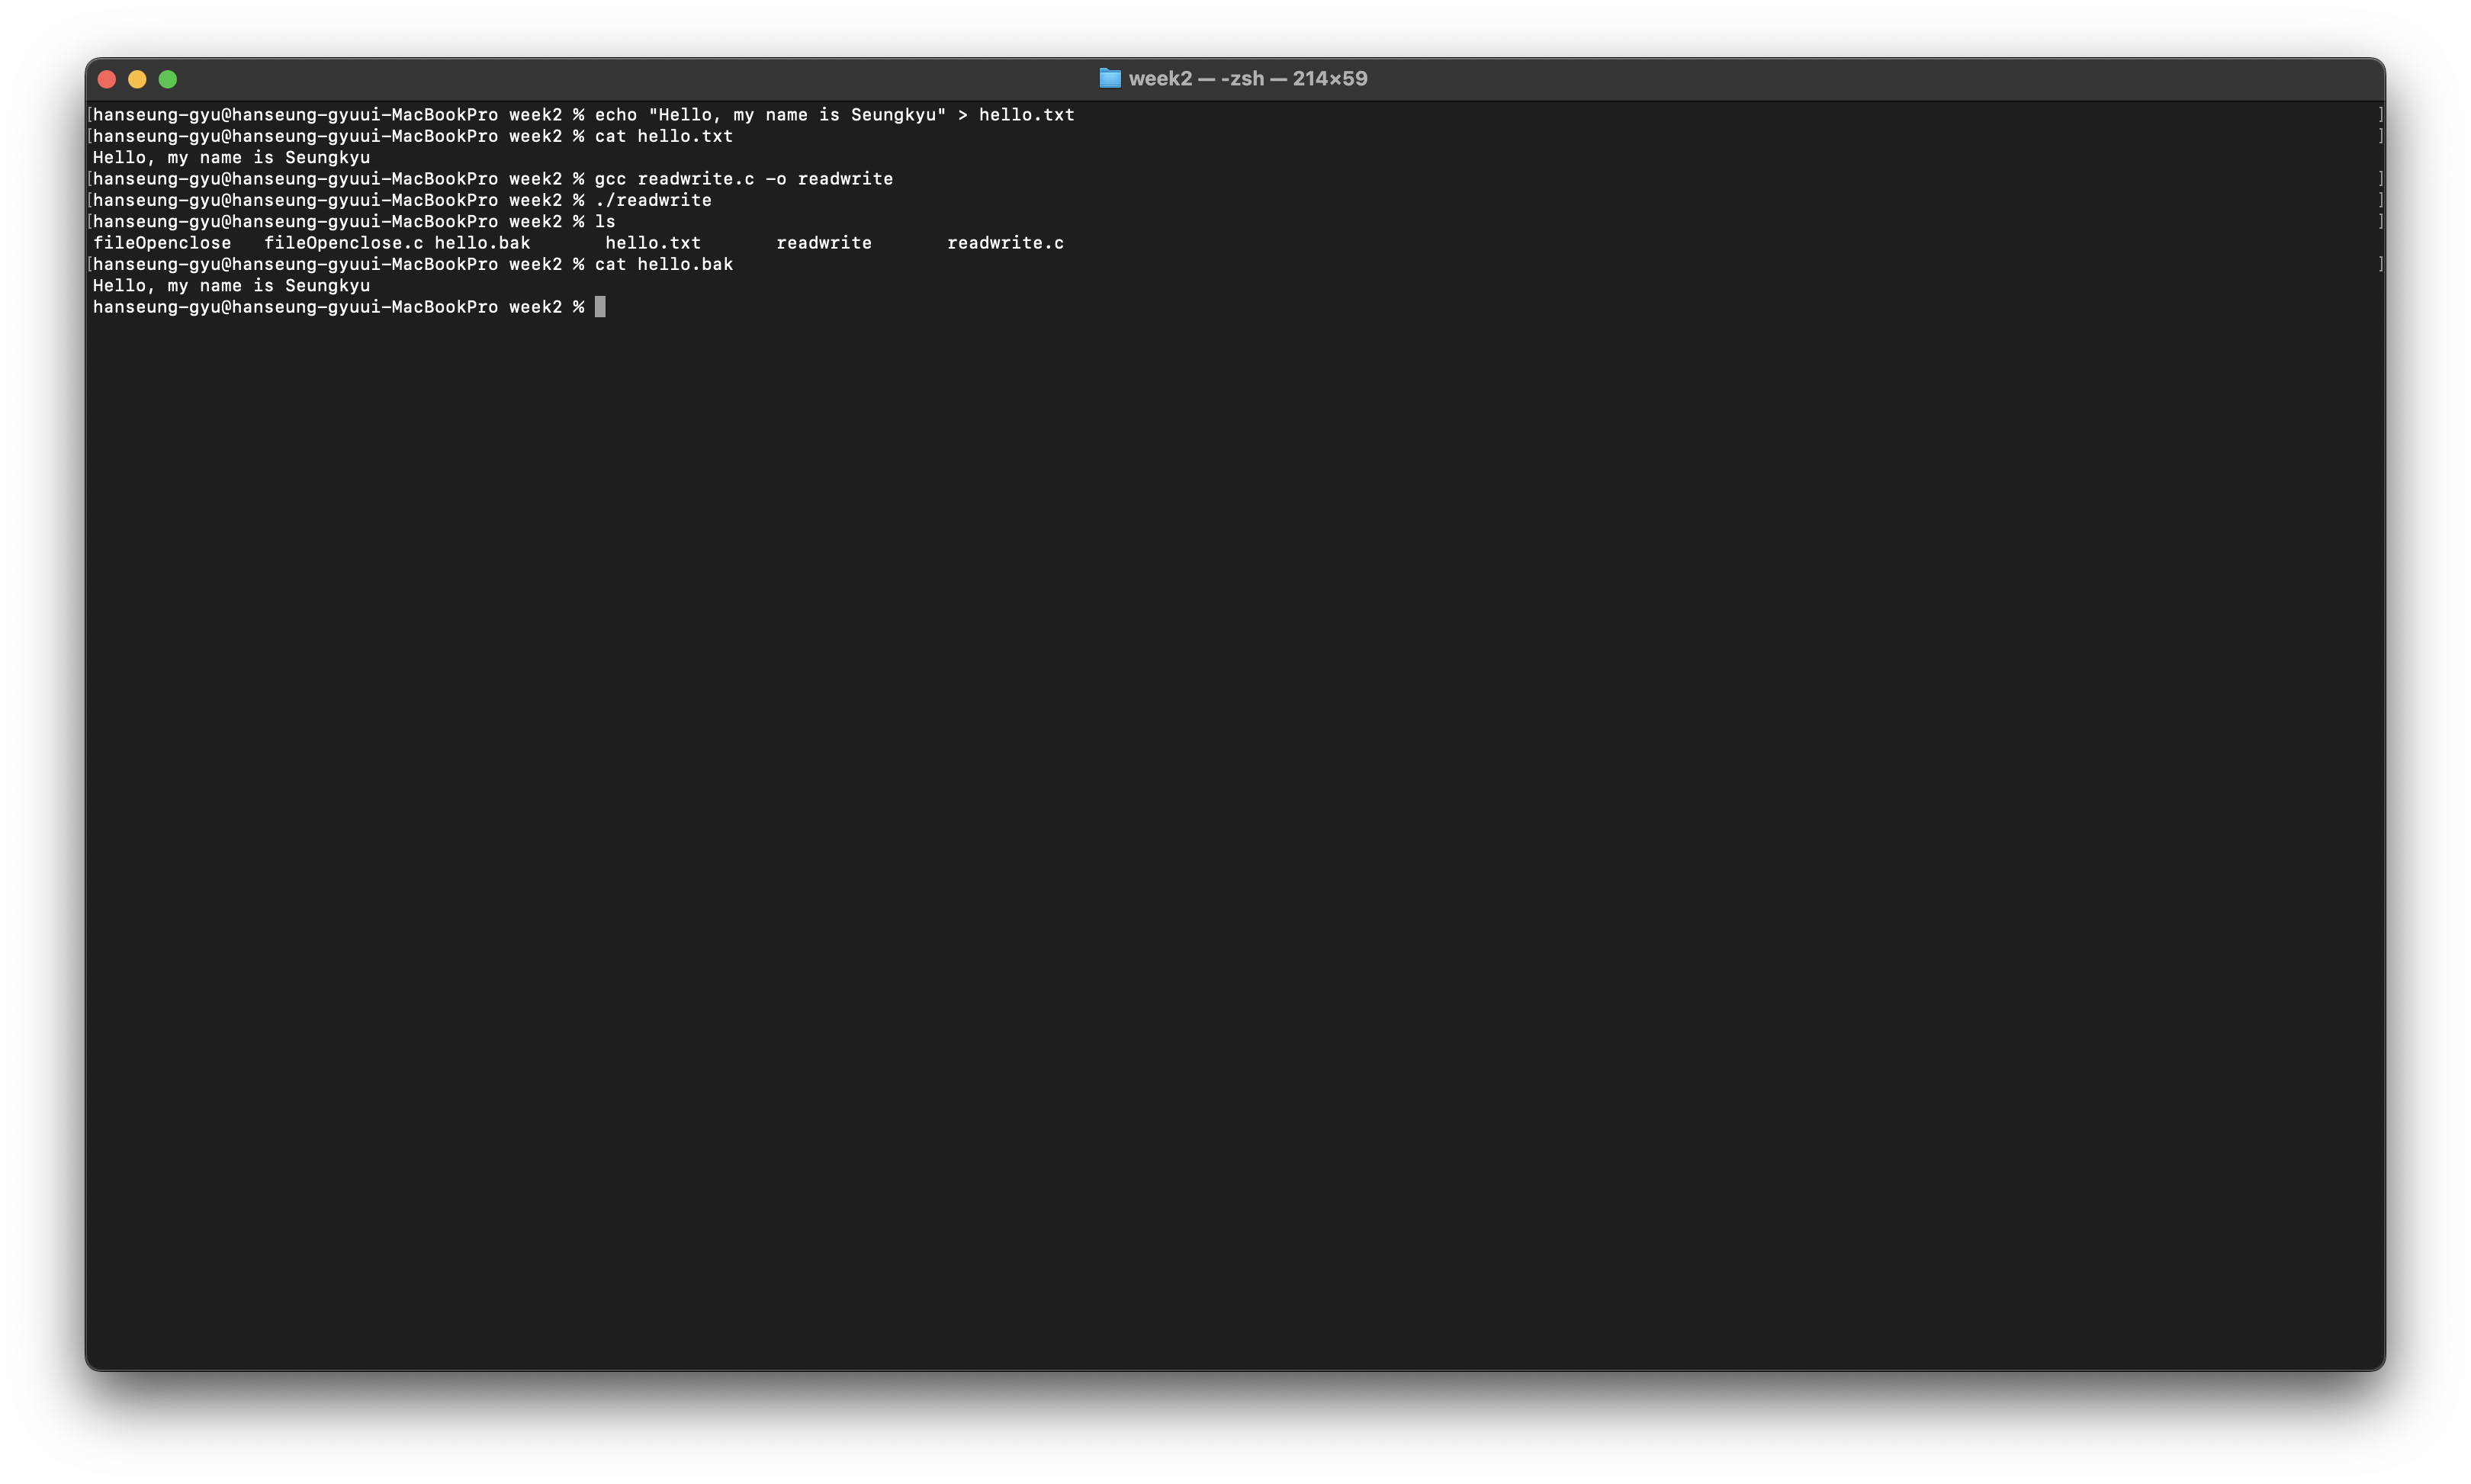
이렇게 read를 이용하여 offset을 따라 모두 읽고 write하는 것을 볼 수 있다.
우리는 당연히 파일을 처음부터 순차적으로 따라 읽으며 내려왔다.
하지만 파일의 원하는 Block에 직접 접근 하는 방법도 있다.
Moving the file offset
#include <sys/types.h>
#include <unistd.h>

off_t lseek(int fd, off_t offset, int whence);
-fd(file descriptor)
대상 file descriptor
-offset
이동시킬 byte 수 (양수 or 음수)
-whence
기준 위치
return: 이동 후 file offset (-1: 에러)
whence에는
SEEK_SET: 파일의 시작
SEEK_CUR: 현재 위치
SEEK_END: 파일의 끝
이렇게 3가지 종류가 있다.
한 번 사용해보도록 하자
#include <sys/types.h>
#include <fcntl.h>
#include <unistd.h>
#include <stdlib.h>
#include <stdio.h>

int main(void){
    int fd, n;
    off_t start, cur;
    char buf[256];

    fd = open("linux.txt", O_RDONLY);
    if(fd == -1){
        perror("Open linux.txt");
        exit(1);
    }

    start = lseek(fd, 0, SEEK_CUR);
    n = read(fd, buf, 255);
    buf[n] = '\0';
    printf("Offset start=%d, Read Str=%s, n=%d\n", (int)start, buf, n);
    cur = lseek(fd, 0, SEEK_CUR);
    printf("Offset cur=%d\n", (int)cur);

    start = lseek(fd, 6, SEEK_SET);
    n = read(fd, buf, 255);
    buf[n] = '\0';
    printf("Offset start=%d, Read Str=%s", (int)start, buf);

    close(fd);

    return 0;
}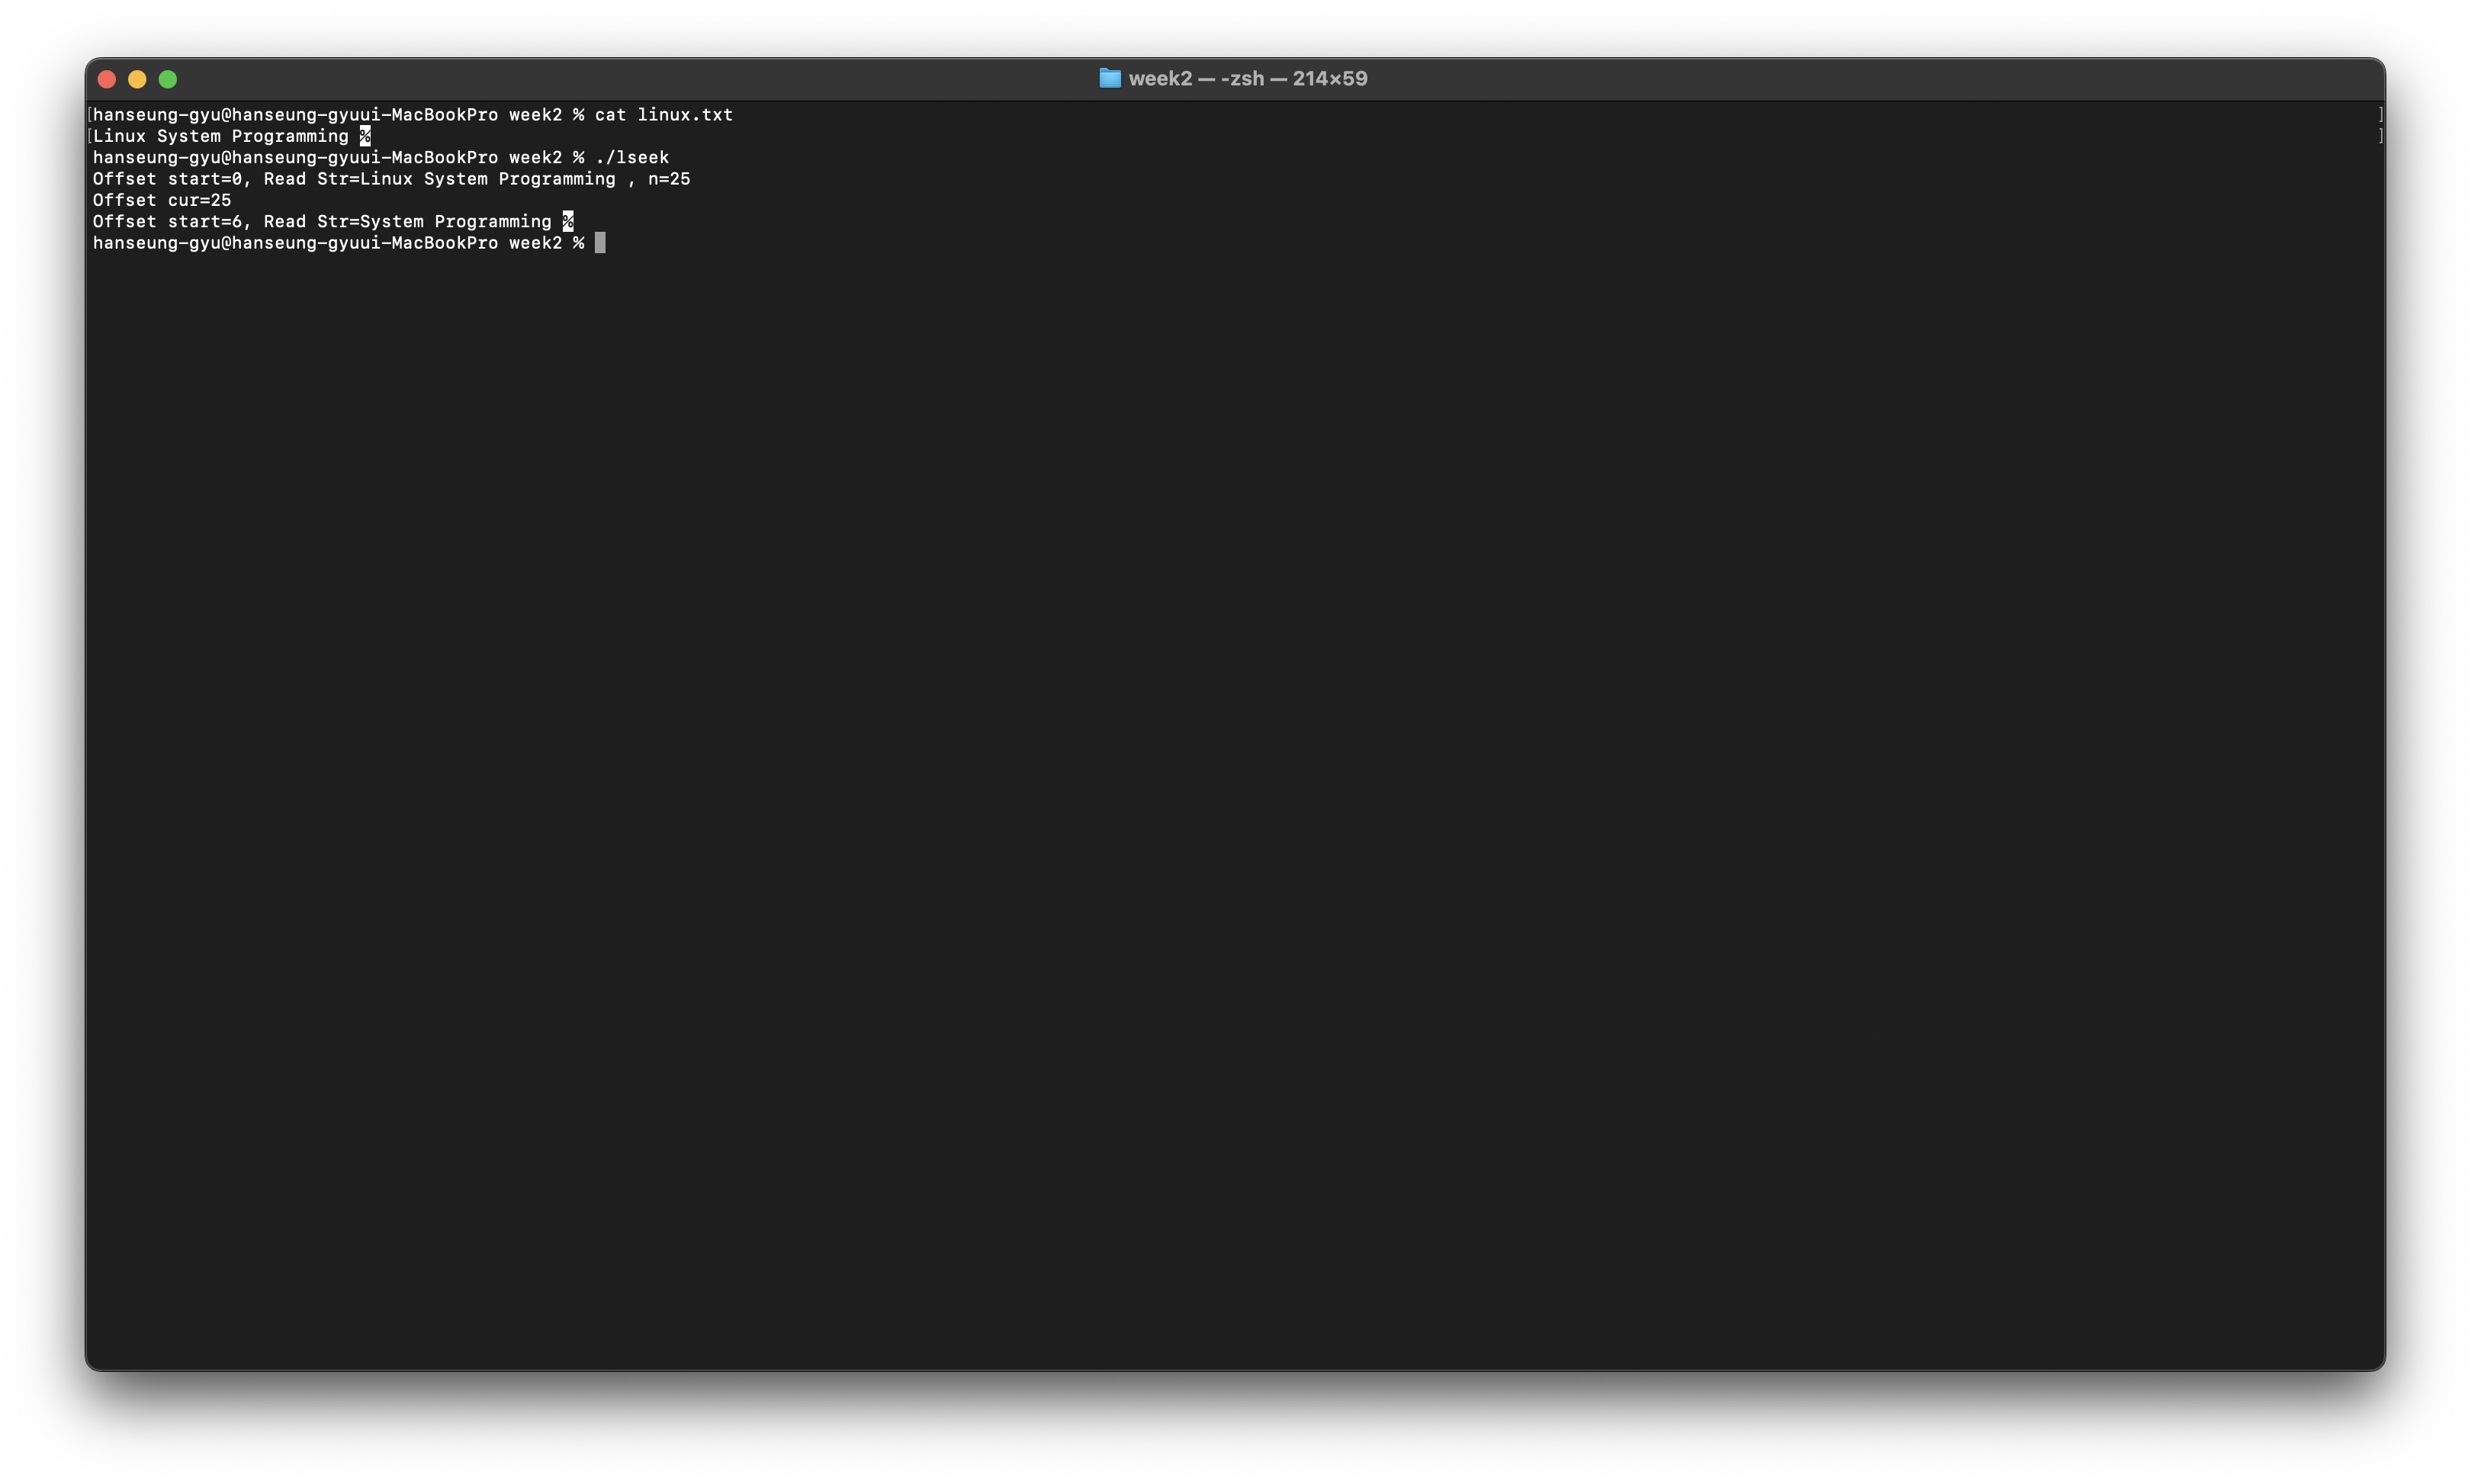
실행을 시키면 이렇게 offset이 이동하는 것을 볼 수 있다.
Page cache & write-Back
Page ache
- In-memory store of recenlty accessd dat from an on-disk filesystem
- Disk 접근 시간 절약을 위해 kernel 내부적 기법
page write-back
- Page cache에 변경 된 내용을 disk에 반영하는 것
- 반영 시기는 kernel이 결정
Synchronizing with disks
#include <unistd.h>

int fsync(int fd);
-fd(file descriptor)
대상 file descriptor
return: 0(success), -1(error)
page write-back을 강제로 수행한다.
- File descriptor
Duplicating FD
#include <unistd.h>

int dup(int oldfd);
int dup2(int oldfd, int newfd);
-oldfd(old file descriptor)
복사하려는 file descriptor
-newfd
새로운 fd 지정
dup()의 경우 할당 가능한 fd 중 가장 작은 값으로 할당
return: oldfd를 복사한 새로운 fd (-1: 에러)
한번 실습을 해보자
#include <fcntl.h>
#include <unistd.h>
#include <stdlib.h>
#include <stdio.h>

int main(void){
    int fd, fd1;

    fd = open("tmp.aaa", O_CREAT | O_WRONLY | O_TRUNC, 0644);
    if(fd == -1){
        perror("Create tmp.aaa");
        exit(1);
    }

    close(1);

    fd1 = dup(fd);

    printf("DUP FD = %d\n", fd1);
    printf("Standard Output Redirection\n");
    close(fd);

    return 0;
}
이거를 실행해보면 stdout이 tmp.aaa로 연결이 되어
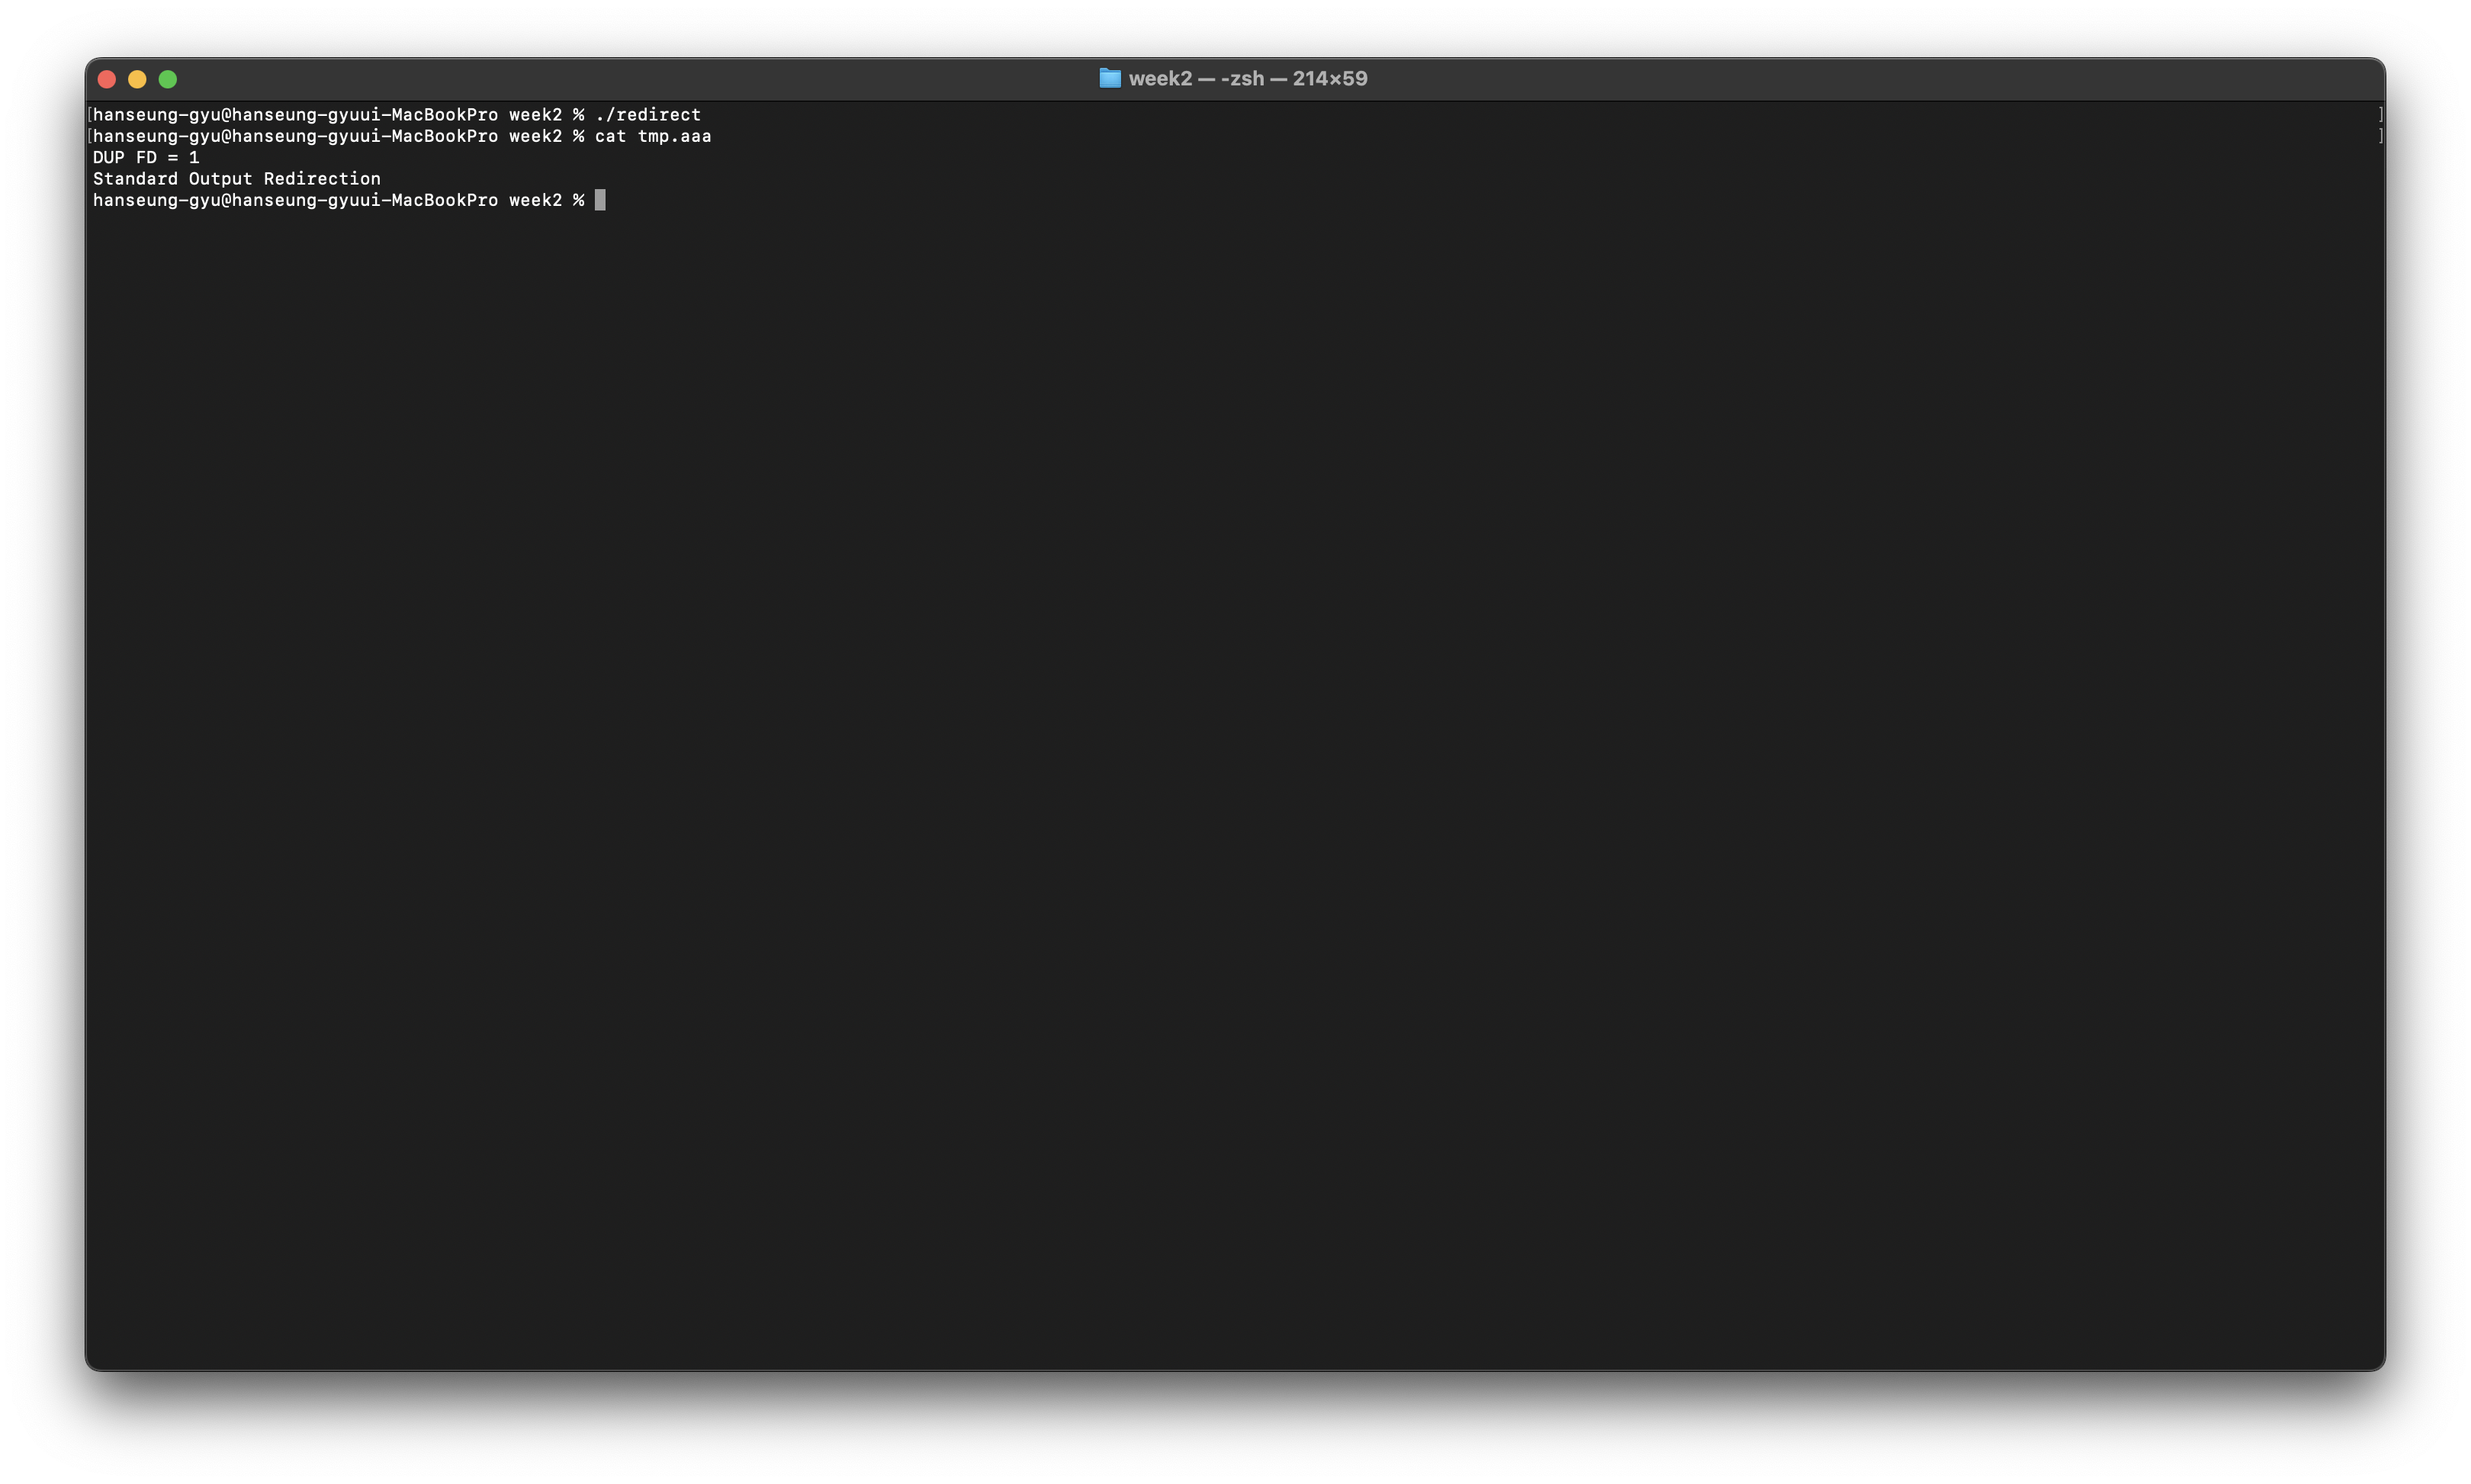
터미널에 출력이 되지 않고 tmp.aaa에 저장이 되는 것을 볼 수 있다.
'학교 생활 > 시스템 프로그래밍' 카테고리의 다른 글
| 시스템 프로그래밍 6주차 (0) | 2023.03.07 |
|---|---|
| 시스템 프로그래밍 5주차 (0) | 2023.03.05 |
| 시스템 프로그래밍 4주차 (0) | 2023.03.02 |
| 시스템 프로그래밍 3주차 (0) | 2023.01.16 |
| 시스템 프로그래밍 1주차 (0) | 2023.01.14 |