728x90

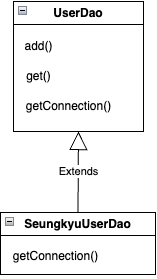
1.2에서는 상속을 이용하여 다른 연결을 가지는 UserDao를 만들었었다.


상속이 아닌 다른 방법으로도 관심사를 분리할 수 있을 것이라고 생각하기에, 아예 연결을 수행하는 독립적인 클래스를 만들어서 분리해보도록 하자.


public class SeungkyuConnection {

    public Connection getConnection() throws ClassNotFoundException, SQLException {
        Class.forName("com.mysql.cj.jdbc.Driver");

        return DriverManager.getConnection(
                "jdbc:mysql://localhost:3306/tobi",
                "root",
                "seungkyu");
    }
}


이렇게 연결만을 수행하는 클래스를 만들고, 해당 클래스를 통해 Dao에서 연결을 생성하도록 만들었다.

public class UserDao {

    private SeungkyuConnection seungkyuConnection;

    public UserDao(){
        seungkyuConnection = new SeungkyuConnection();
    }

    public void add(User user) throws ClassNotFoundException, SQLException {
        Connection connection = seungkyuConnection.getConnection();

        PreparedStatement preparedStatement = connection.prepareStatement(
                "insert into users(id, name, password) values(?,?,?)"
        );

        preparedStatement.setString(1, user.getId());
        preparedStatement.setString(2, user.getName());
        preparedStatement.setString(3, user.getPassword());

        preparedStatement.executeUpdate();

        preparedStatement.close();
        connection.close();
    }

    public User get(String id) throws ClassNotFoundException, SQLException {

        Connection connection = seungkyuConnection.getConnection();

        PreparedStatement preparedStatement = connection.prepareStatement(
                "select * from users where id = ?"
        );

        preparedStatement.setString(1, id);

        var resultSet = preparedStatement.executeQuery();

        resultSet.next();

        var user = new User();
        user.setId(resultSet.getString("id"));
        user.setName(resultSet.getString("name"));
        user.setPassword(resultSet.getString("password"));

        resultSet.close();
        preparedStatement.close();
        connection.close();

        return user;
    }
}


이런 방법에도 2가지 문제점이 있다고 한다.


첫째는 이러한 리펙토링도 add와 get등 기존의 연결을 사용하고 있던 코드들을 찾아서 모두 새로운 방식의 연결로 바꿔줘야 한다는 일이다.

현재는 2가지 부분만 변경을 하면 되지만, 프로젝트가 커지고 파일이 분리될수록 해당 코드들을 모두 찾아서 바꾸어주기는 어려울 것이다.


둘째는 UserDao에서 데이터베이스의 연결에 대해 알고 있어야 한다는 점이다.

연결에 대한 정보가 SeungkyuConnection에 존재하기 때문에, 현재 UserDao는 해당 정보들에게 종속되어 버린다.


이러한 방식을 해결하기 위해, 두 클래스를 느슨하게 연결하도록 만들어주는 인터페이스를 사용한다.


인터페이스를 사용하면 해당 메서드의 정보만 제공하고, 구현에 관한 내용은 신경 쓸 필요가 없기 때문에 연결을 느슨하게 만들어준다.

Connection을 인터페이스로 만든다면 UserDao는 자신이 사용할 클래스에 대해 깊게 알 필요가 없어진다는 것이다.


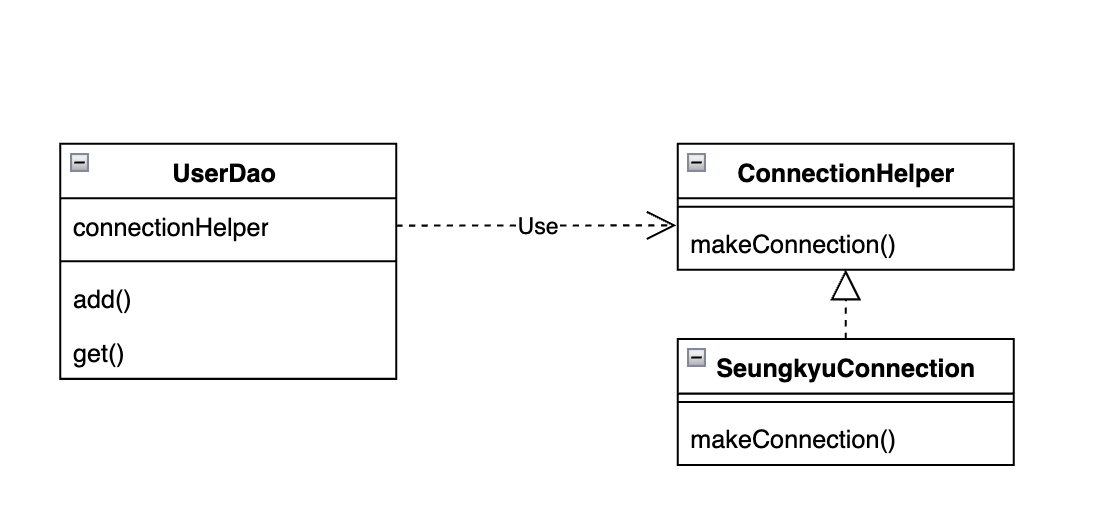
이렇게 ConnectionHelper 인터페이스를 구현하고, 해당 객체를 UserDao에서 사용하는 방법으로 해결 할 수 있다.

SeungkyuConnection에서 해당 인터페이스를 구현하고, 데이터베이스의 연결에 대한 정보를 가지고 있다.


public class SeungkyuConnection implements ConnectionHelper {

    public Connection getConnection() throws ClassNotFoundException, SQLException {
        Class.forName("com.mysql.cj.jdbc.Driver");

        return DriverManager.getConnection(
                "jdbc:mysql://localhost:3306/tobi",
                "root",
                "seungkyu");
    }
}


이러면 UserDao에서는 ConnectionHelper의 makeConnection 메서드를 사용하고 있기 때문에, 사용하는 클래스를 변경하더라도 add(), get()의 메서드에서 코드를 수정해줄 필요가 없다.


이렇게 만들어도, UserDao의 생성자에서 사용할 객체의 클래스 이름을 사용해 UserDao를 생성해야 한다는 문제가 있다.


    private ConnectionHelper connectionHelper;

    public UserDao(){
        connectionHelper = new SeungkyuConnection(); //SeungkyuConnection으로 생성해줘야 함
    }


이러면 데이터베이스의 연결 정보를 변경하고 싶을 때마다, UserDao의 코드를 수정해줘야 한다.


이렇게 현재 UserDao에서 직접적으로 SeungkyuConnection을 사용하기 때문에 발생한 문제이다.

UserDao에서는 인터페이스만을 사용하여 해당 클래스를 구현해야 한다.


런타임 중에 오브젝트 관계를 만들어주기 위해 

    private ConnectionHelper connectionHelper;

    public UserDao(ConnectionHelper connectionHelper) {
        this.connectionHelper = connectionHelper;
    }


이렇게 생성자에서 ConnectionHelper를 구현한 객체를 받고, 해당 객체를 사용해 UserDao를 동작하도록 구현하여 UserDao와 SeungkyuConnection관의 의존관계를 제거한다.


사용할 때는

UserDao userDao = new UserDao(new SeungkyuConnection());

이렇게 연결정보를 담고있는 ConnectionHelper를 넘겨주어야 한다.


이러면 UserDao는 이제 연결과 데이터베이스의 정보에 신경쓰지 않고, ConnectionHelper를 사용해 데이터베이스를 조작할 수 있다.


개방 폐쇄 원칙

지금까지는 Dao를 사용해 다양한 방법으로 리펙토링을 해보고 장단점을 비교했다.

이것의 결과로 개방 폐쇄 원칙(OCP)에 대해 설명해보자.

현재 UserDao는 데이터베이스를 연결하는 방법으로는 확장이 가능하다.

동시에 UserDao는 핵심 로직들은 영향을 받지 않고 유지할 수 있다.

이런 것을 개방에는 열려있고, 변경에는 닫혀있는 개방 폐쇄 원칙이라고 한다.


높은 응집도와 낮은 결합도

응집도가 높다고 하는 것은 하나의 모듈과 클래스가 하나의 관심사만 집중하고 있다는 뜻이다.

현재 UserDao에서는 데이터베이스를 통해 사용자의 정보를 관리하는 것에 집중하고 있다.

여기에 데이터베이스를 연결하는 코드가 추가된다면, 사용자의 정보라는 관심사에 어긋나게 된다.

유지보수를 위해 하나의 클래스는 관심사를 가지는 기능들로 높은 응집도를 유지하도록 해야한다.


결합도는 하나의 오브젝트가 변경이 일어날 때, 관계를 맺고 있는 다른 오브젝트에게 변화를 요구하는 정도이다.

만약 인터페이스를 사용하지 않았다면, SeungkyuConnection을 변경할 때 UserDao도 계속 같이 변경해줘야 했을 것이다.

이것이 SeungkyuConnection과 UserDao간의 결합이 생기기 때문이었으며, 이를 인터페이스를 통한 의존으로 해결해주었다.


이렇게 응집도를 높이고, 결합도를 낮추는 방법으로 유지보수를 더 수월하게 할 수 있도록 해야한다.

728x90

이번 챕터에서는 구조와 관심사에 관해 이야기 하는 것 같다.


public class UserDao {

    public void add(User user) throws ClassNotFoundException, SQLException {
        Class.forName("com.mysql.cj.jdbc.Driver");

        var connection = DriverManager.getConnection(
                "jdbc:mysql://localhost:3306/tobi",
                "root",
                "seungkyu");

        PreparedStatement preparedStatement = connection.prepareStatement(
                "insert into users(id, name, password) values(?,?,?)"
        );

        preparedStatement.setString(1, user.getId());
        preparedStatement.setString(2, user.getName());
        preparedStatement.setString(3, user.getPassword());

        preparedStatement.executeUpdate();

        preparedStatement.close();
        connection.close();
    }

    public User get(String id) throws ClassNotFoundException, SQLException {
        Class.forName("com.mysql.cj.jdbc.Driver");

        var connection = DriverManager.getConnection(
                "jdbc:mysql://localhost:3306/tobi",
                "root",
                "seungkyu");

        PreparedStatement preparedStatement = connection.prepareStatement(
                "select * from users where id = ?"
        );

        preparedStatement.setString(1, id);

        var resultSet = preparedStatement.executeQuery();

        resultSet.next();

        var user = new User();
        user.setId(resultSet.getString("id"));
        user.setName(resultSet.getString("name"));
        user.setPassword(resultSet.getString("password"));

        resultSet.close();
        preparedStatement.close();
        connection.close();

        return user;
    }
}


이렇게 만든 코드에서 만약 데이터베이스의 정보를 바꾸려고 한다면, 모든 코드에서 하나하나 코드를 바꿔야 한다는 문제가 생긴다는 것이다.

그렇기 때문에 관심사에 따라 중복되는 코드를 추출해 별도로 분리해야 한다.

private Connection getConnection() throws ClassNotFoundException, SQLException {
        Class.forName("com.mysql.cj.jdbc.Driver");

        return DriverManager.getConnection(
                "jdbc:mysql://localhost:3306/tobi",
                "root",
                "seungkyu");
    }


이렇게 연결에 관한 부분을 분리했다.


만약 데이터베이스의 연결에 관한 정보가 변경된다면, 이 곳에서 한번에 연결에 대한 정보를 변경 할 수 있다.

이렇게 기존의 동작에는 영향을 주지 않으면서 내부 구조를 재구성하는 작업을 리펙토링이라고 한다.

방금 이러한 작업이 리펙토링의 일종이며, 유지보수를 위해 꼭 필요한 작업 중 하나이다.


조금 더 리펙토링 해보도록 하자.

만약, 현재 UserDao에서 add와 get의 코드를 공개하지 않고 데이터베이스의 연결을 수정하고 싶다면 어떻게 해야할까?


생성자를 통해 데이터베이스의 연결 정보를 받아올 수는 있지만, 일부의 메서드만 수정할 수 있도록 하기 위해서는 객체지향의 특징은 추상화를 이용하면 된다.


public abstract class UserDao {

    public void add(User user) throws ClassNotFoundException, SQLException {
        Connection connection = getConnection();

        PreparedStatement preparedStatement = connection.prepareStatement(
                "insert into users(id, name, password) values(?,?,?)"
        );

        preparedStatement.setString(1, user.getId());
        preparedStatement.setString(2, user.getName());
        preparedStatement.setString(3, user.getPassword());

        preparedStatement.executeUpdate();

        preparedStatement.close();
        connection.close();
    }

    public User get(String id) throws ClassNotFoundException, SQLException {

        Connection connection = getConnection();

        PreparedStatement preparedStatement = connection.prepareStatement(
                "select * from users where id = ?"
        );

        preparedStatement.setString(1, id);

        var resultSet = preparedStatement.executeQuery();

        resultSet.next();

        var user = new User();
        user.setId(resultSet.getString("id"));
        user.setName(resultSet.getString("name"));
        user.setPassword(resultSet.getString("password"));

        resultSet.close();
        preparedStatement.close();
        connection.close();

        return user;
    }

    public abstract Connection getConnection() throws ClassNotFoundException ,SQLException;
}


이렇게 UserDao를 추상 클래스로, getConnection()을 추상 메서드로 변경한 후


public class SeungkyuUserDao extends UserDao{

    public Connection getConnection() throws ClassNotFoundException, SQLException {
        Class.forName("com.mysql.cj.jdbc.Driver");

        return DriverManager.getConnection(
                "jdbc:mysql://localhost:3306/tobi",
                "root",
                "seungkyu");
    }
}


상속받는 객체에서 해당 추상 메서드를 구현하고


UserDao userDao = new SeungkyuUserDao();


SeungkyuUserDao를 부모 객체인 UserDao로 할당하여 그대로 사용한다.


이런 식으로 객체지향의 특징을 잘 활용하면 리펙토링을 적절하게 할 수 있다.


이런 방식으로 부모 객체에서 추상화해둔 메서드들을 자식 메서드에서 구현하여 사용하는 디자인 패턴을 템플릿 메서드 패턴이라고 한다.

728x90

스프링을 사용하면서, 스프링을 깊게 공부해보고 싶다는 욕심이 있었다.

백엔드 개발자로 꾸준하게 성장하고 싶었기에, 이번 기회에 토비의 스프링을 사용하여 스프링의 처음부터 다시 보려고 한다.


책은 가격이 좀 나갔지만, 도안탄히엔님께서 주셨다.(감사합니다!!)


우선 DAO를 만들어보자.


DAO는 데이터베이스와 상호작용하며, 데이터를 조회하거나 조작하는 기능을 전담하는 클래스이다.


우선 사용자 정보를 저장하는 클래스이다.

public class User {

    private String id;
    private String name;
    private String password;

    public String getId() {
        return id;
    }

    public void setId(String id) {
        this.id = id;
    }

    public String getName() {
        return name;
    }

    public void setName(String name) {
        this.name = name;
    }

    public String getPassword() {
        return password;
    }

    public void setPassword(String password) {
        this.password = password;
    }
}


이렇게 필드가 private으로 직접 변경이 불가능하고, getter와 setter로 조작해야 하며 기본 생성자가 존재하는 오브젝트를 자바빈이라고 한다.


이렇게 만든 사용자의 정보 객체로 데이터베이스를 조작할 수 있도록 DAO 클래스를 만들어보자.


package seungkyu;

import java.sql.DriverManager;
import java.sql.PreparedStatement;
import java.sql.SQLException;

public class UserDao {

    public void add(User user) throws ClassNotFoundException, SQLException {
        Class.forName("com.mysql.cj.jdbc.Driver");

        var connection = DriverManager.getConnection(
                "jdbc:mysql://localhost:3306/tobi",
                "root",
                "seungkyu");

        PreparedStatement preparedStatement = connection.prepareStatement(
                "insert into users(id, name, password) values(?,?,?)"
        );

        preparedStatement.setString(1, user.getId());
        preparedStatement.setString(2, user.getName());
        preparedStatement.setString(3, user.getPassword());

        preparedStatement.executeUpdate();

        preparedStatement.close();
        connection.close();
    }

    public User get(String id) throws ClassNotFoundException, SQLException {
        Class.forName("com.mysql.cj.jdbc.Driver");

        var connection = DriverManager.getConnection(
                "jdbc:mysql://localhost:3306/tobi",
                "root",
                "seungkyu");

        PreparedStatement preparedStatement = connection.prepareStatement(
                "select * from users where id = ?"
        );

        preparedStatement.setString(1, id);

        var resultSet = preparedStatement.executeQuery();

        resultSet.next();

        var user = new User();
        user.setId(resultSet.getString("id"));
        user.setName(resultSet.getString("name"));
        user.setPassword(resultSet.getString("password"));

        resultSet.close();
        preparedStatement.close();
        connection.close();

        return user;
    }
}


이렇게 일단 JDBC 커넥션을 항상 열고 닫는 방법으로 DAO를 만들었다.


간단하게 메인 메서드에서 테스트를 해보았는데


이렇게 정상적으로 저장되는 것을 볼 수 있다.


정상적으로 작동은 하지만, 개선할 부분이 많은 코드라고 한다.

다음 챕터에서 수정해보며 알아보도록 하자.

728x90

https://kotlinlang.org/docs/control-flow.html


Conditions and loops | Kotlin


kotlinlang.org


Conditions and loops

If expression

코틀린에서는 if는 표현식이다.(값을 반환할 수 있다.)

그렇기에 코틀린에서는 삼항 연산자(condition ? then : else)가 없다.

If가 이 역할을 하기 때문이다.

fun main(){
    val a = 1
    val b = 2
    
    var max = 0
    
    max = if (a > b) a else b
    
    val maxOr100 = if (a > 100) a else if(b > 100) b else 100
}


When expression

When은 다양한 곳을 분기할 수 있는 조건식을 정의한다.

C언어에서의 switch라고 생각하면 된다.

fun main(){
    val x = 0
    
    when(x){
        0 -> println("x is 0")
        1 -> println("x is 1")
        2 -> println("x is 2")
        else -> println("x is neither 1 nor 2")
    }
}

When은 만족하는 condition이 있을 때까지 순서대로 매칭해 간다.

else는 아무것에도 해당하지 않을 때를 정의한다.


만약 When이 표현식으로 사용된다면 Else branch는 필수적이다.

그래도 컴파일러가 모든 경우의 수를 커버하고 있다고 알 수 있으면, Else는 생략 가능하다.

enum class Bit{
    ZERO, ONE
}

fun main(){
    val a = Bit.ZERO
    
    when(a){
        Bit.ZERO -> println("Bit.ONE")
        Bit.ONE -> println("Bit.TWO")
    }
}


값이 범위 안에 속하는지도 확인할 수 있다.

fun main(){
    val a = 5
    
    when(a){
        in 1..10 -> println(a)
        else -> println("else")
    }
}


여기서도 is로 타입을 검사하면 스마트캐스팅이 되어 추가적으로 검사할 필요가 없다.

fun hasPrefix(x: Any) = when(x) {
    is String -> x.startsWith("prefix")
    else -> false
}


For loops

for는 iterator를 순환합니다.

for (item in collection) print(item)


숫자를 반복하고 싶다면, range expression을 사용한다.

for (i in 1..3) {
    println(i)
}
for (i in 6 downTo 0 step 2) {
    println(i)
}


While loops

while과 do-while은 조건이 만족할 때까지 계속 ㅁ반복한다.

while: 조건을 체크하고 그것이 참이면 실행한다. 이것을 반복한다.

do-while: 일단 블록을 실행하고 조건을 체크한다.

while (x > 0) {
    x--
}

do {
    val y = myFunc()
} while (y != null) // y is visible here!


Returns and jumps

Returns and jumps

fun main(){
    val a:Int? = null

    val b = (a ?: return).toString()

    println(b)
}

return은 본인이 속한 가장 가까운 함수를 리턴한다

break은 본인이 속한 가장 가까운 loop를 정지한다.

continue는 루프의 다음 스텝으로 넘어간다.


Break and continue labels

fun main(){
    loop@ for (i in 1..10) {
        for (j in 1..10) {
            if(i != j) break@loop
            println("$i $j")
        }
    }
}

코틀린에서는 표현식에 label을 붙일 수 있다.

라벨은 @로 끝나며, abc@와 같은 형태가 된다.

break와 continue를 사용하여 해당 부분으로 jump 할 수 있다.


Return to labels

fun main(){
    listOf(1, 2, 3, 4, 5).forEach lit@{
        if (it == 3) return@main
        print(it)
    }
    print(" done with explicit label")
}

이렇게 return에서도 라벨을 사용하여 리턴할 수 있다.


Exceptions

예외 처리는 크게 2가지로 나뉜다.

Throwing exceptions: 문제가 발생 했을 때 알린다.

Catching exceptions: 문제가 발생 했을 때 어떤 식으로 처리할 것인지 다룬다.


이런 예외 처리는 코드를 더 예측가능하게 도와줄 수 있다.


Throw exceptions

throw IllegalArgumentException()

throw 키워드를 사용하여 Exception을 발생시킨다.

Exception이 발생하는 것은 런타임 중에 예상하지 못한 문제가 발생했다는 것을 알리는 것이다.


Throw Exceptions with precondition functions

코틀린은 조건을 체크하고 에러를 발생시켜주는 precondition function이 존재한다.

Precondition function Use case Exception thrown
require() 유저의 input이 valid 한지 확인 IllegalArgumentException
check() Object 혹은 변수의 상태가 valid 한지 확인 IllegalStateException
error() 잘못된 상태나 조건을 알린다. IllegalStateException


  • require() function
fun getIndices(count: Int): List<Int> {
    require(count >= 0) { "Count must be non-negative. You set count to $count." }
    return List(count) { it + 1 }
}
  • check() function
fun main() {
    var someState: String? = null

    fun getStateValue(): String {

        val state = checkNotNull(someState) { "State must be set beforehand!" }
        check(state.isNotEmpty()) { "State must be non-empty!" }
        return state
    }
    // If you uncomment the line below then the program fails with IllegalStateException
    // getStateValue()

    someState = ""

    // If you uncomment the line below then the program fails with IllegalStateException
    // getStateValue() 
    someState = "non-empty-state"

    // This prints "non-empty-state"
    println(getStateValue())
}

check에서 condition이 false라면 exception을 throw한다.

  • error() function
class User(val name: String, val role: String)

fun processUserRole(user: User) {
    when (user.role) {
        "admin" -> println("${user.name} is an admin.")
        "editor" -> println("${user.name} is an editor.")
        "viewer" -> println("${user.name} is a viewer.")
        else -> error("Undefined role: ${user.role}")
    }
}

fun main() {
    // This works as expected
    val user1 = User("Alice", "admin")
    processUserRole(user1)
    // Alice is an admin.

    // This throws an IllegalStateException
    val user2 = User("Bob", "guest")
    processUserRole(user2)
}

그냥 exception을 발생시켜버린다.


Handle exceptions using try-catch blocks

exception이 발생하면, 그래도 프로그램을 이어가기 위해 exception을 handling 해야 한다.

그럴 때 try-catch를 사용한다.

try {
    // exception을 발생시키는 코드
} catch (e: YourException) {
    // exception을 handling 하는 코드
}


또한 if와 마찬가지로 try-catch는 expression으로 사용 할 수 있다.

fun main() {
    val num: Int = try {
    	10/0
    } catch (e: ArithmeticException) {
        -1
    }
    println("Result: $num")
}


또, 하나의 try에 대하여 여러개의 Catch를 작성 할 수 있다.


The finally block

finally block은 무조건 실행되는 부븐이다.

이 finally block은 try에서 exception이 발생하더라도 무조건 실행된다.

그렇기에 finally는 네트워크나 파일과 같은 리소스를 Close 하는 것에서 중요하다.

try {
    // Exception이 발생 할 수 있는 코드
}
catch (e: YourException) {
    // Exception을 handling 하는 코드
}
finally {
    // 무조건 실행되어야 하는 코드
}

이 finally 블록은 catch 블록을 작성하지 않아도 작성할 수 있다.


'Spring > 코틀린' 카테고리의 다른 글

Idioms  (1) 2024.10.01
Basic syntax  (0) 2024.09.28
코틀린 시작  (0) 2024.09.28
728x90

https://kotlinlang.org/docs/basic-types.html


Basic types | Kotlin


kotlinlang.org


  • Basic types

코틀린에서도 모든 것은 객체이다.

호출하는 함수와 그 어떤 속성도 모두 객체이다.


Integer types

코틀린에서는 4가지의 숫자 타입을 제공한다.

Type Size Min Value Max Value
Byte 8 -128 127
Short 16 -32768 32767
Int 32 -2,147,483,648 (-231) 2,147,483,647 (231 - 1)
Long 64 -9,223,372,036,854,775,808 (-263) 9,223,372,036,854,775,807 (263 - 1)

만약 처음에 타입을 지정해주지 않는다면, 컴파일러는 자동으로 Int로 지정해주게 된다.

만약 Int의 범위 밖이라면, 타입은 Long으로 지정되게 된다.

처음에 Long 타입으로 지정해주고 싶다면, 숫자 뒤에 L을 붙여야 한다.


val a = 1 // Int
val b = 3030303030303030303030 //Long
val c = 123L // Long


Floating-point types

코틀린은 실수에 대해, Float와 Double을 제공한다.
Float은 Single precision, Double은 Double precision


Type Size Significant bits Exponent bits Decimal digits
Float 32 24 8 6-7
Double 64 53 11 15-16


실수를 선언하면 자동으로 Double로 지정이되며, Float로 지정하고 싶다면 뒤에 f를 붙여주어야 한다.

val e = 2.7182818284 // Double
val eFloat = 2.7182818284f // Float, actual value is 2.7182817


Literal constants for numbers

수는 다음과 같이 표현할 수 있다.

- Decimals: 123

- Longs: 123L

- Hexadecimals: 0x0F

- Binaries: 0b00010101

- Doubles by default: 123.5, 123.5e10


Numbers representation on the JVM

자바에서는 수를 Int, double로 저장하게 된다.

하지만 이런 타입에는 null이 지정되지 못한다.

그러면 코틀린에서의 Int?는 어떻게 되는 것일까?

그런 경우에는 자바에서의 boxed type인 Integer, Double을 사용했었다.


nullable 타입은 같은 수라도 다른 object를 참조한다.

fun main() {
    val a: Int = 100
    val boxedA: Int? = a
    val anotherBoxedA: Int? = a

    val b: Int = 10000
    val boxedB: Int? = b
    val anotherBoxedB: Int? = b

    println(boxedA === anotherBoxedA) // true
    println(boxedB === anotherBoxedB) // false
}


이런 일이 생기는 이유는 ~128~127의 범위는 JVM이 메모리 최적화를 위해 같은 곳을 참조하도록 하기 때문이다.

하지만 b의 경우에는 그런 일이 생기지 않는다.


Explicit number conversions

다른 표현 방식 때문에, smaller type은 bigger의 subtype이 아니다.

따라서 아래와 같은 경우 문제가 발생한다.

// Hypothetical code, does not actually compile:
val a: Int? = 1 // A boxed Int (java.lang.Integer)
val b: Long? = a // Implicit conversion yields a boxed Long (java.lang.Long)
print(b == a) // Surprise! This prints "false" as Long's equals() checks whether the other is Long as well


그렇기 때문에 Smaller type은 bigger 타입으로 자동 캐스팅이 되지 않는다.

따라서 명시적인 변환을 거쳐야 한다.

val b: Byte = 1 // OK, literals are checked statically
// val i: Int = b // ERROR
val i1: Int = b.toInt()


Operations on numbers

코틀린은 +, -, *, /, %와 같은 기본 연산자를 지원한다.


Division of integers

Int 끼리의 나누기는 항상 Int를 반환한다.

소숫점 부분은 무시된다.

val x = 5 / 2
//println(x == 2.5) // ERROR: Operator '==' cannot be applied to 'Int' and 'Double'
println(x == 2)


소숫점까지 구하기 위해서는 하나를 명시적으로 float 타입으로 변환해주어야 한다.

val x = 5 / 2.toDouble()
println(x == 2.5)


  • Unsigned integer types

Unsigned integer types

Integer type에 더해, 코틀린은 unsigned 값들을 제공한다.

Type Size Min value Max value
UByte 8 0 255
UShort 16 0 65,535
UInt 32 0 4,294,967,295
ULong 64 0 18,446,744,073,709,551,615


Unsigned arrays and ranges

다른 원시 타입들과 같이, 해당 데이터 타입들도 배열을 제공한다.

UByteArray: and array of unsigned bytes

UShortArray: an array of unsigned shorts

UIntArray: an array of unsigned ints

ULongArray: an array of unsigned longs

Unsigned integers literals

unsigned 타입을 더 명확하게 사용하기 위해, 코틀린은 해당 suffix를 제공한다.(Float, Long과 같이)

뒤에 u, U를 붙이면 해당 unsigned 타입으로 컴파일러가 인지하게 된다.

val b: UByte = 1u  // UByte, expected type provided
val s: UShort = 1u // UShort, expected type provided
val l: ULong = 1u  // ULong, expected type provided

val a1 = 42u // UInt: no expected type provided, constant fits in UInt
val a2 = 0xFFFF_FFFF_FFFFu // ULong: no expected type provided, constant doesn't fit in UInt


  • Booleans

Boolean 타입은 true, false 이렇게 두가지만 가지는 boolean object이다.


다른 언어와 마찬가지로

|| : disjunction(Logical OR)

&&:: conjunction (Logical AND)

!: negation(Logical NOT)


val myTrue: Boolean = true
val myFalse: Boolean = false
val boolNull: Boolean? = null

println(myTrue || myFalse)
// true
println(myTrue && myFalse)
// false
println(!myTrue)
// false
println(boolNull)
// null


||, &&는 Lazy하게 동작하기도 한다.

무슨말이냐면, first operand가 true라면 OR는 second operand를 확인하지 않는다.

마찬가지로, first operand가 false라면 and는 second operand를 확인하지 않는다.


  • Charaters

Character는 작은따옴표 안에 있는 문자 하나를 말한다. ex) '1'

backslash로 시작하는 Special Character가 존재한다.

아래와 같은 역할을 한다.

\t: tab

\b: backspace

\n: new line

\r: carriage return

\': single quotation mark

\": double quotation mark

\\: backslash

\$: dollar sign


  • Strings

String은 문자열이며, JVM에서 UTF-16을 사용하기 때문에 문자 하나당 2bytes를 사용한다.

String은 큰따옴표 안에 존재한다.


String은 immutable로 후에 바꿀 수 없기 때문에 새로운 문자열 객체를 만들어서 대입해야 한다.

String은 +를 사용하여 문자열들을 이을 수 있다.


val s = "abc" + 1
println(s + "def")
// abc1def


  • Strings

Array는 같은 타입이거나 그것들의 sub 타입 객체들을 고정된 숫자로 가지고 있는 자료구조이다.


Create arrays

코틀린에서 배열을 생성하기 위해서는 다음과 같은 함수들을 사용한다.

arrayOf(), arrayOfNulls(), emptyArray()


arrayOf()는 괄호 안에 value들을 넣어서 생성한다.

// Creates an array with values [1, 2, 3]
val simpleArray = arrayOf(1, 2, 3)
println(simpleArray.joinToString())
// 1, 2, 3


arrayOfNulls를 사용하면 해당 사이즈를 가지는 null 배열을 생성한다.

// Creates an array with values [null, null, null]
val nullArray: Array<Int?> = arrayOfNulls(3)
println(nullArray.joinToString())
// null, null, null


emptyArray는 빈 배열을 생성한다.


Nested arrays

Array도 객체이기 때문에 다른 Array 안에 들어 갈 수 있다.

// Creates a two-dimensional array
val twoDArray = Array(2) { Array<Int>(2) { 0 } }
println(twoDArray.contentDeepToString())
// [[0, 0], [0, 0]]


Access and modify elements

Array는 mutable하기 때문에 수정이 가능하다.

접근 할 때도 []를 사용하여 접근 할 수 있다.

simpleArray[0] = 10
twoDArray[0][0] = 2


Work with arrays

Pass variable number of arguments to a function

코틀린에서는 vararg를 통해, 가변 개수의 parameter를 받을 수 있다.

이런 방법은 사전에 정해지지 않은 수의 파라미터를 받는 경우에 굉장히 유리하다.


이런 vararg를 사용하는 함수에 array를 통해 가변 개수의 parameter를 넘기려면 *을 사용한다.

배열에 있는 각각의 객체를 spread해서 넘겨주는 연산자이다.


fun main() {
    val lettersArray = arrayOf("c", "d")
    printAllStrings("a", "b", *lettersArray)
    // abcd
}

fun printAllStrings(vararg strings: String) {
    for (string in strings) {
        print(string)
    }
}


Compare arrays

두개의 Array가 같은 순서로 같은 객체들을 가지고 있는지 확인하기 위해서는 .contentEquals()를 사용하면 된다.

val simpleArray = arrayOf(1, 2, 3)
val anotherArray = arrayOf(1, 2, 3)

// Compares contents of arrays
println(simpleArray.contentEquals(anotherArray))
// true

// Using infix notation, compares contents of arrays after an element 
// is changed
simpleArray[0] = 10
println(simpleArray contentEquals anotherArray)
// false


Transform arrays

코틀린은 array를 transform 하는 것에 많은 함수들을 제공한다.


  • Sum

.sum을 사용하여 해당 Array의 element를 모두 더한 값을 리턴한다.

val sumArray = arrayOf(1, 2, 3)

// Sums array elements
println(sumArray.sum())
// 6


  • Shuffle

Array에서 해당 elements들을 랜덤하게 섞기 위해서 사용하는 함수이다.

val simpleArray = arrayOf(1, 2, 3)

// Shuffles elements [3, 2, 1]
simpleArray.shuffle()
println(simpleArray.joinToString())

// Shuffles elements again [2, 3, 1]
simpleArray.shuffle()
println(simpleArray.joinToString())


  • Convert arrays to collections

Array를 List와 Set으로 변환 할 수 있다.

.toList()와 .toSet()을 사용하면 된다.

val simpleArray = arrayOf("a", "b", "c", "c")

// Converts to a Set
println(simpleArray.toSet())
// [a, b, c]

// Converts to a List
println(simpleArray.toList())
// [a, b, c, c]


  • Type checks and casts

is and !is operators

인스턴스가 해당 타입의 객체인지  확인하기 위해서는 is, !is operator를 사용한다.

if (obj is String) {
    print(obj.length)
}

if (obj !is String) { // Same as !(obj is String)
    print("Not a String")
} else {
    print(obj.length)
}


Smart casts

컴파일러는 is, !is로 확인 한 경우에는 안전하게 해당 타입으로 캐스팅을 해준다.

그렇기 때문에 개발자가 직접 타입을 as를 사용하여 변환 할 필요가 없다.

fun demo(x: Any) {
    if (x is String) {
        print(x.length) // x is automatically cast to String
    }
}


if (x !is String) return

print(x.length) // x is automatically cast to String


"Unsafe" cast operator

명시적으로 타입을 캐스팅하고 싶다면 as를 사용한다.

val x: String = y as String

만약 캐스팅이 불가능하다면, Exception이 발생한다.


"Safe" (nullable) cast operator

이런 exception을 피하기 위해서는 as? 연산자를 사용한다.

만약 해당 캐스팅이 실패하면 null이 return 되게 된다.


val x: String? = y as? String


728x90

https://kotlinlang.org/docs/idioms.html


Idioms | Kotlin


kotlinlang.org


Create DTOs (POJOs/POCOs)

코틀린에서는 Data만 가지는 클래스를 Data class라고 따로 정의할 수 있다.

data class User(val name: String, val email: String)


여기에서 POJOs, POCOs의 개념이 나오는데

POJO(Plain Old Java Object):  자바 모델이나 기능, 프레임워크 등을 따르지 않은 자바 오브젝트를 지칭하는 말이다.

POCO(Plain Old CLR Object)는 자바가 아닌 닷넨 오브젝트들을 말한다.

Default values for function parameters

fun foo(a: Int = 0, b: String = "") { ... }


함수를 선언 할 때, 함수에 기본 값을 줄 수 있다.

foo(1, "123) 이렇게 호출 할 수도 있지만, foo(1) 이렇게 호출 할 수도 있는 것이다.

이런 경우에는 미리 선언해둔 기본값이 들어가게 된다.


Filter a list

fun main(){
    val list = listOf(1, 2, 3, 4, 5)

    val filteredList1 = list.filter{
        x -> x > 3
    }

    println(filteredList1)

    val filteredList2 = list.filter{it > 3}

    println(filteredList2)
}


리스트에서 조건 filter를 통해, 원하는 값들을 추출 할 수 있다.

이 때 람다 뿐 만 아니라, it을 사용해서도 filter 할 수 있다.


Check the presence of an element in a collection

fun main(){

    val emailsList = listOf("trust1204@gmail.com", "trust1204@naver.com")

    if ("trust1204@gmail.com" in emailsList) {
        println("HI trust1204@gmail.com")
    }
}

컬렉션에서 in을 사용하여 해당 값이 컬렉션에 존재하는지 확인 할 수 있다.

String interpolation

fun main(){
    
    val name = "seungkyu"
    
    println("hi $name")
}

$을 통해 문자열 안에 문자열을 끼워 넣을 수 있다.


Instance checks

open class A

class B: A()

fun main(){

    val a = A()

    when(a){
        is B -> println("It is B")
        is A -> println("It is A")
        else -> println("I dont know")
    }

}


is [Class name]을 통해 해당 클래스의 인스턴스인지 검사 할 수 있다.


Read-only list

val list = listOf(1, 2, 3)

이렇게 읽을 수만 있는 리스트를 생성할 수 있다.

이 데이터는 add, put 과 같은 함수로 추가 혹은 수정이 불가능하다. 

Read-only map

val map = mapOf("a" to 1, "b" to 2, "c" to 3)

위와 마찬가지로 읽을 수만 있는 map을 생성할 수 있다.

to로 key와 value를 mapping 한다.


Access a map entry

fun main(){
    val map = mapOf("a" to 1, "b" to 2, "c" to 3)

    println(map["a"])

}

이런 식으로 map에 접근하여 데이터를 읽을 수 있다.


Traverse a map or a list of pairs

fun main(){
    val map = mapOf("a" to 1, "b" to 2, "c" to 3)

    for((k,v) in map){
        println("$k = $v")
    }

}

map의 key와 value를 반복문으로 한 번에 읽어올 수 있다.


Iterate over a range

for (i in 1..10) { ... }  //includes 10
for (i in 1..<10) { ... } //not include 10
for (x in 2..10 step 2) { ... }
for (x in 10 downTo 1) { ... }
(1..10).forEach { ... }

..과 <을 이용해서 iterate의 범위를 정할 수 있다.

Lazy property

fun main(){
    val p: String by lazy { 
        if(0 > 1)
            "Hello World"
        else
            "Hi world"
    }
}

val 타입에서 by lazy로 실행된 이후에 값을 할당 할 수 있다. 

Create a singleton

Object Seungkyu{
	val name = "seungkyu"
}

Object 키워드를 사용하여 싱글톤 객체를 만들 수 있다.

Use inline value classes for type-safe values

@JvmInline
value class UserId(private val id: String)

value 클래스로 만들면, 클래스가 데이터를 직접 참조하기 때문에 객체 생성에 대한 cost를 아낄 수 있다고 한다.


Instantiate an abstract class

abstract class InstantiateAnAbstractClass {
    abstract fun doSomething()
    abstract fun sleep()
}

fun main(){
    val myObject = object : InstantiateAnAbstractClass() {
        override fun doSomething() {
            println("It is doSomething")
        }

        override fun sleep() {
            println("It is sleeping")
        }
    }

    myObject.doSomething()
}

이렇게 추상 클래스를 바로 만들 수 있다.

If-not-null shorthand

fun main(){
    val a: String? = "seungkyu!!"

    println(a?.length)
}

null 가능 변수에 ?. 을 붙여서 만약 null이 아니면 가져올 값을 지정할 수 있다.


If-not-null-else shorthand

fun main(){
    val a: String? = null

    println(a?.length ?: "hello!!")
}

null이 아닐 때 뿐만 아니라, null 일 때 가져올 값을 지정할 수 있다.

만약 ?: 앞의 값이 null이라면 뒤에 있는 값으로 가져오게 된다.


Execute a statement if null

fun main(){
    val values= mapOf<String, Int>()

    println(values["a"] ?: throw NullPointerException())
}


?: 를 통해 null 일 때 Exception을 throw 할 수 있다.


Get first item of a possibly empty collection

fun main(){
    val emails = listOf<String>()

    val mainEmail = emails.firstOrNull()

    println(mainEmail)
}

이런 식으로 first item을 가져오거나 null을 가져 올 수 있다.


Execute if not null

fun main(){
    val value1 = "String"
    val value2:String? = null

    value1?.let {
        println(it)
    }

    value2?.let {
        println(it)
    }
}

?.let을 이용하여 해당 데이터가 null이 아닐 때 실행할 값을 실행할 수 있다.


Return on when statement

fun main(){
    println(myFunc(3))
}

fun myFunc(value: Int): String{
    return when(value){
        1 -> "one"
        2 -> "two"
        3 -> "three"
        else -> "no"
    }
}


이렇게 함수 Return 부분에서 when을 사용하여 값을 return 할 수 있다.

이 때, 어떠한 경우에도 값이 return 될 수 있도록 꼭 when을 지정해주어야 한다.


try-catch expression

fun main(){
    val result = try{
        throw NullPointerException()
    }catch (e: NullPointerException){
        1
    }

    println(result)
}

값을 할당 할 때에도, try-catch Expression을 사용하여 값을 대입할 수 있다.


Builder-style usage of methods that return Unit

fun main(){
    arrayOfMinusOnes(10).forEach { print("$it ") }
}

fun arrayOfMinusOnes(size: Int): IntArray {
    return IntArray(size).apply { fill(-1) }
}

return 할 때에도, 자바의 Builder 스타일을 사용해 값을 반환 할 수 있다.


Single-expression functions

fun theResult1() = 1111

fun theResult2(value: Int) = when(value){
    1 -> "one"
    2 -> "two"
    else -> "other"
}

fun main(){
    println(theResult1())
    println(theResult2(1))
}

함수를 이렇게 하나의 표현식으로도 작성할 수 있다.


Call multiple methods on an object instance (with)

class Bird{
    fun fly(){
        println("Bird fly")
    }

    fun go(x: Int, y: Int){
        println("Bird go $x $y")
    }
}

fun main(){
    val myBird = Bird()

    with(myBird){
        fly()

        for(i in 1..3){
            go(i,i)
        }
    }
}

with를 사용해서 하나의 인스턴스에서 다양한 함수들을 호출 할 수 있다.


Generic function that requires the generic type information

inline fun <reified T: Any> hello(value: String): T =  value as T

fun main() {
    
}

타입 정보를 같이 받는 Generic Function을 구현 할 수도 있다.


Mark code as incomplete (TODO)

fun main(){
    println("Hello Kotlin")
    TODO("아직이요")
}

TODO를 이용하여 아직 작성하지 않은 코드라고 알릴 수 있다.


자동으로 코드를 삽입해주어서, 실행이 가능하다.

물론 TODO()의 코드에 도착하면 그때는 에러가 발생한다.

'Spring > 코틀린' 카테고리의 다른 글

Concepts:Control flow  (1) 2024.10.05
Basic syntax  (0) 2024.09.28
코틀린 시작  (0) 2024.09.28
728x90

https://kotlinlang.org/docs/basic-syntax.html


Basic syntax | Kotlin


kotlinlang.org


Package definition and imports

패키지는 소스파일 가장 위에 명시한다.

package seungkyu

class PackageDefinitionAndImports {

}


코틀린에서는 디렉토리와 패키지를 똑같이 맞출 필요는 없다고 한다.


Program entry point

코틀린 애플리케이션이 시작하는 부분은 main 함수 부분이다.

package seungkyu

fun main(args: Array<String>) {
   println("Hello, world!")

    println(args[0])
}


만약 애플리케이션 실행에서 매개변수를 받고 싶으면, 메인 함수에 저렇게 문자열 배열로 받을 수 있다.


print 함수는 매개변수를 standard output에 출력한다.

package seungkyu

fun main(){
    print("seungkyu")
    
    println("seungkyu")
}

println은 print에서 한 line을 차지하여 출력하는 함수이다.

다음 출력은 해당 출력의 다음줄부터 시작된다.

Read from the standard input

readln은 standard input으로부터 읽어오는 함수이다.

이 함수는 한 줄 전체를 읽어온다.

package seungkyu

fun main(){
    print("Enter your name: ")

    val name = readln()

    print("Your name: ")
    println(name)

    println("is contain new line? : ${name.contains("\n")}")
}


엔터키는 제외하고 읽어오는 것을 볼 수 있다.

Functions

아래는 2개의 Int를 매개변수로 받고 Int를 반환하는 함수이다.

fun sum1(a: Int, b: Int): Int {
    return a + b
}


아래와 같이 명시적이라면 return과 괄호를 생략 할 수 있다.

fun sum2(a: Int, b: Int) = a + b


만약 return이 아무것도 반환하지 않는다면 Unit으로 return type을 준다.

fun printSum(a: Int, b: Int): Unit {
    println("sum of $a and $b is ${a + b}")
}


이 때 Unit은 생략이 가능하다.

fun printSum(a: Int, b: Int) {
    println("sum of $a and $b is ${a + b}")
}


Variables

코틀린은 val, var 키워드로 변수 선언이 가능하며, 그 뒤에 변수의 이름을 적어준다.


val은 할당이 한 번만 일어나는 변수를 선언 할 때 사용하며, 후에 값이 변하지 않는다.

선언 이후에는 read-only이다.

val x: Int = 5


그에 비해 var은 선언 이후에도 값을 변경 할 수 있다.

fun main(){
    var x: Int = 5
    x += 1
}


위에서는 변수의 type을 :로 같이 명시해 준 것을 볼 수 있는데, 사실 코틀린은 변수의 타입을 추정이 가능하기 때문에 변수 타입은 생략을 해주어도 된다.


var x = 5


아래와 같이 변수의 타입까지만 선언해두고 값은 나중에 할당하는 것도 가능하다.

fun main(){
    val x = 5
    
    val c: Int
    c = 3
}


자바와는 다르게, 변수를 클래스 밖인 top level에 선언도 가능하다.

val value = 0

fun main(){

    println(value)
}


Creating classes and instances

늘 그렇듯, 클래스를 정의하기 위해서는 class 키워드를 사용한다.

class Shape


클래스의 속성들은 선언이나 body에 작성할 수 있다.

class Rectangle(val height: Double, val length: Double){
    val perimeter = (height + length) * 2
}


이 때, 클래스 선언부에 작성된 매개변수를 바탕으로 기본 생성자가 만들어진다.

class Rectangle(val height: Double, val length: Double){
    val perimeter = (height + length) * 2
}

fun main(){
    val rectangle = Rectangle(10.0, 20.0)
    println("The Perimeter is ${rectangle.perimeter}")
}


클래스 간의 상속은 : 을 사용하면 된다.

클래스는 기본적으로 상속이 불가능한 final 상태이지만, 앞에 open 키워드를 붙여주면 상속 가능한 클래스가 된다.


open class Shape

class Rectangle(val height: Double, val length: Double): Shape() {
    val perimeter = (height + length) * 2
}

Comments

주석은 //와 /* */를 사용해서 작성 할 수 있다.

//주석입니다.

/* 이것은
주석 블럭입니다 */


String templates

기본적으로 String은 ""이런 형태로 있을 것이다.

자바에서는 문자열들을 붙일 때 +를 사용했지만 코틀린에서는 $을 사용하여 문자열 안에 넣을 수 있다.

val mystring = "${1+2}, but now is $a"


Conditional expressions

조건식도 If를 사용한다.

fun max_result(a: Int, b: Int): Int{
	if (a > b){
    	return a
    }
    else{
    	return b
    }
}


코틀린에서는 3항 연산자가 없으며, 대신 if 또한 표현식으로 사용된다.

fun max_result(a: Int, b: Int) = if (a > b) a else b


for loop

다른 언어와 마찬가지로 for를 사용해서 반복문을 작성한다.


fun main(){
    val items = listOf("apple", "banana", "kiwi")
    for (item in items) {
        println(item)
    }
}


배열에서 in으로 각각의 item을 가져올 수 있다.

while loop

이것도 마찬가지로 while의 괄호 안에 있는 조건이 true일 동안 반복하게 된다.

fun main(){
    val items = listOf("apple", "banana", "kiwi")
    var index = 0
    while (index < items.size) {
        println("item at $index is ${items[index]}")
        index++
    }
}


when expression

C언어에서의 switch이다.

C언어와는 다르게 다양한 타입으로 분기할 수 있다.


또한 이것도 표현식이기 때문에 when을 사용하여 변수에 값을 할당 할 수 있다.

이 때는 else로 모두 해당하지 않는 경우를 꼭 지정해주어야 한다.

fun main(args: Array<String>) {
    val obj = "hi"
    
    val result = when (obj) {
        "hi" -> "hello"
        "hello" -> "hi"
        else -> ""
    }
}


Ranges

in 연산자를 사용하여 숫자가 범위 내에 있는지 확인한다.

fun main(){
    val x = 10
    val y = 9

    if(x in 1..y+1){
        println("fits in range")
    }
}


반복문에서도 이렇게 사용할 수 있다.

for (x in 1..5){
	print(x)
}


downTo와 step을 사용하여 증가인지 감소인지와 간격을 지정해 줄  수 있다.

fun main(){
    for (x in 1..10 step 2) {
        print(x)
    }
    println()
    for (x in 9 downTo 0 step 3) {
        print(x)
    }
}


Collections

collection을 반복하는 방법

for (item in items){
	println(item)
}


map을 사용하여 해당 collection을 반복 할 수도 있다.

    val fruits = listOf("banana", "avocado", "apple", "kiwifruit")
    fruits
    	//a로 시작하는 단어 찾기
        .filter { it.startsWith("a") }
        //정렬
        .sortedBy { it }
        //대문자로 변환
        .map { it.uppercase() }
        //각각을 출력
        .forEach { println(it) }


Nullable values and null checks

코틀린에서는 null을 허용할 때 명시를 해주어야 한다.

타입의 마지막에 ?를 붙여주면 nullable 타입이다.

fun main(){
    val a: Int? = null
    val b: Int = 1
}


Type checks and automatic casts

is는 인스턴스가 해당 타입이 맞는지 확인하는 연산자이다.

그리고 is로 검사가 끝나면 해당 타입으로 자동 캐스팅해준다.

fun getStringLength(obj: Any): Int? {
    if (obj is String) {
        // `obj` is automatically cast to `String` in this branch
        return obj.length
    }

    // `obj` is still of type `Any` outside of the type-checked branch
    return null
}

fun main() {
    fun printLength(obj: Any) {
        println("Getting the length of '$obj'. Result: ${getStringLength(obj) ?: "Error: The object is not a string"} ")
    }
    printLength("Incomprehensibilities")
    printLength(1000)
    printLength(listOf(Any()))
}


'Spring > 코틀린' 카테고리의 다른 글

Concepts:Control flow  (1) 2024.10.05
Idioms  (1) 2024.10.01
코틀린 시작  (0) 2024.09.28
728x90

거의 1년간 코틀린으로 스프링부트를 사용하고 있었지만, 사실 나의 코틀린은 자바에서 단지 널 안정성만 추가된 언어였다.


물론 널 안정성 만으로도 자바에서 코틀린으로 넘어 올 가치는 있지만, 그래도 더 나은 개발자가 되기 위해서는 코루틴까지 자유롭게 사용할 수 있어야 한다는 생각이 들었다.


코틀린은 아직 한국어 자료가 많이 없기 때문에 이 참에 공식문서를 참고하여 코틀린을 깊게 공부해보려 한다.


https://kotlinlang.org/docs/home.html


Kotlin Docs | Kotlin


kotlinlang.org


'Spring > 코틀린' 카테고리의 다른 글

Concepts:Control flow  (1) 2024.10.05
Idioms  (1) 2024.10.01
Basic syntax  (0) 2024.09.28

+ Recent posts