728x90
그 다음은 HotPublisher이다.
소비자와 관계 없이 데이터를 한 번만 통지하는 것이 HotPublisher이다.
해당하는 데이터는 한 번만 통지하고, 소비자는 구독한 시점 이후에 통지된 데이터들만 전달 받을 수 있다.
바로 작성해보도록 하자.
Subscriber는 변함 없이 ColdPublisher에서 사용했던 코드를 그대로 사용한다.
- Publisher
Cold와는 지속적으로 데이터를 전달한다.
@Slf4j
public class SimpleHotPublisher implements Flow.Publisher<Integer>{

    private final ExecutorService publisherExecutor = Executors.newSingleThreadExecutor();
    private final Future<Void> task;
    private List<Integer> numbers = new ArrayList<>();
    private List<SimpleHotSubscription> subscriptions = new ArrayList<>();

    public SimpleHotPublisher(){
        numbers.add(1);
        task = publisherExecutor.submit(() -> {
            for(int i = 2; !Thread.interrupted(); i++){
                numbers.add(i);
                subscriptions.forEach(SimpleHotSubscription::wakeup);
                Thread.sleep(100);
            }
            return null;
        });
    }

    public void shutdown(){
        this.task.cancel(true);
        publisherExecutor.shutdown();
    }

    @Override
    public void subscribe(Flow.Subscriber<? super Integer> subscriber) {
        var subscription = new SimpleHotSubscription(subscriber);
        subscriber.onSubscribe(subscription);
        subscriptions.add(subscription);
    }

    private class SimpleHotSubscription implements Flow.Subscription{
        private int offset;
        private int requiredOffset;
        private final Flow.Subscriber<? super Integer> subscriber;
        private final ExecutorService subscriptionExecutorService = Executors.newSingleThreadExecutor();

        public SimpleHotSubscription(Flow.Subscriber<? super Integer> subscriber){
            int lastElementIndex = numbers.size() - 1;
            this.offset = lastElementIndex;
            this.requiredOffset = lastElementIndex;
            this.subscriber = subscriber;
        }

        @Override
        public void request(long n) {
            requiredOffset += n;

            onNextWhilePossible();
        }

        @Override
        public void cancel() {
            this.subscriber.onComplete();
            if(subscriptions.contains(this)){
                subscriptions.remove(this);
            }
            subscriptionExecutorService.shutdown();
        }

        public void wakeup(){
            onNextWhilePossible();
        }

        private void onNextWhilePossible(){
            subscriptionExecutorService.submit(() -> {
                while (offset < requiredOffset && offset < numbers.size()){
                    var item = numbers.get(offset);
                    subscriber.onNext(item);
                    offset++;
                }
            });
        }

    }
}
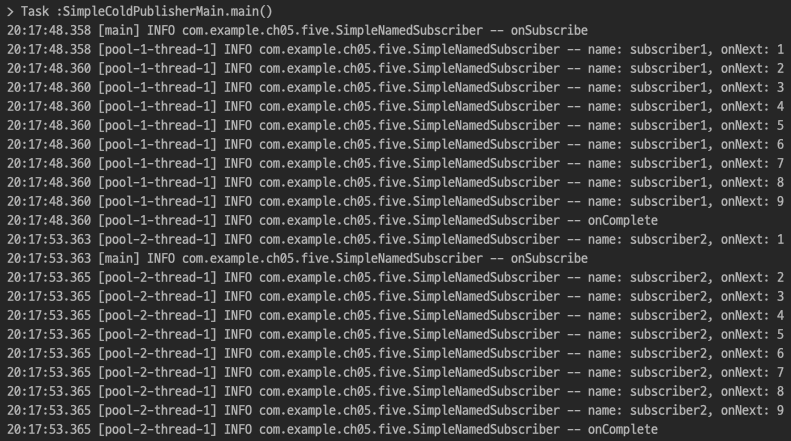
해당 코드를 실행해보자.

이렇게 시점에 따라 전달받는 데이터가 다른 것을 볼 수 있다.
'Spring > 리액티브 프로그래밍' 카테고리의 다른 글
| RxJava Reactor (2) | 2024.03.14 |
|---|---|
| Project reactor (0) | 2024.03.14 |
| ColdPublisher 구현 (0) | 2024.03.13 |
| Publisher, Subscriber에 대하여 (0) | 2024.03.12 |
| CompletableFuture를 사용한 성능튜닝 (0) | 2024.03.06 |