인프런 김영한 님의 강의를 참고했습니다.
스프링 MVC 1편 - 백엔드 웹 개발 핵심 기술 - 인프런 | 강의
웹 애플리케이션을 개발할 때 필요한 모든 웹 기술을 기초부터 이해하고, 완성할 수 있습니다. 스프링 MVC의 핵심 원리와 구조를 이해하고, 더 깊이있는 백엔드 개발자로 성장할 수 있습니다., -
www.inflearn.com
간단한 학생 관리 웹을 만들어보자.
학생의 정보에는 학번, 이름, 입학년도가 있다.
우선 학생의 클래스를 작성해보자.
전에도 사용했던 Lombok을 사용한다.
package hello.servlet.domain.student;

import lombok.Getter;
import lombok.Setter;
import lombok.ToString;

@Getter
@Setter
@ToString
public class Student {
    private Long studentId;
    private String name;
    private String year;
}
학생들의 정보를 저장할 저장소이다.
package hello.servlet.domain.student;

import java.util.ArrayList;
import java.util.HashMap;
import java.util.List;
import java.util.Map;

public class StudentRepository {
    private static Map<Long, Student> store = new HashMap<>();
    private static long STUDENT_ID_SEQUENCE = 0L;

    private static final StudentRepository instance = new StudentRepository();

    public static StudentRepository getInstance(){
        return instance;
    }

    private StudentRepository() {}

    public Student save(Student student){
        student.setStudentId(++STUDENT_ID_SEQUENCE);
        store.put(student.getStudentId(), student);
        return student;
    }

    public Student findById(Long id){
        return store.get(id);
    }

    public List<Student> findAll(){
        return new ArrayList<>(store.values());
    }

    public void clearStore(){
        store.clear();
    }
}
저장소는 싱글톤으로 생성했고, 저장과 검색 메서드들을 추가했다.
command + shift + T로 테스트 코드를 작성해보자.
package hello.servlet.domain.student;

import org.junit.jupiter.api.AfterEach;
import org.junit.jupiter.api.Assertions;
import org.junit.jupiter.api.Test;

import java.util.List;

import static org.junit.jupiter.api.Assertions.*;

class StudentRepositoryTest {

    StudentRepository studentRepository = StudentRepository.getInstance();

    @AfterEach
    void afterEach(){
        studentRepository.clearStore();
    }

    @Test
    void save(){
        //given
        Student student = new Student("hyunttai", 2022);

        //when
        Student savedStudent = studentRepository.save(student);

        //then
        Student findStudent = studentRepository.findById(savedStudent.getStudentId());
        Assertions.assertEquals(savedStudent, findStudent);
    }

    @Test
    void findAll(){
        //given
        Student student1 = new Student("hyeontae", 2022);
        Student student2 = new Student("hyeonttai", 2022);

        //when
        studentRepository.save(student1);
        studentRepository.save(student2);
        List<Student> result = studentRepository.findAll();

        //then
        Assertions.assertEquals(result.size(), 2);
        org.assertj.core.api.Assertions.assertThat(result).contains(student1, student2);
    }
}
@AfterEach로 각 테스트마다 저장소를 초기화 해주었다.
문제없이 작성했다면 테스트를 통과 했을 것이다.
이제 servlet으로 HTML form을 응답하도록 코드를 작성해보자.
package hello.servlet.web.servlet;

import jakarta.servlet.ServletException;
import jakarta.servlet.annotation.WebServlet;
import jakarta.servlet.http.HttpServlet;
import jakarta.servlet.http.HttpServletRequest;
import jakarta.servlet.http.HttpServletResponse;

import java.io.IOException;
import java.io.PrintWriter;

@WebServlet(name = "studentFormServlet", urlPatterns = "/servlet/students/new-form")
public class StudentFormServlet extends HttpServlet {

    @Override
    protected void service(HttpServletRequest req, HttpServletResponse resp) throws ServletException, IOException {
        resp.setContentType("text/html");
        resp.setCharacterEncoding("utf-8");

        PrintWriter writer = resp.getWriter();
        writer.write("<!DOCTYPE html>\n" +
                "<html>\n" +
                "<head>\n" +
                "    <meta charset=\"UTF-8\">\n" +
                "    <title>Title</title>\n" +
                "</head>\n" +
                "<body>\n" +
                "<form action=\"/servlet/students/save\" method=\"post\">\n" +
                "    studentName: <input type=\"text\" name=\"studentName\" />\n" +
                "           year:      <input type=\"text\" name=\"year\" />\n" +
                " <button type=\"submit\">전송</button>\n" + "</form>\n" +
                "</body>\n" +
                "</html>\n");
    }
}
response 객체에 ContentType을 html로해서 html로 응답한 모습이다.
action에 save를 달아주었기 때문에 이 요청을 받을 save도 작성을 해야한다.
package hello.servlet.web.servlet;

import hello.servlet.domain.student.Student;
import hello.servlet.domain.student.StudentRepository;
import jakarta.servlet.ServletException;
import jakarta.servlet.annotation.WebServlet;
import jakarta.servlet.http.HttpServlet;
import jakarta.servlet.http.HttpServletRequest;
import jakarta.servlet.http.HttpServletResponse;

import java.io.IOException;
import java.io.PrintWriter;

@WebServlet(name = "studentSaveServlet", urlPatterns = "/servlet/students/save")
public class StudentSaveServlet extends HttpServlet {

    private StudentRepository studentRepository = StudentRepository.getInstance();

    @Override
    protected void service(HttpServletRequest req, HttpServletResponse resp) throws ServletException, IOException {
        String studentName = req.getParameter("studentName");
        int year = Integer.parseInt(req.getParameter("year"));

        Student student = new Student(studentName, year);
        studentRepository.save(student);

        PrintWriter writer = resp.getWriter();

        writer.write("<html>\n" +
                "<head>\n" +
                " <meta charset=\"UTF-8\">\n" + "</head>\n" +
                "<body>\n" +
                "<ul>\n" +
                "    <li>studentId="+student.getStudentId()+"</li>\n" +
                "    <li>name="+student.getStudentName()+"</li>\n" +
                " <li>year="+student.getYear()+"</li>\n" + "</ul>\n" +
                "<a href=\"/index.html\">메인</a>\n" + "</body>\n" +
                "</html>");
    }
}
그러고 http://localhost:8080/servlet/students/new-form 해당 페이지에 접근하면 잘 작동하는 것을 볼 수 있다.
이번엔 하나씩 조회하는 것이 아니라 모든 학생들을 조회하는 기능을 만들어보자.
package hello.servlet.web.servlet;

import hello.servlet.domain.student.Student;
import hello.servlet.domain.student.StudentRepository;
import jakarta.servlet.ServletException;
import jakarta.servlet.annotation.WebServlet;
import jakarta.servlet.http.HttpServlet;
import jakarta.servlet.http.HttpServletRequest;
import jakarta.servlet.http.HttpServletResponse;

import java.io.IOException;
import java.io.PrintWriter;
import java.util.List;

@WebServlet(name = "studentListServlet", urlPatterns = "/servlet/students")
public class StudentListServlet extends HttpServlet {

    private StudentRepository studentRepository = StudentRepository.getInstance();

    @Override
    protected void service(HttpServletRequest req, HttpServletResponse resp) throws ServletException, IOException {
        resp.setContentType("text/html");
        resp.setCharacterEncoding("utf-8");

        List<Student> students = studentRepository.findAll();

        PrintWriter writer = resp.getWriter();

        writer.write("<html>");
        writer.write("<head>");
        writer.write("    <meta charset=\"UTF-8\">");
        writer.write("    <title>Title</title>");
        writer.write("</head>");
        writer.write("<body>");
        writer.write("<a href=\"/index.html\">메인</a>");
        writer.write("<table>");
        writer.write("    <thead>");
        writer.write("    <th>studentId</th>");
        writer.write("    <th>studentName</th>");
        writer.write("    <th>year</th>");
        writer.write("    </thead>");
        writer.write("    <tbody>");
        for (Student student : students) {
            writer.write("    <tr>");
            writer.write("        <td>" + student.getStudentId() + "</td>");
            writer.write("        <td>" + student.getStudentName() + "</td>");
            writer.write("        <td>" + student.getYear() + "</td>");
            writer.write("    </tr>");
        }
        writer.write("    </tbody>");
        writer.write("</table>");
        writer.write("</body>");
        writer.write("</html>");
    }
}
이렇게 for-each문을 이용해서 반복되는 html들을 찍어주었다.
이렇게 잘 출력되는 것을 볼 수 있다.
하지만 이렇게 자바코드 안에 HTML을 넣어서 작업하는 방법은 너무 힘들다.
그렇기에 HTML에 자바코드를 작성하는 JSP로 페이지를 만들어보자.
신입생을 등록하는 jsp는 html과 크게 다르지 않다.
<%@ page contentType="text/html;charset=UTF-8" language="java" %>
<html>
<head>
    <title>신입생 등록</title>
</head>
<body>
<form action = "/jsp/students/save.jsp" method="post">
    studentName: <input type = "text" name="studentName">
    year: <input type="text" name="age">
    <button type="submit">전송</button>
</form>

</body>
</html>
여기서 응답을 하는 save.jsp는
<%@ page import="hello.servlet.domain.student.StudentRepository" %>
<%@ page import="hello.servlet.domain.student.Student" %>
<%@ page contentType="text/html;charset=UTF-8" language="java" %>
<%
  StudentRepository studentRepository = StudentRepository.getInstance();

  String studentName = request.getParameter("studentName");
  int year = Integer.parseInt(request.getParameter("year"));

  Student student = new Student(studentName, year);
  studentRepository.save(student);

%>
<html>
<head>
    <title>신입생 등록 완료</title>
</head>
<body>
<ul>
  <li>studentId=<%=student.getStudentId()%></li>
  <li>studentName=<%=student.getStudentName()%></li>
  <li>year=<%=student.getYear()%></li>
</ul>

<a href="/index.html">메인</a>

</body>
</html>
이렇게 자바코드와 html이 합쳐져 있다.
윗 부분에 자바 코드들을 작성하고 html의 body에서 데이터들을 가져오는 것이다.
이렇게 보면 기존과 크게 차이가 없어 보이지만, html에 자바코드를 사용해서 반복문으로 값을 출력하면 훨씬 작업하기 편해진다.
학생들의 목록을 출력해주는 JSP이다.
<%@ page import="hello.servlet.domain.student.StudentRepository" %>
<%@ page import="hello.servlet.domain.student.Student" %>
<%@ page import="java.util.List" %>
<%@ page contentType="text/html;charset=UTF-8" language="java" %>
<%
    StudentRepository studentRepository = StudentRepository.getInstance();
    List<Student> students = studentRepository.findAll();
%>
<html>
<head>
    <title>학생 조회</title>
    <meta charset="UTF-8">
</head>
<body>
<a href="/index.html">메인</a>
<table>
    <thead>
    <th>studentId</th>
    <th>studentName</th>
    <th>year</th>
    </thead>
    <tbody>
    <%
        for(Student student: students){
            out.write("<tr>\n");
            out.write("<td>" + student.getStudentId() + "</td>\n");
            out.write("<td>" + student.getStudentName() + "</td>\n");
            out.write("<td>" + student.getYear() + "</td>\n");
            out.write("</tr>\n");
        }
    %>
    </tbody>
</table>

</body>
</html>
이렇게 html 안에서 자바코드를 사용하여 html 코드들을 반복해서 출력하는 것으로 코드가 훨씬 보기 좋고 편해졌다.
하지만 현재의 JSP는 너무 많은 역할을 담당하고 있다.
그렇기 때문에 Model, View, Controll의 MVC 패턴에 맞추어 작성하도록 해야한다.
Model은 컨트롤러에서 뷰로 넘기는 데이터로 뷰가 출력하는 데에 필요한 데이터들을 가지고 있다.
View는 Model에 있는 데이터를 사용해서 화면을 보여주는 역할을 한다.
Controller는 HTTP 요청을 받아 파라미터를 보고, 로직을 실행한다. 그러고 Model에 데이터를 담아 View에 넘긴다.
여기서 Controller에 로직들을 둘 수 있지만, 역할을 나누기위해 서비스를 만들어 그 서비스를 호출하여 실행하는 역할을 한다.
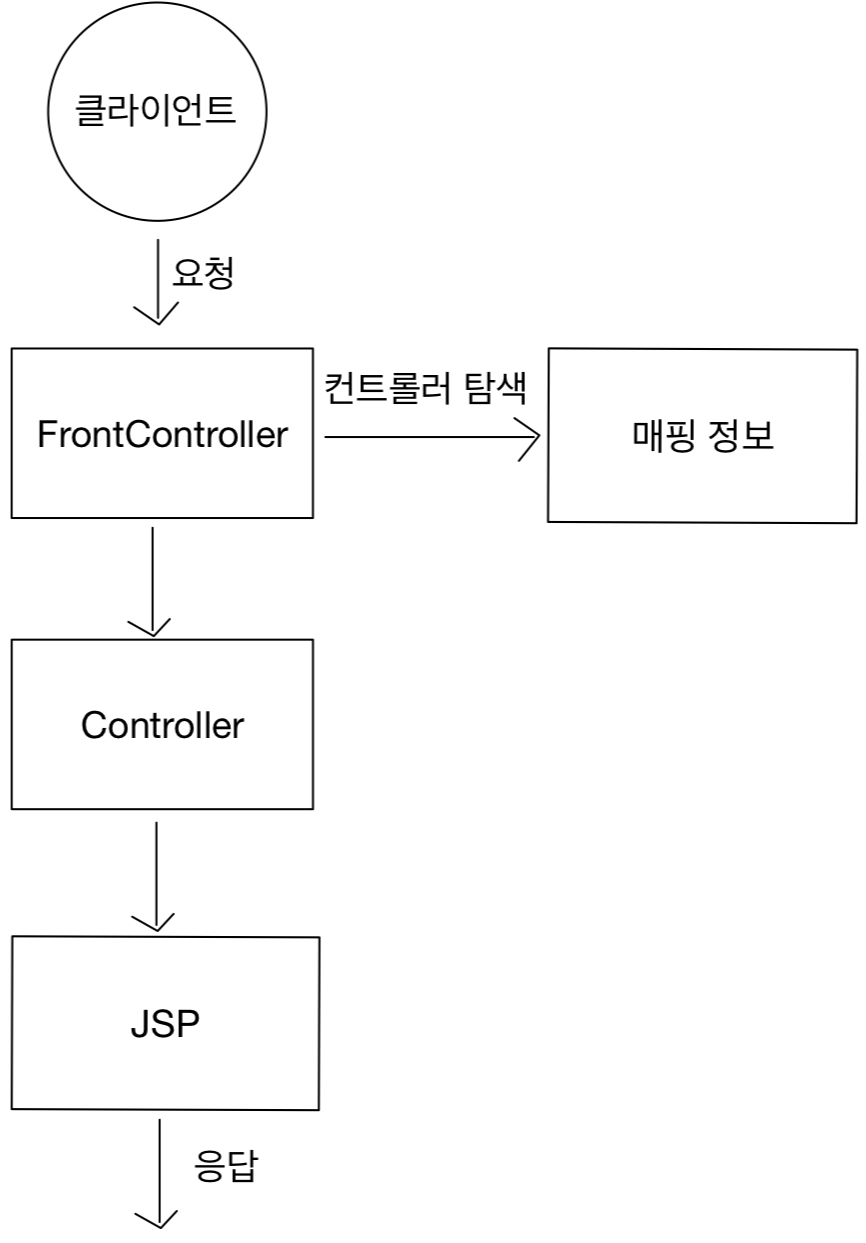
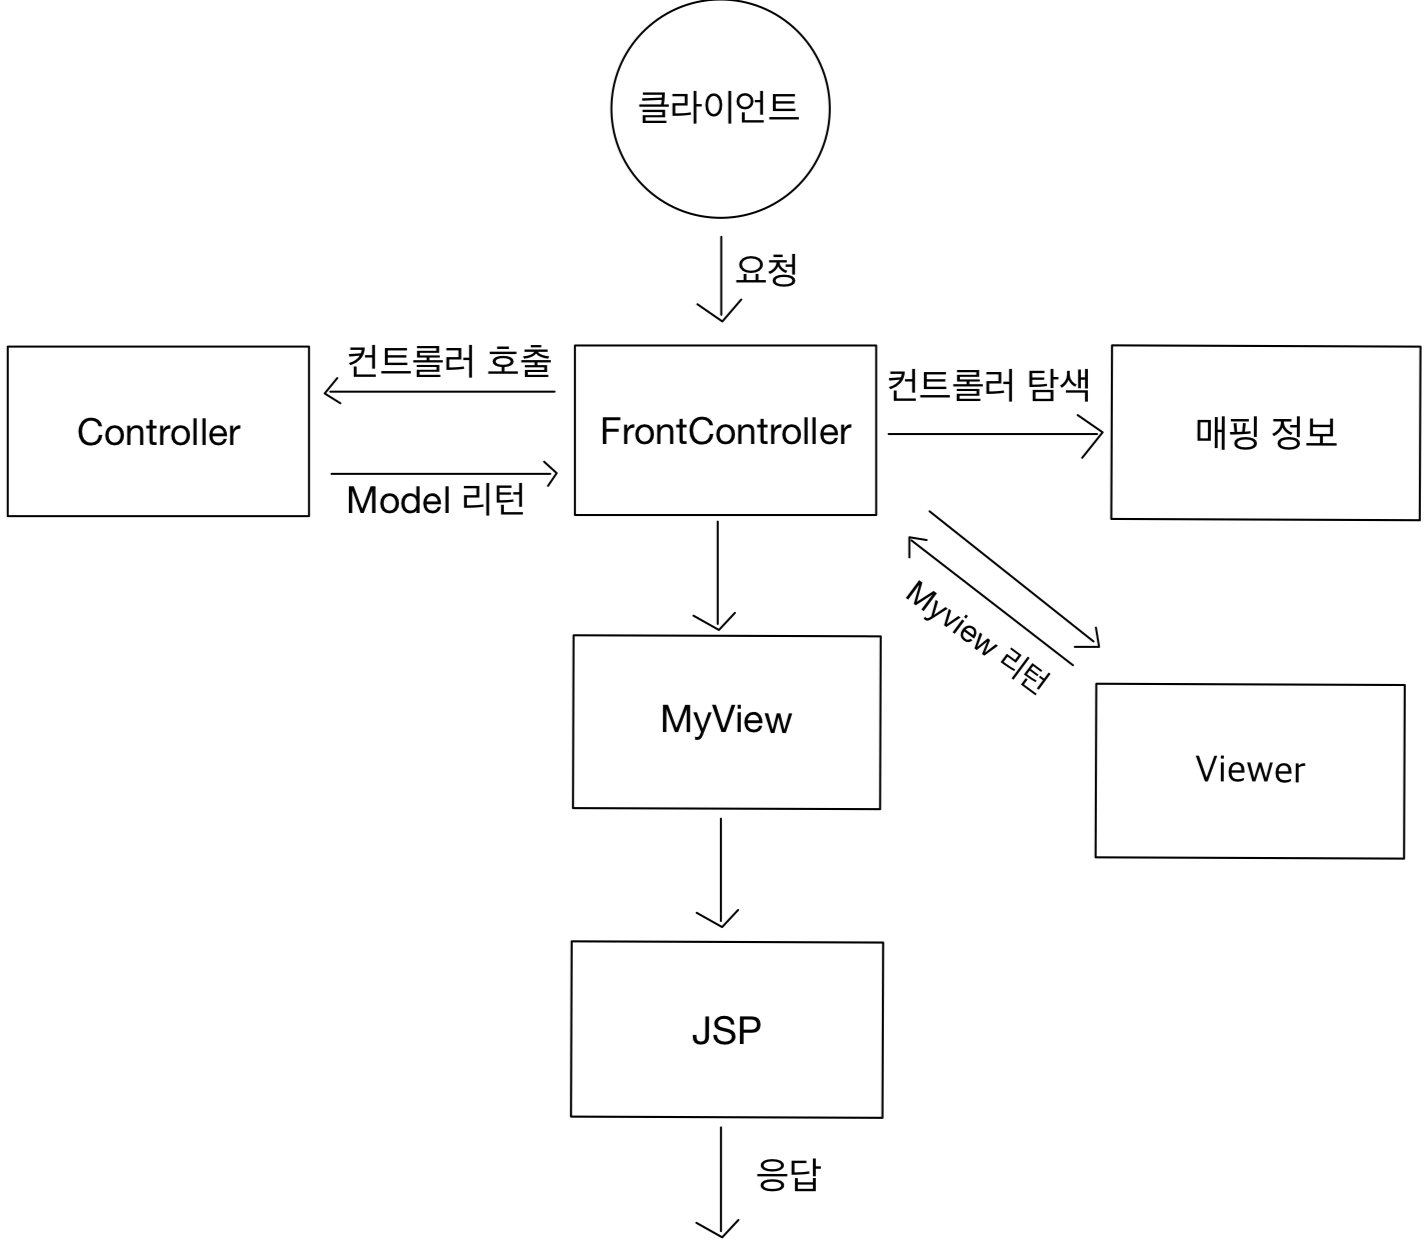
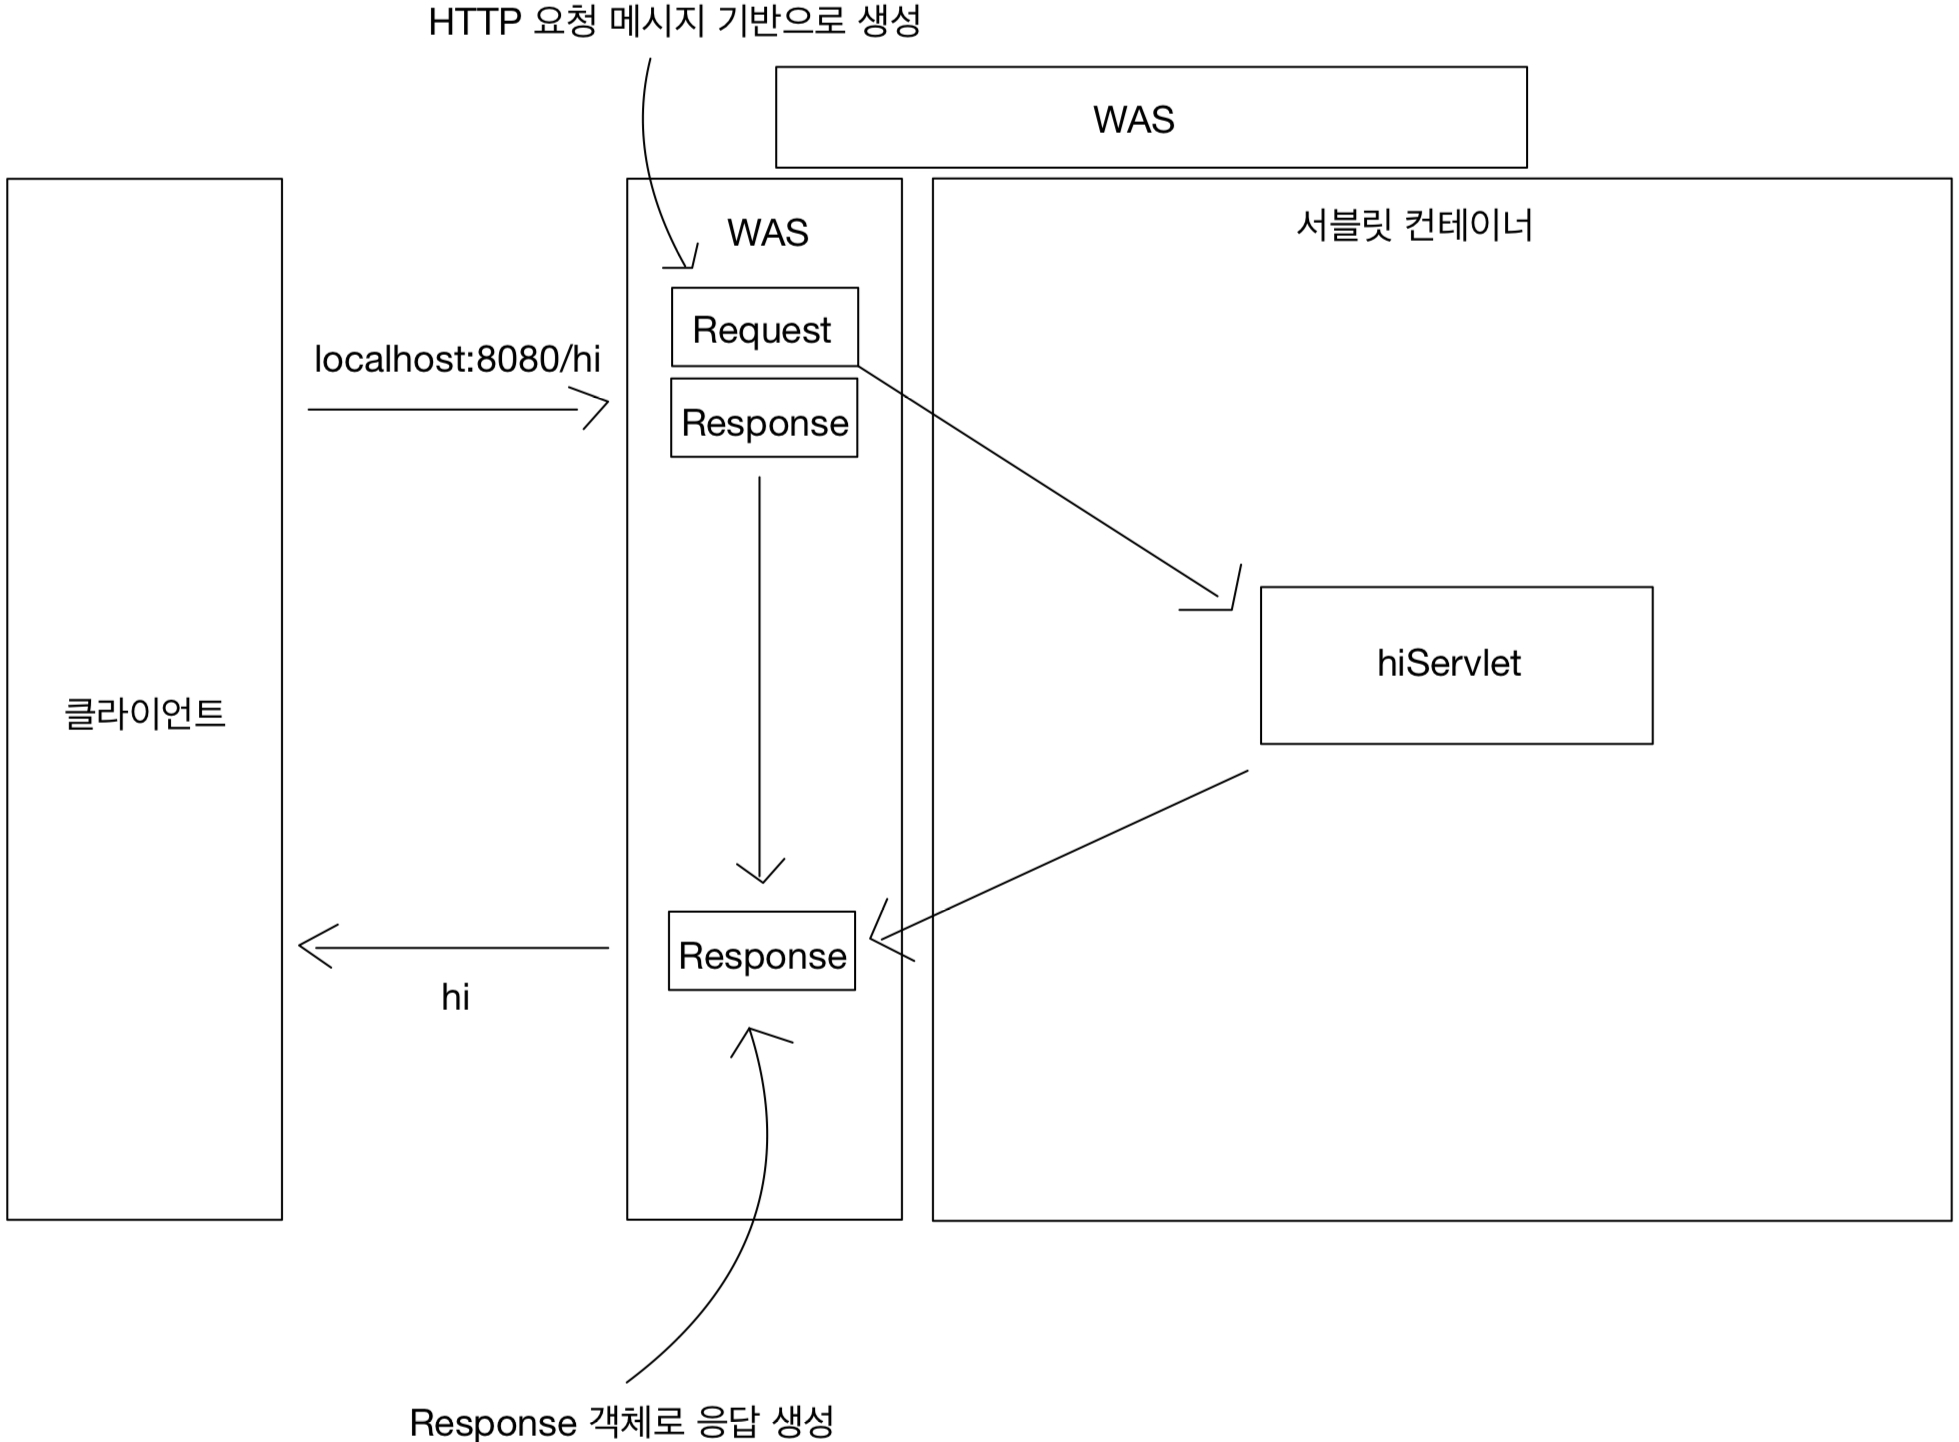
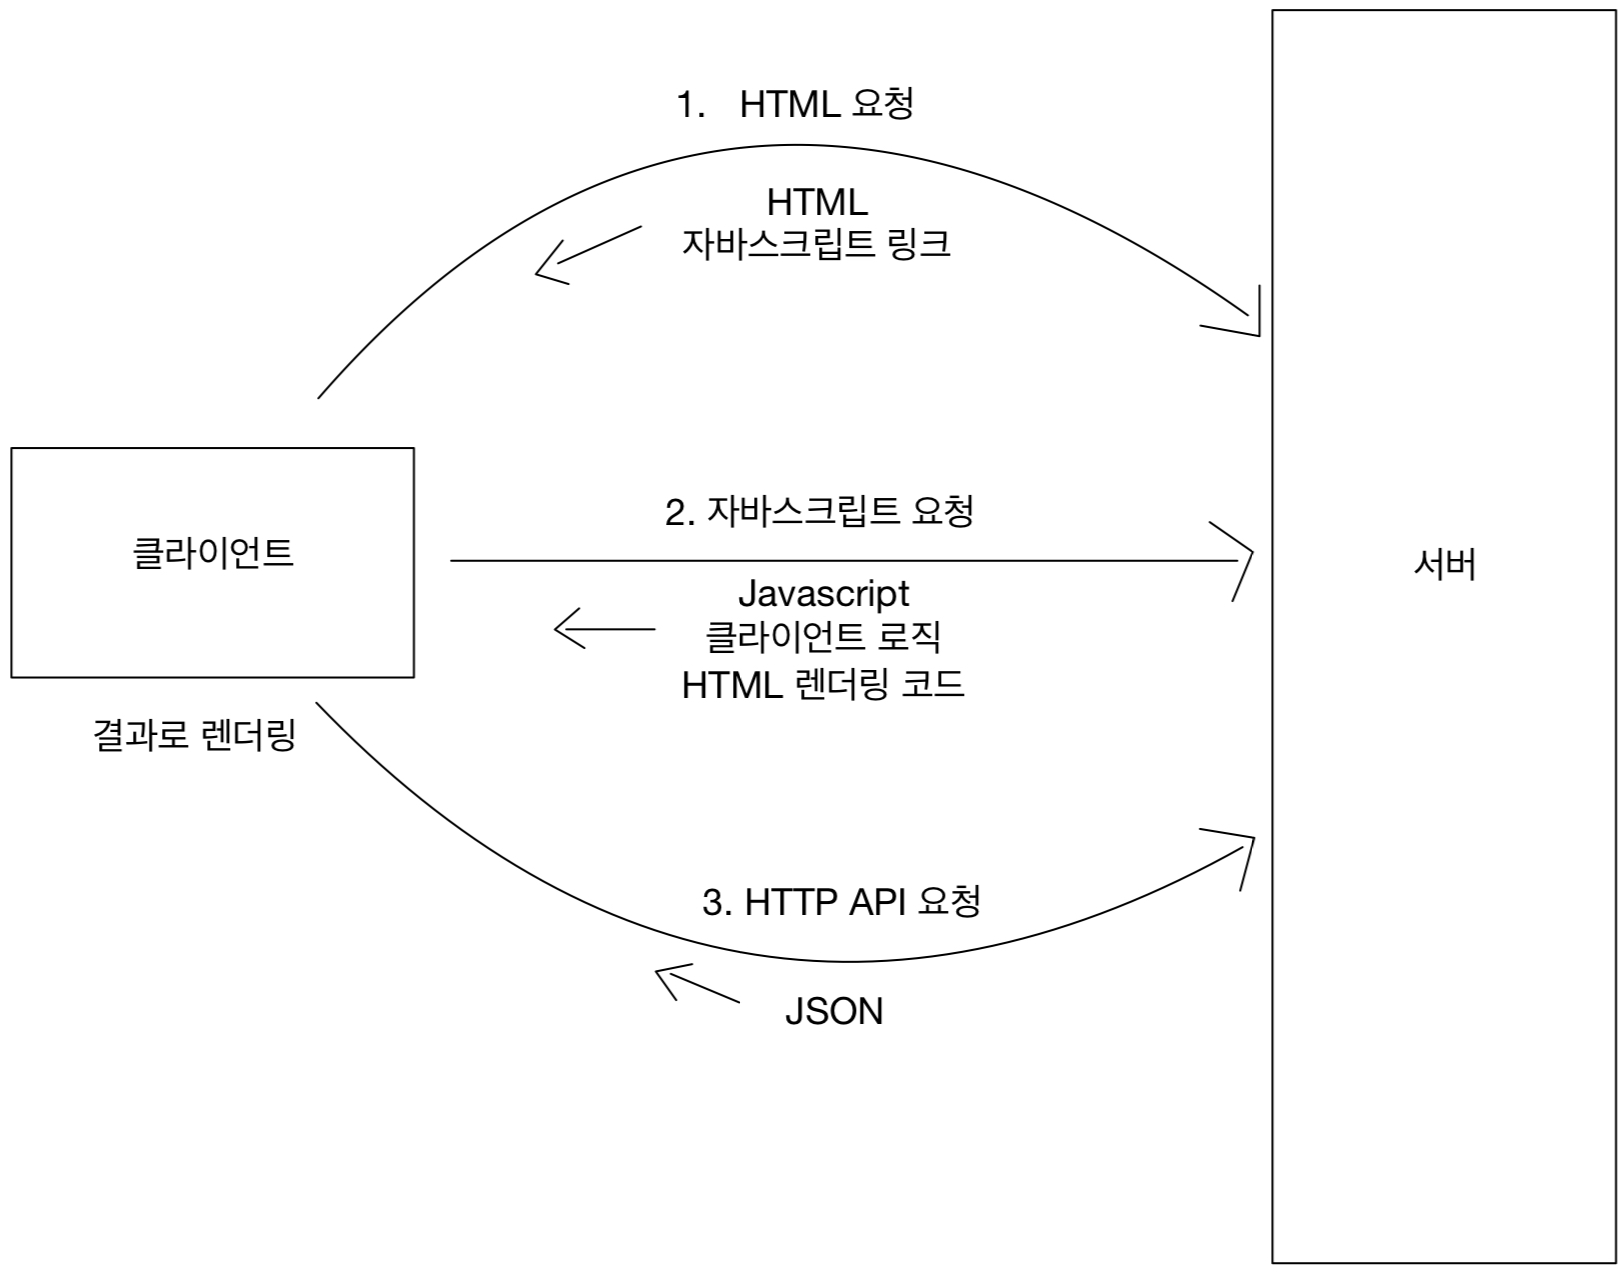
요청부터 응답까지의 과정을 살펴보면
이렇게 MVC를 이용하여 요청에 응답을 한다.
그러면 여기서 로직을 수행하는 부분은 서블릿으로, 뷰를 보여주는 부분은 JSP로 작성을 한다.
package hello.servlet.web.servletmvc;

import jakarta.servlet.RequestDispatcher;
import jakarta.servlet.ServletException;
import jakarta.servlet.annotation.WebServlet;
import jakarta.servlet.http.HttpServlet;
import jakarta.servlet.http.HttpServletRequest;
import jakarta.servlet.http.HttpServletResponse;

import java.io.IOException;

@WebServlet(name = "mvcStudentFormServlet", urlPatterns = "servlet-mvc/students/new-form")
public class MvcStudentFormServlet extends HttpServlet {
    @Override
    protected void service(HttpServletRequest req, HttpServletResponse resp) throws ServletException, IOException {
        String viewPath="/WEB-INF/views/new-form.jsp";
        RequestDispatcher dispatcher = req.getRequestDispatcher(viewPath);
        dispatcher.forward(req, resp);
    }
}
이렇게 작성을 하면 urlPattern으로 mapping 한 주소에 접속할 때 dispatcher.forward를 통해 viewPath에 있는 JSP를 열어주게 된다.
여기서 /WEB-INF를 만들어야 하는데, 이 경로 안에 있는 JSP는 외부에서 호출할 수 없고 서버 내부에서만 호출이 가능하다.
이제 새로 열릴 new-form.jsp를 만들어준다.
<%@ page contentType="text/html;charset=UTF-8" language="java" %>
<html>
<head>
    <title>신입생 등록</title>
    <meta charset="UTF-8">
</head>
<body>
<form action="save" method="post">
    studentName: <input type="text" name="studentName"/>
    year: <input type="text" name="year"/>
    <button type="submit">전송</button>
</form>
</body>
</html>
action을 save로 잡아주었으니 이제 save를 작성한다.
전송을 하면 아래의 서블릿에서 로직이 실행이 된다.
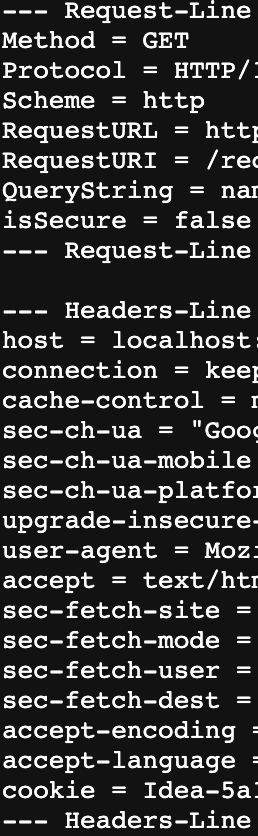
request를 보고 파라미터들을 이용하여 값을 가져온 후 다시 request.setAttribute()를 이용하여 데이터를 넣어준 후 jsp로 넘겨준다.
package hello.servlet.web.servletmvc;

import hello.servlet.domain.student.Student;
import hello.servlet.domain.student.StudentRepository;
import jakarta.servlet.RequestDispatcher;
import jakarta.servlet.ServletException;
import jakarta.servlet.annotation.WebServlet;
import jakarta.servlet.http.HttpServlet;
import jakarta.servlet.http.HttpServletRequest;
import jakarta.servlet.http.HttpServletResponse;

import java.io.IOException;

@WebServlet(name = "mvcStudentSaveServlet", urlPatterns = "/servlet-mvc/students/save")
public class MvcStudentSaveServlet extends HttpServlet {
    private StudentRepository studentRepository = StudentRepository.getInstance();

    @Override
    protected void service(HttpServletRequest req, HttpServletResponse resp) throws ServletException, IOException {
        String studentName = req.getParameter("studentName");
        int year = Integer.parseInt(req.getParameter("year"));

        Student student = new Student(studentName, year);
        studentRepository.save(student);

        req.setAttribute("student", student);

        String viewPath = "/WEB-INF/views/save-result.jsp";
        RequestDispatcher dispatcher = req.getRequestDispatcher(viewPath);
        dispatcher.forward(req, resp);
    }
}
이제 결과를 출력할 jsp를 작성해준다.
<%@ page contentType="text/html;charset=UTF-8" language="java" %>
<html>
<head>
    <title>신입생 등록 완료</title>
    <meta charset="UTF-8">
</head>
<body>

<ul>
  <li>studentId=${student.studentId}</li>
  <li>studentName=${student.studentName}</li>
  <li>year=${student.year}</li>
</ul>

<a href="/index.html">메인</a>

</body>
</html>
${}를 이용하면 attribute에 있는 데이터를 조회할 수 있다.