728x90

저번에는 UserDao에 try-catch-finally를 추가했다.

이제 이걸 적용하려면 이 예외처리를 기존의 코드에 하나하나 추가해줘야 한다.


당연히 말도 안된다.

코드를 빼먹을 수도 있고, 수정할 때마다 모두 찾아서 수정을 해줘야한다.


그렇기에 반드시 개선해야 하는 부분이다.

    public void deleteAll() throws SQLException {
        Connection connection = null;
        PreparedStatement preparedStatement;
        try{
            connection = dataSource.getConnection();

            preparedStatement = connection.prepareStatement("delete from users");

            preparedStatement.executeUpdate();
            preparedStatement.close();
        } finally{
            if(connection != null){
                connection.close();
            }
        }
    }


코드를 보면 Connection, PreparedStatement를 준비하는 부분과 finally 부분은 모두 공통으로 변하지 않는 것을 볼 수 있다.

중간 부분만 바꾸면 되는것이다.


메서드로 추출하는 방법도 있지만 큰 이점은 없어보이기에, 템플릿 메서드 패턴을 적용해보려고 한다.

템플릿 메서드 패턴은 상속을 통해 기능을 확장해서 사용하는 방법이다.

변하지 않는 부분은 슈퍼클래스에 두고, 변하는 부분은 추상 메서드로 정의해서 서브클레스에서 오버라이드해서 새롭게 정의해 쓰도록 만드는 것이다.


public class UserDaoDeleteAll extends UserDao {

    public UserDaoDeleteAll(DataSource dataSource) {
        super(dataSource);
    }

    @Override
    protected PreparedStatement makeStatement(Connection c) throws SQLException {
        return c.prepareStatement("delete from users");
    }
}


하지만 여기서 템플릿 메서드의 단점은 사용하고 싶은 sql문마다 dao 클래스를 만들어줘야 한다는 것이다.


이거보다 더 확장적인 방법은 오브젝트를 둘로 분리하고 클래스 레벨에서는 인터페이스를 통해서만 의존하도록 만드는 전략 패턴이다.

좌측의 Context의 contextMethod()에서 일정한 구조를 가지고 동작하다가 특정 확장 기능은 Strategy 인터페이스를 통해 외부의 독립된 전략 클래스에 위임하는 것이다.


deleteAll()에서 변하지 않는 부분이라고 한 것이 바로 contextMethod()가 되는 것이다.


변하는 부분을 StatementStrategy로 하고 인터페이스를 만든다.

public interface StatementStrategy {

    PreparedStatement makePreparedStatement(Connection c) throws SQLException;
}


그리고 이거를 상속받아, 변하는 부분을 작성한다.

여기에서는 deleteAll이다.

public class DeleteAllStatement implements StatementStrategy {

    @Override
    public PreparedStatement makePreparedStatement(Connection c) throws SQLException {
        return c.prepareStatement("DELETE FROM users");
    }
}


그리고 삭제할 때마다 해당 클래스를 생성해서 함수를 호출하는 것이다.

    public void deleteAll() throws SQLException {
        Connection connection = null;
        PreparedStatement preparedStatement;
        try{
            connection = dataSource.getConnection();

            StatementStrategy statementStrategy = new DeleteAllStatement();

            preparedStatement = statementStrategy.makePreparedStatement(connection);

            preparedStatement.executeUpdate();
            preparedStatement.close();
        } finally{
            if(connection != null){
                connection.close();
            }
        }
    }


이렇게하면 뭐..가능은 하지만 항상 클래스를 생성해줘야 하고, 구체적인 클래스인 DeleteAllStatement에 의존하기 때문에 OCP에 잘 맞는다고 할 수는 없다.


더 발전시키기 위해 전략패턴을 더 생각해보자.

Context가 어떤 전략을 사용할지는 Context를 사용하는 Client가 결정하도록 한다.

Client가 구체적인 전략을 선택해서 Context에 전달하는 것이다.

    public void jdbcContextWithStatementStrategy(StatementStrategy statementStrategy) throws SQLException {
        Connection connection = null;
        PreparedStatement preparedStatement;
        try{
            connection = dataSource.getConnection();

            preparedStatement = statementStrategy.makePreparedStatement(connection);

            preparedStatement.executeUpdate();
            preparedStatement.close();
        } finally{
            if(connection != null){
                connection.close();
            }
        }
    }


이렇게 공통적으로 동작하는 부분을 분리하고

    public void deleteAll() throws SQLException {
        StatementStrategy strategy = new DeleteAllStatement();
        jdbcContextWithStatementStrategy(strategy);
    }

deleteAll()을 클라이언트로 전략 오브젝트를 만들어서 컨텍스트를 호출하도록 한다.

사용할 전략 클래스는 DeleteAllStatement이고 컨텍스트로 분리한 jdbcContextWithStatementStrategy() 메서드를 호출한다.


728x90

이번 챕터에서는 구조와 관심사에 관해 이야기 하는 것 같다.


public class UserDao {

    public void add(User user) throws ClassNotFoundException, SQLException {
        Class.forName("com.mysql.cj.jdbc.Driver");

        var connection = DriverManager.getConnection(
                "jdbc:mysql://localhost:3306/tobi",
                "root",
                "seungkyu");

        PreparedStatement preparedStatement = connection.prepareStatement(
                "insert into users(id, name, password) values(?,?,?)"
        );

        preparedStatement.setString(1, user.getId());
        preparedStatement.setString(2, user.getName());
        preparedStatement.setString(3, user.getPassword());

        preparedStatement.executeUpdate();

        preparedStatement.close();
        connection.close();
    }

    public User get(String id) throws ClassNotFoundException, SQLException {
        Class.forName("com.mysql.cj.jdbc.Driver");

        var connection = DriverManager.getConnection(
                "jdbc:mysql://localhost:3306/tobi",
                "root",
                "seungkyu");

        PreparedStatement preparedStatement = connection.prepareStatement(
                "select * from users where id = ?"
        );

        preparedStatement.setString(1, id);

        var resultSet = preparedStatement.executeQuery();

        resultSet.next();

        var user = new User();
        user.setId(resultSet.getString("id"));
        user.setName(resultSet.getString("name"));
        user.setPassword(resultSet.getString("password"));

        resultSet.close();
        preparedStatement.close();
        connection.close();

        return user;
    }
}


이렇게 만든 코드에서 만약 데이터베이스의 정보를 바꾸려고 한다면, 모든 코드에서 하나하나 코드를 바꿔야 한다는 문제가 생긴다는 것이다.

그렇기 때문에 관심사에 따라 중복되는 코드를 추출해 별도로 분리해야 한다.

private Connection getConnection() throws ClassNotFoundException, SQLException {
        Class.forName("com.mysql.cj.jdbc.Driver");

        return DriverManager.getConnection(
                "jdbc:mysql://localhost:3306/tobi",
                "root",
                "seungkyu");
    }


이렇게 연결에 관한 부분을 분리했다.


만약 데이터베이스의 연결에 관한 정보가 변경된다면, 이 곳에서 한번에 연결에 대한 정보를 변경 할 수 있다.

이렇게 기존의 동작에는 영향을 주지 않으면서 내부 구조를 재구성하는 작업을 리펙토링이라고 한다.

방금 이러한 작업이 리펙토링의 일종이며, 유지보수를 위해 꼭 필요한 작업 중 하나이다.


조금 더 리펙토링 해보도록 하자.

만약, 현재 UserDao에서 add와 get의 코드를 공개하지 않고 데이터베이스의 연결을 수정하고 싶다면 어떻게 해야할까?


생성자를 통해 데이터베이스의 연결 정보를 받아올 수는 있지만, 일부의 메서드만 수정할 수 있도록 하기 위해서는 객체지향의 특징은 추상화를 이용하면 된다.


public abstract class UserDao {

    public void add(User user) throws ClassNotFoundException, SQLException {
        Connection connection = getConnection();

        PreparedStatement preparedStatement = connection.prepareStatement(
                "insert into users(id, name, password) values(?,?,?)"
        );

        preparedStatement.setString(1, user.getId());
        preparedStatement.setString(2, user.getName());
        preparedStatement.setString(3, user.getPassword());

        preparedStatement.executeUpdate();

        preparedStatement.close();
        connection.close();
    }

    public User get(String id) throws ClassNotFoundException, SQLException {

        Connection connection = getConnection();

        PreparedStatement preparedStatement = connection.prepareStatement(
                "select * from users where id = ?"
        );

        preparedStatement.setString(1, id);

        var resultSet = preparedStatement.executeQuery();

        resultSet.next();

        var user = new User();
        user.setId(resultSet.getString("id"));
        user.setName(resultSet.getString("name"));
        user.setPassword(resultSet.getString("password"));

        resultSet.close();
        preparedStatement.close();
        connection.close();

        return user;
    }

    public abstract Connection getConnection() throws ClassNotFoundException ,SQLException;
}


이렇게 UserDao를 추상 클래스로, getConnection()을 추상 메서드로 변경한 후


public class SeungkyuUserDao extends UserDao{

    public Connection getConnection() throws ClassNotFoundException, SQLException {
        Class.forName("com.mysql.cj.jdbc.Driver");

        return DriverManager.getConnection(
                "jdbc:mysql://localhost:3306/tobi",
                "root",
                "seungkyu");
    }
}


상속받는 객체에서 해당 추상 메서드를 구현하고


UserDao userDao = new SeungkyuUserDao();


SeungkyuUserDao를 부모 객체인 UserDao로 할당하여 그대로 사용한다.


이런 식으로 객체지향의 특징을 잘 활용하면 리펙토링을 적절하게 할 수 있다.


이런 방식으로 부모 객체에서 추상화해둔 메서드들을 자식 메서드에서 구현하여 사용하는 디자인 패턴을 템플릿 메서드 패턴이라고 한다.

728x90

스프링을 사용하면서, 스프링을 깊게 공부해보고 싶다는 욕심이 있었다.

백엔드 개발자로 꾸준하게 성장하고 싶었기에, 이번 기회에 토비의 스프링을 사용하여 스프링의 처음부터 다시 보려고 한다.


책은 가격이 좀 나갔지만, 도안탄히엔님께서 주셨다.(감사합니다!!)


우선 DAO를 만들어보자.


DAO는 데이터베이스와 상호작용하며, 데이터를 조회하거나 조작하는 기능을 전담하는 클래스이다.


우선 사용자 정보를 저장하는 클래스이다.

public class User {

    private String id;
    private String name;
    private String password;

    public String getId() {
        return id;
    }

    public void setId(String id) {
        this.id = id;
    }

    public String getName() {
        return name;
    }

    public void setName(String name) {
        this.name = name;
    }

    public String getPassword() {
        return password;
    }

    public void setPassword(String password) {
        this.password = password;
    }
}


이렇게 필드가 private으로 직접 변경이 불가능하고, getter와 setter로 조작해야 하며 기본 생성자가 존재하는 오브젝트를 자바빈이라고 한다.


이렇게 만든 사용자의 정보 객체로 데이터베이스를 조작할 수 있도록 DAO 클래스를 만들어보자.


package seungkyu;

import java.sql.DriverManager;
import java.sql.PreparedStatement;
import java.sql.SQLException;

public class UserDao {

    public void add(User user) throws ClassNotFoundException, SQLException {
        Class.forName("com.mysql.cj.jdbc.Driver");

        var connection = DriverManager.getConnection(
                "jdbc:mysql://localhost:3306/tobi",
                "root",
                "seungkyu");

        PreparedStatement preparedStatement = connection.prepareStatement(
                "insert into users(id, name, password) values(?,?,?)"
        );

        preparedStatement.setString(1, user.getId());
        preparedStatement.setString(2, user.getName());
        preparedStatement.setString(3, user.getPassword());

        preparedStatement.executeUpdate();

        preparedStatement.close();
        connection.close();
    }

    public User get(String id) throws ClassNotFoundException, SQLException {
        Class.forName("com.mysql.cj.jdbc.Driver");

        var connection = DriverManager.getConnection(
                "jdbc:mysql://localhost:3306/tobi",
                "root",
                "seungkyu");

        PreparedStatement preparedStatement = connection.prepareStatement(
                "select * from users where id = ?"
        );

        preparedStatement.setString(1, id);

        var resultSet = preparedStatement.executeQuery();

        resultSet.next();

        var user = new User();
        user.setId(resultSet.getString("id"));
        user.setName(resultSet.getString("name"));
        user.setPassword(resultSet.getString("password"));

        resultSet.close();
        preparedStatement.close();
        connection.close();

        return user;
    }
}


이렇게 일단 JDBC 커넥션을 항상 열고 닫는 방법으로 DAO를 만들었다.


간단하게 메인 메서드에서 테스트를 해보았는데


이렇게 정상적으로 저장되는 것을 볼 수 있다.


정상적으로 작동은 하지만, 개선할 부분이 많은 코드라고 한다.

다음 챕터에서 수정해보며 알아보도록 하자.

728x90

마지막으로 Java NIO non-blocking으로 만든 서버에서도 문제가 있었다.

accept 할 때마다 조건문으로 확인을 하고 Thread.sleep을 걸어주면, 그만큼 리소스의 낭비가 생기기 때문이다.

그리고 sleep 중간에 요청이 들어오면, sleep이 끝날 때까지 대기를 하기 때문에 그만큼 딜레이가 생긴다.


이런 이벤트들을 계속 확인하지 않고, 여러 이벤트를 추적할 수 있도록 변경해보자.

이번 내용은 네트워크 프로그래밍에서 배웠던 내용을 C에서 Java로 변경한 느낌일 것이다.


Selector 이론

SelectableChannel


selectableChannel에는 register 함수를 제공한다.

register는 Selector에 channel을 등록할 수 있다.

public abstract class SelectableChannel
    extends AbstractInterruptibleChannel
    implements Channel
{

    public abstract SelectableChannel configureBlocking(boolean block)
        throws IOException;

    public final SelectionKey register(Selector sel, int ops)
        throws ClosedChannelException
    {
        return register(sel, ops, null);
    }
}


Selector


여러 Channel의 이벤트를 등록하고 준비된 이벤트를 모아서 조회할 수 있도록 한다.

public abstract class Selector implements Closable{
    public abstract int select() throws IOException;
    public abstract Set<SelectionKey> selectedKEys();
}


Selector를 만들고, channel에 selector와 관심 있는 이벤트를 등록한다.

channel의 register를 이용하면 내부 함수에서 다시 selector의 register를 호출하기 때문에, channel에 등록하더라도 selector에서 이벤트를 받을 수 있다.

관심있는 이벤트가 ops인데, 무슨 이벤트인지에 대한 정보이다.

이벤트들은 다음과 같다.

  • OP_READ: Channel에 읽기 준비가 완료되었다.
  • OP_WRITE: Channel에 쓸 준비가 완료되었다.
  • OP_ACCEPT: serverSocketChannel에서 accept 할 준비가 완료되었다.
  • OP_CONNECT: socketChannel에서 connect 할 준비가 완료되었다.


이렇게 해서 Accept를 등록하려는 코드는 다음과 같다.

serverChannel.register(selector, SelectionKey.OP_ACCEPT);


등록이 끝나면 이제 Accept를 대기할 텐데, select를 사용하면 준비가 될 때까지 쓰레드 blocking이 된다.


while(true){
    selector.select();
    
    var selectedKEys = selector.selectedKeys().iterator();
    
    while(selectedKeys.hasNext()){
    	var key = selectedKeys.next();
        /////
        selectedKeys.remove();
    }
}


select에서 준비가 완료된 작업들이 발견된다면, 다음 line으로 이동한다.

준비가 완료된 작업을 가져올 때는 selectedKeys를 사용한다.


여기서 SelectionKey를 iterator로 가져오게 되는데, SelectionKey는 다음과 같다.

public abstract class SelectionKey {

    public abstract SelectableChannel channel();

    public abstract Selector selector();

    public abstract int interestOps();

    public final boolean isReadable() {
        return (readyOps() & OP_READ) != 0;
    }

    public final boolean isWritable() {
        return (readyOps() & OP_WRITE) != 0;
    }

    public final boolean isConnectable() {
        return (readyOps() & OP_CONNECT) != 0;
    }

    public final boolean isAcceptable() {
        return (readyOps() & OP_ACCEPT) != 0;
    }

}


SelectionKey는 channel과 selector, 발생한 이벤트의 정보를 가지고 있는 객체이다.

여기에 모든 정보가 있기 때문에, 이거만 있으면 추가적인 정보를 넘길 필요가 없을 것이다.


이렇게 accept를 알아보았고, read인 경우에는 해당 이벤트를 받아 동일하게 처리하면 될 것이다.


Selector 실습

이제 Selector를 사용하여 더 최적화를 해보도록 하자.

저번에 작성했던 NIO 서버를 변경할 것이다.

@Slf4j
public class SelectorServer {

    private static ExecutorService executorService = Executors.newFixedThreadPool(50);

    @SneakyThrows
    public static void main(String[] args) {
        log.info("start");
        try(ServerSocketChannel serverSocketChannel = ServerSocketChannel.open();
            Selector selector = Selector.open()){

            serverSocketChannel.bind(new InetSocketAddress("localhost", 8080));
            serverSocketChannel.configureBlocking(false);
            serverSocketChannel.register(selector, SelectionKey.OP_ACCEPT);

            while(true){

                selector.select();

                Iterator<SelectionKey> selectedKeys = selector.selectedKeys().iterator();

                while(selectedKeys.hasNext()){
                    SelectionKey key = selectedKeys.next();
                    selectedKeys.remove();

                    if(key.isAcceptable()){
                        SocketChannel clientSocket = ((ServerSocketChannel)key.channel()).accept();
                        clientSocket.configureBlocking(false);
                        clientSocket.register(selector, SelectionKey.OP_READ);
                    }else if(key.isReadable()){
                        SocketChannel clientSocket = (SocketChannel) key.channel();

                        String responseBody = handleRequest(clientSocket);
                        sendResponse(clientSocket, responseBody);
                    }
                }

            }
        }
    }

    @SneakyThrows
    private static String handleRequest(SocketChannel clientSocket) {
        ByteBuffer requestByteBuffer = ByteBuffer.allocateDirect(1024);
        clientSocket.read(requestByteBuffer);

        requestByteBuffer.flip();
        String requestBody = StandardCharsets.UTF_8.decode(requestByteBuffer).toString();
        log.info("request: {}", requestBody);

        return requestBody;
    }

    @SneakyThrows
    public static void sendResponse(SocketChannel clientSocket, String requestBody){
        CompletableFuture.runAsync(() -> {

            try {
                Thread.sleep(10);
                String content = "received: " + requestBody;
                ByteBuffer responseByteBuffer = ByteBuffer.wrap(content.getBytes());
                clientSocket.write(responseByteBuffer);
                clientSocket.close();
            } catch (Exception e) {
            }
        }, executorService);

    }
}


여기서 Accept 이벤트와 Read 이벤트를 처리하고 있는 것을 볼 수 있다.

각각의 이벤트 키로 해당 이벤트를 넣어 처리를 하며, 다른 쓰레드에서 비동기적으로 마지막 메서드를 실행하는 것을 볼 수 있다.


'Spring > 리액티브 프로그래밍' 카테고리의 다른 글

Java AIO  (0) 2024.03.19
Java IO Server 서버를 NIO로 변경  (0) 2024.03.19
Java NIO  (0) 2024.03.18
JAVA IO  (0) 2024.03.18
Mutiny  (0) 2024.03.14
728x90

지금까지 배운 것을 바탕으로 서버를 만들고, 차례로 성능을 높여보자.


우선 간단한 기본 서버이다.


@Slf4j
public class JavaIOServer {

    @SneakyThrows
    public static void main(String[] args) {
        log.info("start");

        try(ServerSocket serverSocket = new ServerSocket()){
            serverSocket.bind(new InetSocketAddress("localhost", 8080));

            while(true){

                Socket clientSocket = serverSocket.accept();

                byte[] requestBytes = new byte[1024];
                InputStream inputStream = clientSocket.getInputStream();
                inputStream.read(requestBytes);

                log.info("request: {}", new String(requestBytes).trim());

                OutputStream outputStream = clientSocket.getOutputStream();
                String response = "I am Server";
                outputStream.write(response.getBytes());
                outputStream.flush();
            }

        }
    }
}


간단한 서버이다.

while(true)를 돌며 계속 응답을 받고, 받은 후에 클라이언트에게 I am Server라는 값을 준다.


클라이언트이다.

요청을 보내고, 응답을 받은 후 종료된다.

@Slf4j
public class JavaIOClient {

    public static void main(String[] args) {
        try(Socket socket = new Socket()){
            socket.connect(new InetSocketAddress("localhost", 8080));

            var outputStream = socket.getOutputStream();
            String requestBody = "I am Seungkyu client";
            outputStream.write(requestBody.getBytes());
            outputStream.flush();

            InputStream inputStream = socket.getInputStream();
            byte[] responseBytes = new byte[1024];
            inputStream.read(responseBytes);

            log.info("result: {}", new String(responseBytes).trim());


        }catch (IOException e){
            throw new RuntimeException(e);
        }
    }
}

이런 식으로 서버에 계속 요청이 오는 것을 볼 수 있다.


이제 서버를 NIO로 변경해보자.

@Slf4j
public class JavaNIOBlockingServer {

    @SneakyThrows
    public static void main(String[] args) {
        log.info("start");

        try(ServerSocketChannel serverSocketChannel = ServerSocketChannel.open()) {

            serverSocketChannel.bind(new InetSocketAddress("localhost", 8080));

            while(true){

                SocketChannel socketChannel = serverSocketChannel.accept();

                ByteBuffer requestByteBuffer = ByteBuffer.allocateDirect(1024);
                socketChannel.read(requestByteBuffer);
                requestByteBuffer.flip();
                String requestBody = StandardCharsets.UTF_8.decode(requestByteBuffer).toString();
                log.info("request: {}", requestBody);

                ByteBuffer responseByteBuffer = ByteBuffer.wrap("I am Server".getBytes());
                socketChannel.write(responseByteBuffer);
                socketChannel.close();
            }

        }
    }
}


Channel을 이용하여 데이터를 읽고 쓰며, 버퍼를 사용하는 것을 볼 수 있다.

이렇게 속도를 높이겠지만, 아직도 accept에서 Blocking이 발생하고 있다.


그렇기에 이거를 Non-Blocking으로 바꿔보자

@Slf4j
public class JavaNIONonBlockingServer {

    @SneakyThrows
    public static void main(String[] args) {
        log.info("start");

        try(ServerSocketChannel serverSocketChannel = ServerSocketChannel.open()) {

            serverSocketChannel.bind(new InetSocketAddress("localhost", 8080));
            serverSocketChannel.configureBlocking(false);

            while(true){

                SocketChannel socketChannel = serverSocketChannel.accept();

                if(socketChannel == null){
                    Thread.sleep(100);
                    continue;
                }

                ByteBuffer requestByteBuffer = ByteBuffer.allocateDirect(1024);
                while(socketChannel.read(requestByteBuffer) == 0){
                    log.info("reading");
                }
                socketChannel.read(requestByteBuffer);
                requestByteBuffer.flip();
                String requestBody = StandardCharsets.UTF_8.decode(requestByteBuffer).toString();
                log.info("request: {}", requestBody);

                ByteBuffer responseByteBuffer = ByteBuffer.wrap("I am Server".getBytes());
                socketChannel.write(responseByteBuffer);
                socketChannel.close();
            }
        }
    }
}


configureBlocking에 false를 주어 Non-Blocking으로 동작하게 했다.

하지만 socketChannel이 null 일 때 Thread.sleep을 하기에 좋은 방법은 아닌 것 같다.

또한 requestBuffer에도 데이터가 있는지를 계속 체크 해주어야 하기 때문에, 이 부분도 수정이 필요해보인다.


이거를 1000개의 요청으로 얼마나 걸리는지 테스트를 해보도록 하자.

테스트 용도의 코드는 다음과 같다.

@Slf4j
public class JavaIOMultiClient {
    private static ExecutorService executorService = Executors.newFixedThreadPool(50);

    @SneakyThrows
    public static void main(String[] args) {
        log.info("start main");

        List<CompletableFuture<Void>> futures = new ArrayList<>();
        long start = System.currentTimeMillis();

        for (int i = 0; i < 1000; i++) {
            var future = CompletableFuture.runAsync(() -> {
                try (Socket socket = new Socket()) {
                    socket.connect(new InetSocketAddress("localhost", 8080));

                    OutputStream out = socket.getOutputStream();
                    String requestBody = "This is client";
                    out.write(requestBody.getBytes());
                    out.flush();

                    InputStream in = socket.getInputStream();
                    byte[] responseBytes = new byte[1024];
                    in.read(responseBytes);
                    log.info("result: {}", new String(responseBytes).trim());
                } catch (Exception e) {}
            }, executorService);

            futures.add(future);
        }

        CompletableFuture.allOf(futures.toArray(new CompletableFuture[0])).join();
        executorService.shutdown();
        log.info("end main");
        long end = System.currentTimeMillis();
        log.info("duration: {}", (end - start) / 1000.0);
    }
}


50개의 쓰레드로 1000개의 요청을 한다.


이렇게 실행해서 시간을 측정해보니, 약 12초가 나왔다.


여기서 코드를 수정해서 속도를 높일 수는 없을까?


서버에서 처리하는 코드를 CompletableFuture를 이용해 별개의 쓰레드에서 처리하도록 했다.

@Slf4j
public class JavaNIONonBlockingServer {
    @SneakyThrows
    public static void main(String[] args) {
        log.info("start main");
        try (ServerSocketChannel serverSocket = ServerSocketChannel.open()) {
            serverSocket.bind(new InetSocketAddress("localhost", 8080));
            serverSocket.configureBlocking(false);

            while (true) {
                SocketChannel clientSocket = serverSocket.accept();
                if (clientSocket == null) {
                    Thread.sleep(100);
                    continue;
                }

                CompletableFuture.runAsync(() -> {
                    handleRequest(clientSocket);
                });
            }
        }
    }

    @SneakyThrows
    private static void handleRequest(SocketChannel clientSocket) {
        ByteBuffer requestByteBuffer = ByteBuffer.allocateDirect(1024);
        while (clientSocket.read(requestByteBuffer) == 0) {
            log.info("Reading...");
        }
        requestByteBuffer.flip();
        String requestBody = StandardCharsets.UTF_8.decode(requestByteBuffer).toString();
        log.info("request: {}", requestBody);

        Thread.sleep(10);

        ByteBuffer responeByteBuffer = ByteBuffer.wrap("This is server".getBytes());
        clientSocket.write(responeByteBuffer);
        clientSocket.close();
    }
}


이렇게 서버를 실행해보니 시간이 많이 준 것을 볼 수 있었다.


'Spring > 리액티브 프로그래밍' 카테고리의 다른 글

Java Selector  (1) 2024.03.20
Java AIO  (0) 2024.03.19
Java NIO  (0) 2024.03.18
JAVA IO  (0) 2024.03.18
Mutiny  (0) 2024.03.14
728x90

Java에서 NIO에 대해 알아보자.


java New Input/Output의 줄인말이며, 파일과 네트워크에 데이터를 읽고 쓸 수 있는 API를 제공한다.

buffer기반이며, non-blocking을 지원한다.


java IO는 InputStream, OutputStream을 사용해서 방향이 정해져있었다면, NIO는 Channel을 이용해 읽고 쓰기가 한번에 가능하다.

또한 NIO는 아예 시작부터 buffer의 단위로 데이터를 주고 받는다.


Channel, Buffer

데이터를 읽을 때는 Channel read()를 사용하여 버퍼에 데이터를 저장한다.

데이터를 쓸 때는 Channel write()를 사용하여 버퍼에 데이터를 쓴다.


이 버퍼에서도 ByteBuffer부터 CharBuffer까지 다양한 타입의 버퍼가 존재한다.


Buffer의 위치

버퍼의 현재 커서를 나타내는 다양한 속성이 있다.

capacity: Buffer의 크기이다. Buffer 생성시에 결정된다.

position: Buffer의 현재 위치이다. 버퍼에서 데이터를 읽거나 쓸 때 시작하는 위치이며, 1Byte가 추가될 때마다 1씩 증가한다.

limit: Buffer에서 데이터를 읽거나 쓸 수 있는 마지막 위치이다. limit 이후로 데이터를 읽거나 쓰기 불가능하다.

mark: 현재 position의 위츠를 지정한다.


Buffer의 위치 메서드

flip: Buffer의 limit 위치를 현재 position으로 이동시키고, position을 0으로 리셋한다.

rewind: Buffer의 position 위치를 0으로 리셋. limit은 유지한다.

clear: Buffer의 limit 위치를 capacity 위치로 이동시키고, position을 0으로 리셋한다.


Buffer

Java IO는 JVM의 버퍼에만 접근이 가능하고, 시스템 자체에는 접근이 불가능했다.

하지만 Java NIO는 시스템 버퍼에도 접근이 가능하다.

NIO의 버퍼들이다.

DirectByteBuffer HeapByteBuffer
시스템 자체 메모리에 저장 JVM Heap 메모리에 저장
자체 메모리에서 JVM으로 복사를 하지 않기 때문에 속도가 빠르다. JVM으로 복사가 일어나므로 데이터를 읽고 쓰는 속도가 느리다.
allocate, deallocate가 느리다. gc에서 관리하기에 allocate, deallocate가 빠르다.


DirectByteBuffer는 allocateDirect() 함수로 생성이 가능하고, HeapByteBuffer는 allocate(), wrap() 함수로 생성 가능하다.

isDirect인지 DirectBuffer인지 아닌지 확인 가능하다.


FileChannel - Read

@Slf4j
public class FileChannelReadExample {

    public static void main(String[] args) throws IOException {
        log.info("start");

        var file = new File("path");

        try(var fileChannel = FileChannel.open(file.toPath())){
            var byteBuffer = ByteBuffer.allocateDirect(1024);
            fileChannel.read(byteBuffer);
            byteBuffer.flip();

            var result = StandardCharsets.UTF_8.decode(byteBuffer);
            log.info("result: {}", result);
        }
        log.info("end");
    }
}


allocateDirect로 커널을 사용하여 파일을 읽어온다.

NIO를 사용하기 때문에 FileChannel에서 읽고 쓰기가 가능하다.


아래는 ByteBuffer.wrap()으로 JVM버퍼를 사용하는 예제이다.

@Slf4j
public class FileChannelWriteExample {

    public static void main(String[] args) throws IOException {
        var file = new File("path");

        var mode = StandardOpenOption.WRITE;
        try(var fileChannel = FileChannel.open(file.toPath(), mode)){
            var buffer = ByteBuffer.wrap("Hi Seungkyu~~".getBytes());
            var result = fileChannel.write(buffer);
            log.info("result: {}", result);
        }
    }
}


SocketChannel

이제 배운것들로 소켓 서버와 클라이언트를 만들어보자.


우선 서버이다.

@Slf4j
public class ServerSocketChannelExample {

    public static void main(String[] args) throws IOException {

        log.info("start");

        try(var serverChannel = ServerSocketChannel.open()){
            var address = new InetSocketAddress("localhost", 8080);
            serverChannel.bind(address);

            try(var clientSocket = serverChannel.accept()){
                ByteBuffer byteBuffer = ByteBuffer.allocateDirect(1024);
                clientSocket.read(byteBuffer);
                byteBuffer.flip();

                var request = new String(byteBuffer.array()).trim();
                log.info("request: {}", request);

                var response = "I am Server";
                var responseBuffer = ByteBuffer.wrap(response.getBytes());
                clientSocket.write(responseBuffer);
                responseBuffer.flip();
            }

        }

        log.info("end");
    }
}


Direct 버퍼를 만들어서 읽어온다.

Socket에서도 read와 flip을 사용해서 읽어노는 것을 볼 수 있다.


다음은 클라이언트이다.

@Slf4j
public class ClientSocketChannelExample {

    public static void main(String[] args) throws IOException {
        log.info("start");

        try(var socketChannel = SocketChannel.open()){
            var address = new InetSocketAddress("localhost", 8080);
            var connected = socketChannel.connect(address);
            log.info("connected: {}", connected);

            String request = "I am Client";
            ByteBuffer requestBuffer = ByteBuffer.wrap(request.getBytes());
            socketChannel.write(requestBuffer);
            requestBuffer.clear();
            
            ByteBuffer responseBuffer = ByteBuffer.allocateDirect(1024);
            while (socketChannel.read(responseBuffer) > 0){
                responseBuffer.flip();
                log.info("response: {}", StandardCharsets.UTF_8.decode(responseBuffer));
                responseBuffer.clear();
            }
        }
        log.info("end");
    }
}


'Spring > 리액티브 프로그래밍' 카테고리의 다른 글

Java AIO  (0) 2024.03.19
Java IO Server 서버를 NIO로 변경  (0) 2024.03.19
JAVA IO  (0) 2024.03.18
Mutiny  (0) 2024.03.14
RxJava Reactor  (2) 2024.03.14
728x90

이번엔 Map을 mapping 해본다.


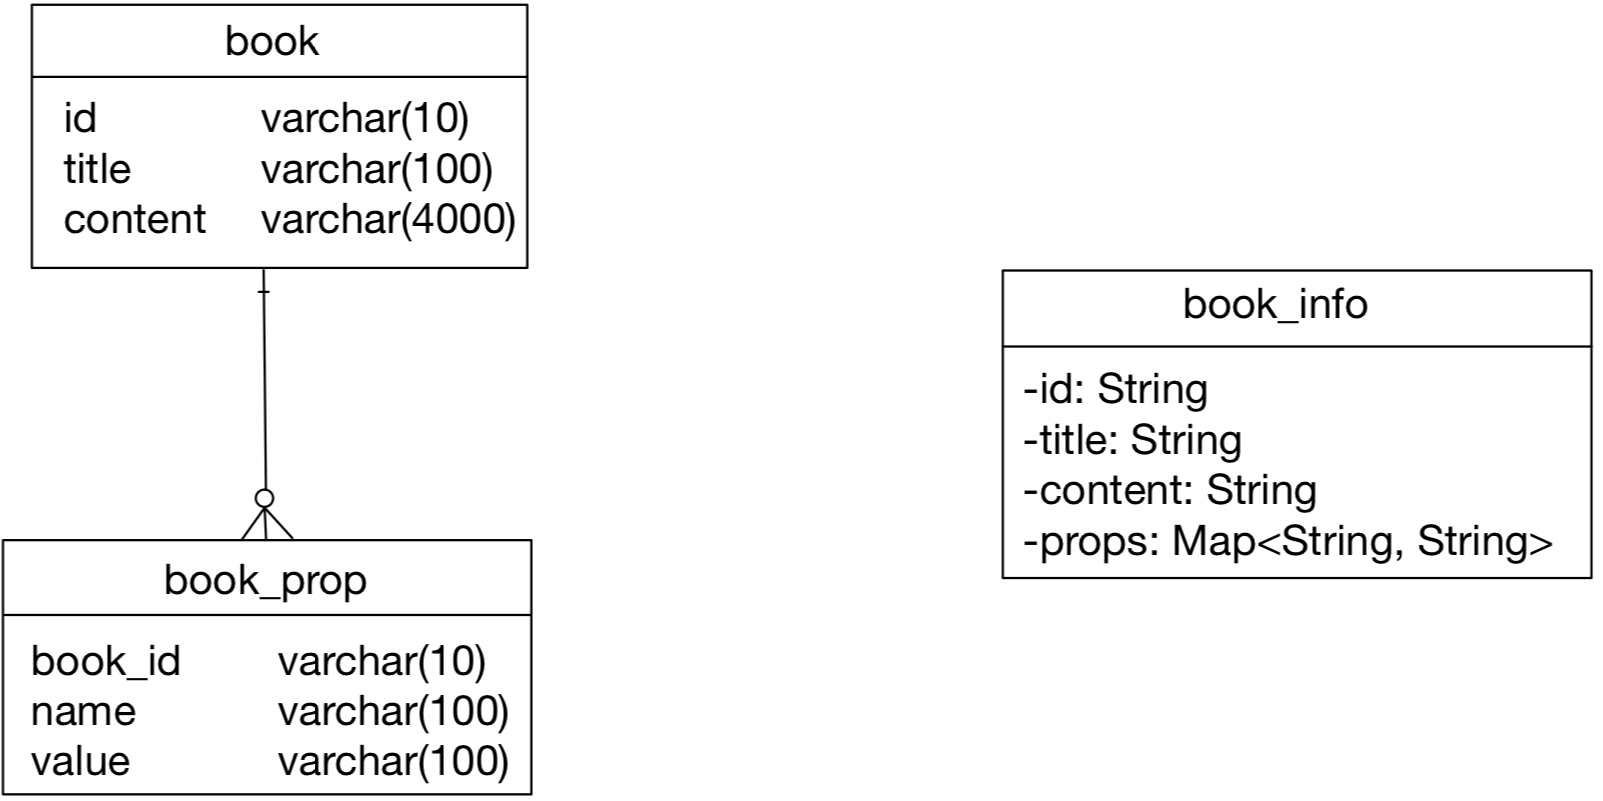
이런 테이블이 있다고 해보자.

import jakarta.persistence.*;

import java.util.HashMap;
import java.util.Map;

@Entity
@Table(name = "book")
public class book {
    @Id
    private String id;
    private String title;
    private String content;
    @ElementCollection
    @CollectionTable(
            name = "book_prop",
            joinColumns = @JoinColumn(name="book_id")
    )
    @MapKeyColumn(name = "name")
    @Column(name = "value")
    private Map<String, String> props = new HashMap<>();

    protected book(){}

    public book(String id, String title, String content, Map<String, String> props) {
        this.id = id;
        this.title = title;
        this.content = content;
        this.props = props;
    }
    
    //getter... setter...
}

이렇게 @CollectionTable로 저장할 테이블을 지정을 해주고

Map에 들어간 데이터를 어떤 column에 넣어줄지 PK는 @MapKeyColumn에, 그냥 데이터는 @Column으로 지정을 해준다.


import jakarta.persistence.EntityManager;
import jakarta.persistence.EntityManagerFactory;
import jakarta.persistence.EntityTransaction;
import jakarta.persistence.Persistence;

import java.util.HashMap;
import java.util.Map;

public class book_main {

    public static void main(String[] args) {
        EntityManagerFactory entityManagerFactory = Persistence.createEntityManagerFactory("jpabegin");
        EntityManager entityManager = entityManagerFactory.createEntityManager();
        EntityTransaction entityTransaction = entityManager.getTransaction();

        Map<String, String> props1 = new HashMap<>();
        Map<String, String> props2 = new HashMap<>();

        props1.put("name1", "value1");
        props1.put("name2", "value2");
        book book1 = new book("1", "이름", "내용", props1);
        book book2;

        try{
            entityTransaction.begin();
            entityManager.persist(book1);
            entityTransaction.commit();
        }catch(NullPointerException exception){
            throw new NullPointerException();
        }

        try{
            book2 = entityManager.find(book.class, "1");
        }catch(NullPointerException exception){
            throw new NullPointerException();
        }

        System.out.println("book: " + book2);
        System.out.println("props: " + book2.getProps());
    }
}

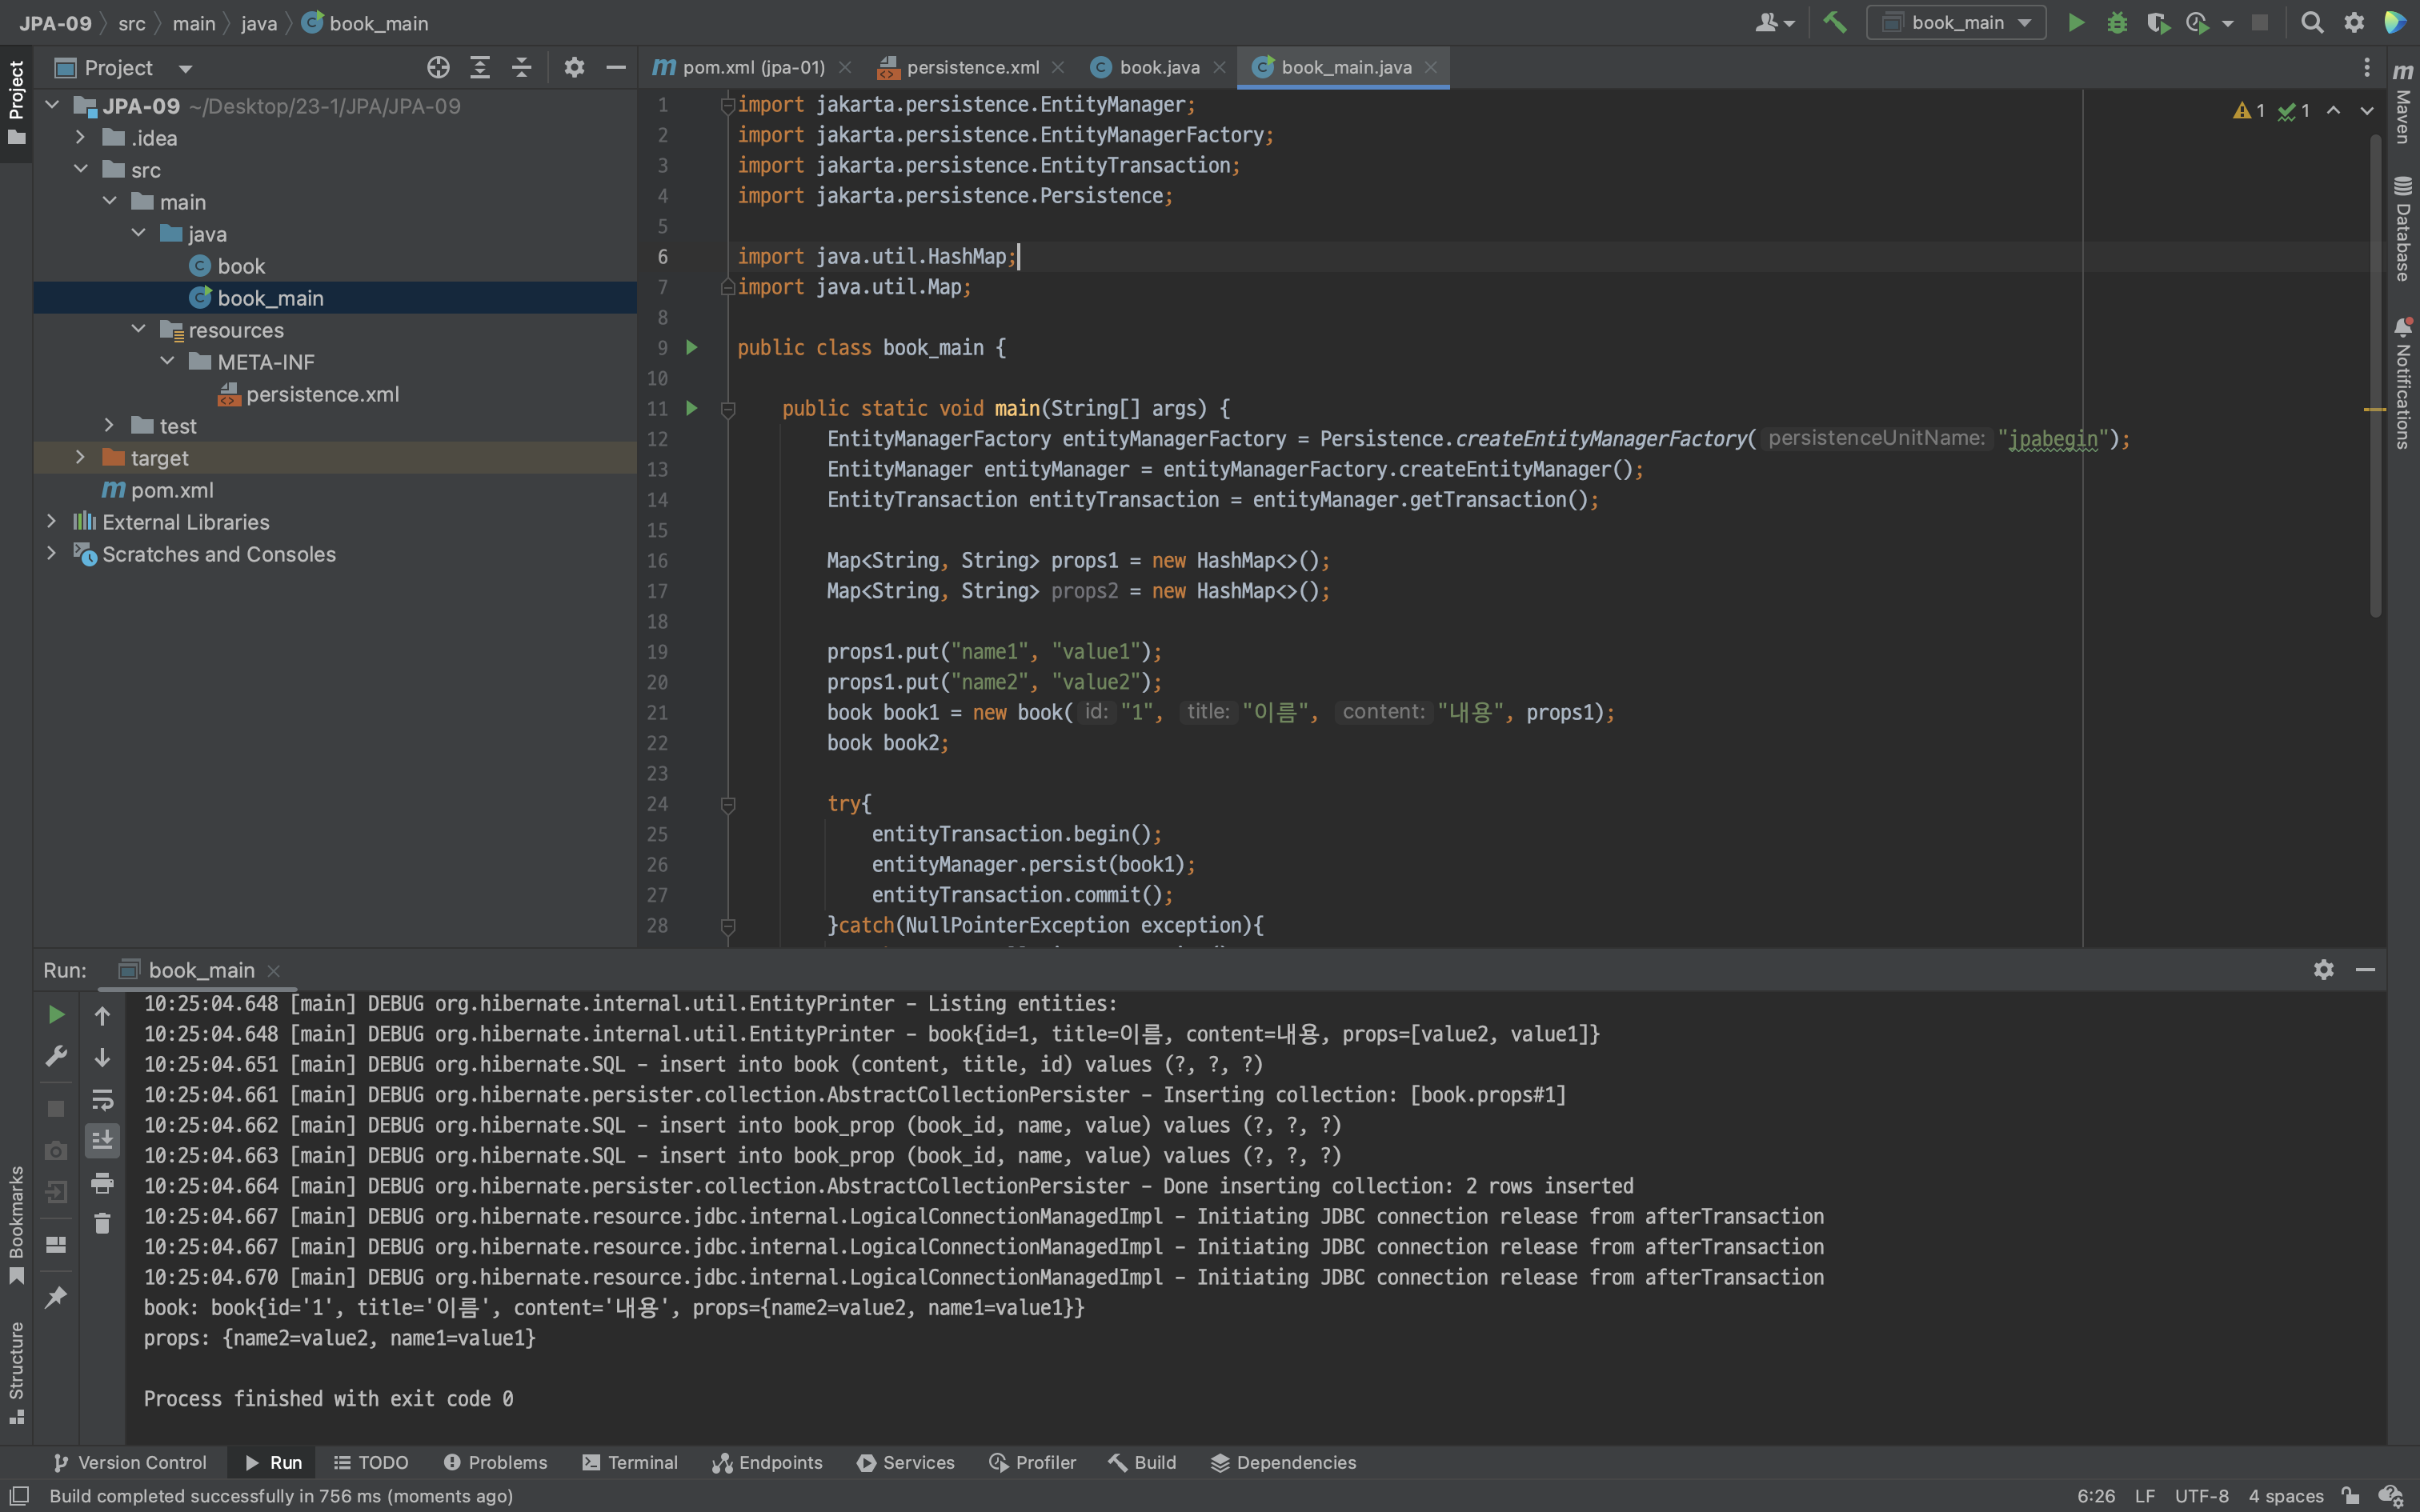
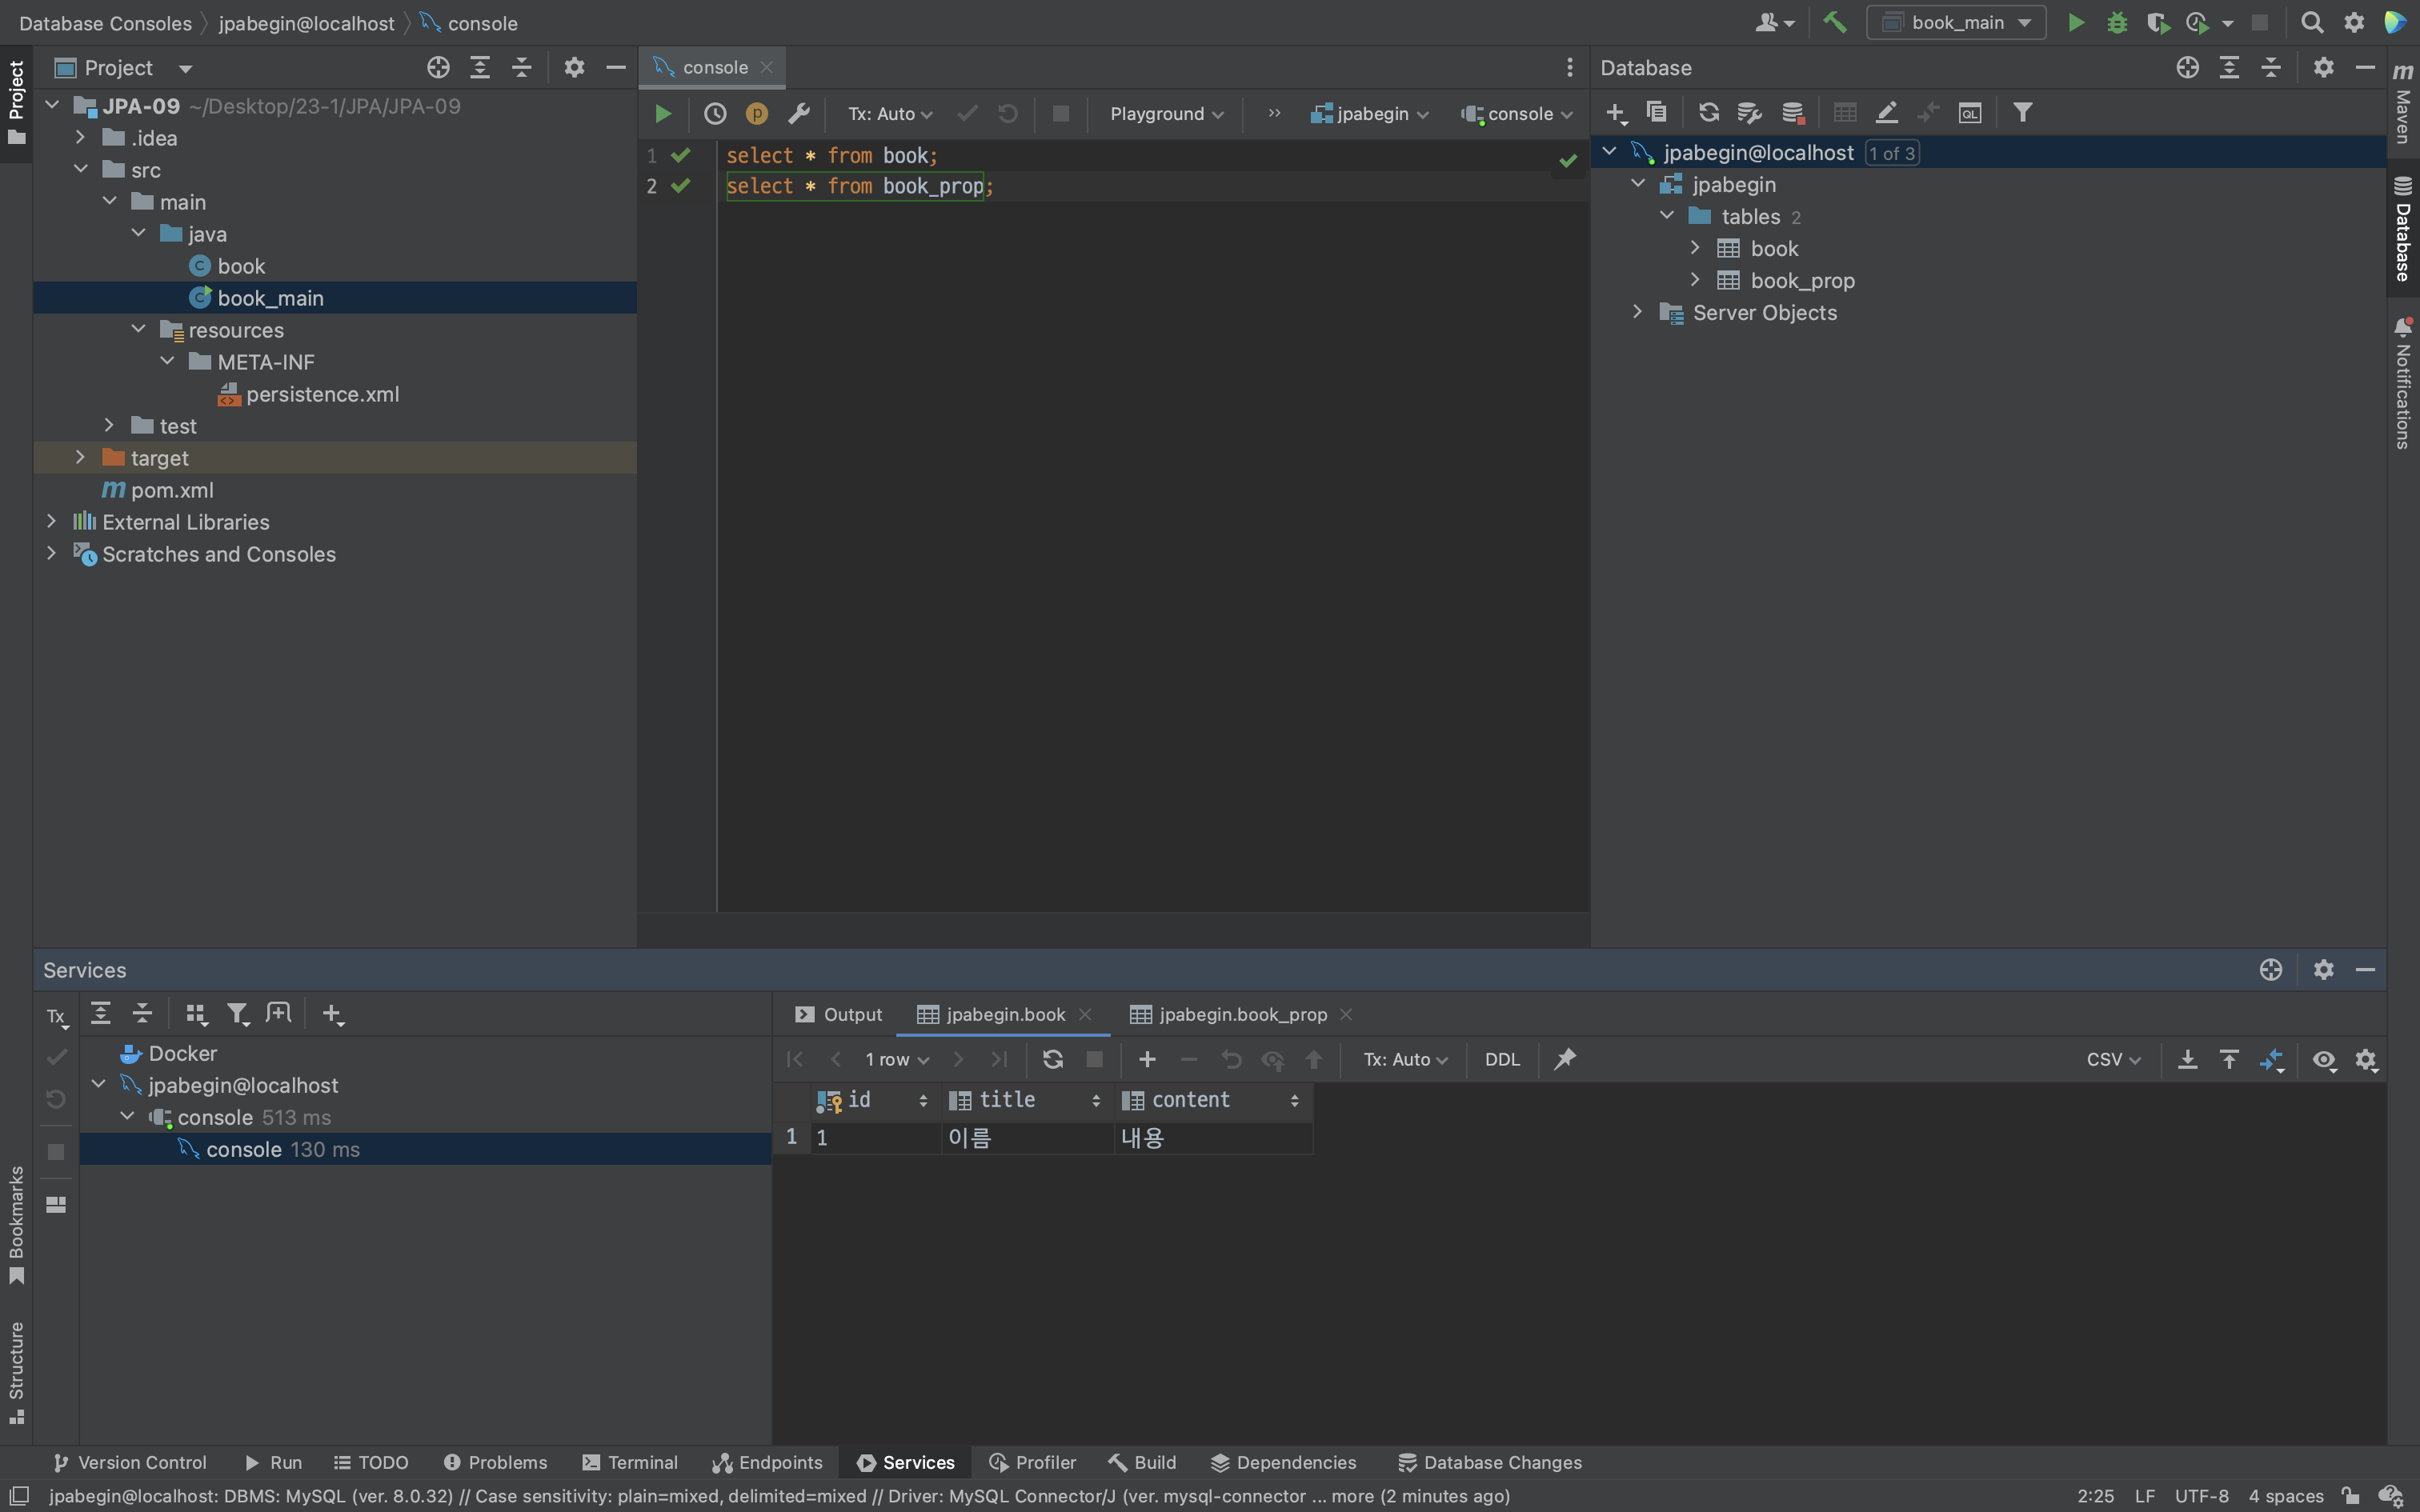
이렇게 추가를 하고 조회를 하면

정상 작동하는 것을 볼 수 있다.


늘 그렇듯이 이번엔 Embeddable 타입이다.

이런 테이블이 있다고 하고, 여기서 PropValue를 Embeddable로 만들 생각이다.

우선 Embeddable 타입을 먼저 작성한다.

import jakarta.persistence.Access;
import jakarta.persistence.AccessType;
import jakarta.persistence.Embeddable;

@Embeddable
@Access(AccessType.FIELD)
public class PropValue {
    private String value;
    private boolean enabled;

    public PropValue(String value, boolean enabled) {
        this.value = value;
        this.enabled = enabled;
    }

    protected PropValue () {}
	
    //getter...setter...
    
    @Override
    public String toString() {
        return "PropValue{" +
                "value='" + value + '\'' +
                ", enabled=" + enabled +
                '}';
    }
}

이렇게 항상 작성하던 @Embeddable을 작성하고

import jakarta.persistence.*;

import java.util.HashMap;
import java.util.Map;

@Entity
@Table(name = "book")
public class book2 {
    @Id
    private String id;
    private String title;
    private String content;
    @ElementCollection
    @CollectionTable(
            name = "book_prop",
            joinColumns = @JoinColumn(name = "book_id")
    )
    @MapKeyColumn(name = "name")
    private Map<String, PropValue> props = new HashMap<>();

	//getter...setter...
    
    @Override
    public String toString() {
        return "book2{" +
                "id='" + id + '\'' +
                ", title='" + title + '\'' +
                ", content='" + content + '\'' +
                ", props=" + props +
                '}';
    }
}

@MapKeyColumn을 이용해서 그랬던 것처럼 작성을 해준다.

여기에 Map의 타입에 <PK, @Embeddable>을 넣어서 작성해준다.

import jakarta.persistence.EntityManager;
import jakarta.persistence.EntityManagerFactory;
import jakarta.persistence.EntityTransaction;
import jakarta.persistence.Persistence;

import java.util.HashMap;
import java.util.Map;

public class book_main2 {

    public static void main(String[] args) {
        EntityManagerFactory entityManagerFactory = Persistence.createEntityManagerFactory("jpabegin");
        EntityManager entityManager = entityManagerFactory.createEntityManager();
        EntityTransaction entityTransaction = entityManager.getTransaction();

        Map<String, PropValue> Propvalues = new HashMap<>();

        PropValue propValue1 = new PropValue("value1", true);
        PropValue propValue2 = new PropValue("value2", true);

        Propvalues.put("String1", propValue1);
        Propvalues.put("String2", propValue2);

        book2 book1 = new book2("id1", "title1", "content1", Propvalues);
        book2 book2;

        try{
            entityTransaction.begin();
            entityManager.persist(book1);
            entityTransaction.commit();
        }catch (NullPointerException exception){
            throw new NullPointerException();
        }

        try{
            book2 = entityManager.find(book2.class, "id1");
            System.out.println(book2);
        }catch(NullPointerException exception){
            throw new NullPointerException();
        }finally {
            entityManager.close();
        }

        entityManagerFactory.close();

    }
}

이렇게 동작하는 것을 볼 수 있다.

'Spring > JPA' 카테고리의 다른 글

JPA 10장 (영속 컨텍스트와 LifeCycle)  (0) 2023.03.22
JPA 8장 (List collection mapping)  (0) 2023.03.18
JPA 7장 (Set collection mapping)  (0) 2023.03.18
JPA 6장 (@Embeddable)  (0) 2023.03.17
JPA 5장 (Entity 식별자 생성 방식)  (0) 2023.03.16
728x90

일단 바로 만들어보고 시작하자.


intellij에서 JDK17로 Maven 프로젝트를 생성한다.

그리고 pom.xml을 다음과 같이 작성한다.

<?xml version="1.0" encoding="UTF-8"?>
<project xmlns="http://maven.apache.org/POM/4.0.0"
         xmlns:xsi="http://www.w3.org/2001/XMLSchema-instance"
         xsi:schemaLocation="http://maven.apache.org/POM/4.0.0 http://maven.apache.org/xsd/maven-4.0.0.xsd">
    <modelVersion>4.0.0</modelVersion>

    <groupId>jpa-basic</groupId>
    <artifactId>JPA-01</artifactId>
    <version>1.0-SNAPSHOT</version>

    <properties>
        <maven.compiler.source>17</maven.compiler.source>
        <maven.compiler.target>17</maven.compiler.target>
        <project.build.sourceEncoding>UTF-8</project.build.sourceEncoding>
        <hibernate.verstion>6.0.0.FINAL</hibernate.verstion>
    </properties>

    <dependencies>
        <dependency>
            <groupId>org.hibernate</groupId>
            <artifactId>hibernate-core</artifactId>
            <version>${hibernate.verstion}</version>
        </dependency>
        <dependency>
            <groupId>org.hibernate</groupId>
            <artifactId>hibernate-hikaricp</artifactId>
            <version>${hibernate.verstion}</version>
        </dependency>
        <dependency>
            <groupId>mysql</groupId>
            <artifactId>mysql-connector-java</artifactId>
            <version>8.0.28</version>
        </dependency>
        <dependency>
            <groupId>ch.qos.logback</groupId>
            <artifactId>logback-classic</artifactId>
            <version>1.2.11</version>
        </dependency>
    </dependencies>

</project>

우선 이렇게 작성해주고 src/main/resources/META-INF에 가서는 persistence.xml을 만든 후

<?xml version="1.0" encoding="utf-8" ?>

<persistence xmlns="https://jakarta.ee/xml/ns/persistence"
             xmlns:xsi="http://www.w3.org/2001/XMLSchema-instance"
             xsi:schemaLocation="https://jakarta.ee/xml/ns/persistence
                https://jakarta.ee/xml/ns/persistence/persistence_3_0.xsd"
             version="3.0">

    <persistence-unit name="jpabegin" transaction-type="RESOURCE_LOCAL">
        <class>jpabasic.reserve.domain.User</class>
        <exclude-unlisted-classes>true</exclude-unlisted-classes>
        <properties>
            <property name="jakarta.persistence.jdbc.driver" value="com.mysql.cj.jdbc.Driver"/>
            <property name="jakarta.persistence.jdbc.url"
                      value="jdbc:mysql://localhost/jpabegin?characterEncoding=utf8"/>
            <property name="jakarta.persistence.jdbc.user" value="jpauser"/>
            <property name="jakarta.persistence.jdbc.password" value="12345678"/>

            <property name="hibernate.dialect" value="org.hibernate.dialect.MySQLDialect"/>
            <property name="hibernate.hikari.poolName" value="pool"/>
            <property name="hibernate.hikari.maximumPoolSize" value="10"/>
            <property name="hibernate.hikari.minimumIdle" value="10"/>
            <property name="hibernate.hikari.connectionTimeout" value="1000"/>
        </properties>
    </persistence-unit>
</persistence>

이렇게 작성을 해준다.

MySQL을 사용하고 사용자 정보를 저렇게 사용하기 때문에 저렇게 만든 것이다.


이 상태로 바로 class를 작성하러 가보자.

JDBC를 공부했으니 어느정도는 이해가 될 수도 있다.

package jpabasic.reserve.domain;

import jakarta.persistence.*;
import java.time.LocalDateTime;

@Entity
@Table(name = "user")
public class User {
    @Id
    private String email;
    private String name;
    private String create_date;

    public User(String email, String name, String create_date) {
        this.email = email;
        this.name = name;
        this.create_date = create_date;
    }

    protected User() {
        
    }

    public String getEmail() {
        return email;
    }

    public void setEmail(String email) {
        this.email = email;
    }

    public String getName() {
        return name;
    }

    public void setName(String name) {
        this.name = name;
    }

    public String getCreate_date() {
        return create_date;
    }

    public void setCreate_date(String create_date) {
        this.create_date = create_date;
    }
}

클래스 위에 @Entity annotation으로 요소임을 알리고, @Table로 테이블을 지정하며, @Id로 식별자들을 지정해준다.

그리고 당연히 생성자와 Getter, Setter를 만들어준다.


import jakarta.persistence.*;
import jpabasic.reserve.domain.User;
import java.time.LocalDateTime;

public class UserSaveMain {
    public static void main(String[] args) {
        EntityManagerFactory entityManagerFactory = Persistence.createEntityManagerFactory("jpabegin");
        EntityManager entityManager = entityManagerFactory.createEntityManager();
        EntityTransaction transaction = entityManager.getTransaction();

        try{
            transaction.begin();
            User user = new User("hello@gmail.com", "hello", LocalDateTime.now());
            entityManager.persist(user);
            transaction.commit();
        } catch(Exception exception){
            exception.printStackTrace();
            transaction.rollback();
        }finally {
            entityManager.close();
        }

        entityManager.close();
    }
}


우선 EntityManagerFactory를 생성한다.

이 때 xml에서 작성했던 jpabegin 이름을 이용한다.


persist를 사용하면 parameter로 넘긴 객체가 DB에 저장이 된다.

실행을 해보면 잘 들어가는 것을 볼 수 있다.

당연히 한 번 더 추가하면 pk가 겹치기 때문에 추가할 수 없다고 나온다.


이번엔 조회다.

import jakarta.persistence.EntityManager;
import jakarta.persistence.EntityManagerFactory;
import jakarta.persistence.EntityTransaction;
import jakarta.persistence.Persistence;
import jpabasic.reserve.domain.User;

public class UserGetMain {
    public static void main(String[] args) {

        String find_id = "hello@gmail.com";

        EntityManagerFactory entityManagerFactory = Persistence.createEntityManagerFactory("jpabegin");

        EntityManager entityManager = entityManagerFactory.createEntityManager();
        EntityTransaction transaction = entityManager.getTransaction();

        try{
            transaction.begin();
            User user = entityManager.find(User.class, find_id);
            if (user == null) System.out.println("User 없음");
            else {
                System.out.printf("email : %s, name = %s, createDate = %s\n", user.getEmail(), user.getName(), user.getCreate_date());
            }
            transaction.commit();
        }catch (Exception exception){
            exception.printStackTrace();
            transaction.rollback();
        }finally {
            entityManager.close();
        }
        entityManager.close();
    }
}

entityManager에서 find로 찾아온다.

parameter는 해당 클래스와 PK이다.

실행을 해보면 정상적으로 조회되는 것을 볼 수 있다.


이번엔 수정이다.

import jakarta.persistence.*;
import jpabasic.reserve.domain.User;
import java.time.LocalDateTime;

public class UserUpdateMain {
    public static void main(String[] args) {
        EntityManagerFactory entityManagerFactory = Persistence.createEntityManagerFactory("jpabegin");
        EntityManager entityManager = entityManagerFactory.createEntityManager();
        EntityTransaction transaction = entityManager.getTransaction();

        try{
            transaction.begin();
            User user = entityManager.find(User.class, "hello@gmail.com");
            if(user == null) System.out.println("User 없음");
            else{
                user.setName("hi");
            }
            transaction.commit();
        } catch(Exception exception){
            exception.printStackTrace();
            transaction.rollback();
        }finally {
            entityManager.close();
        }

        entityManager.close();
    }
}

수정은 조회를 한 후 해당 클래스의 데이터를 변경하고 commit을 수행하면 된다.

transaction 범위 내에서 수정해야 한다.

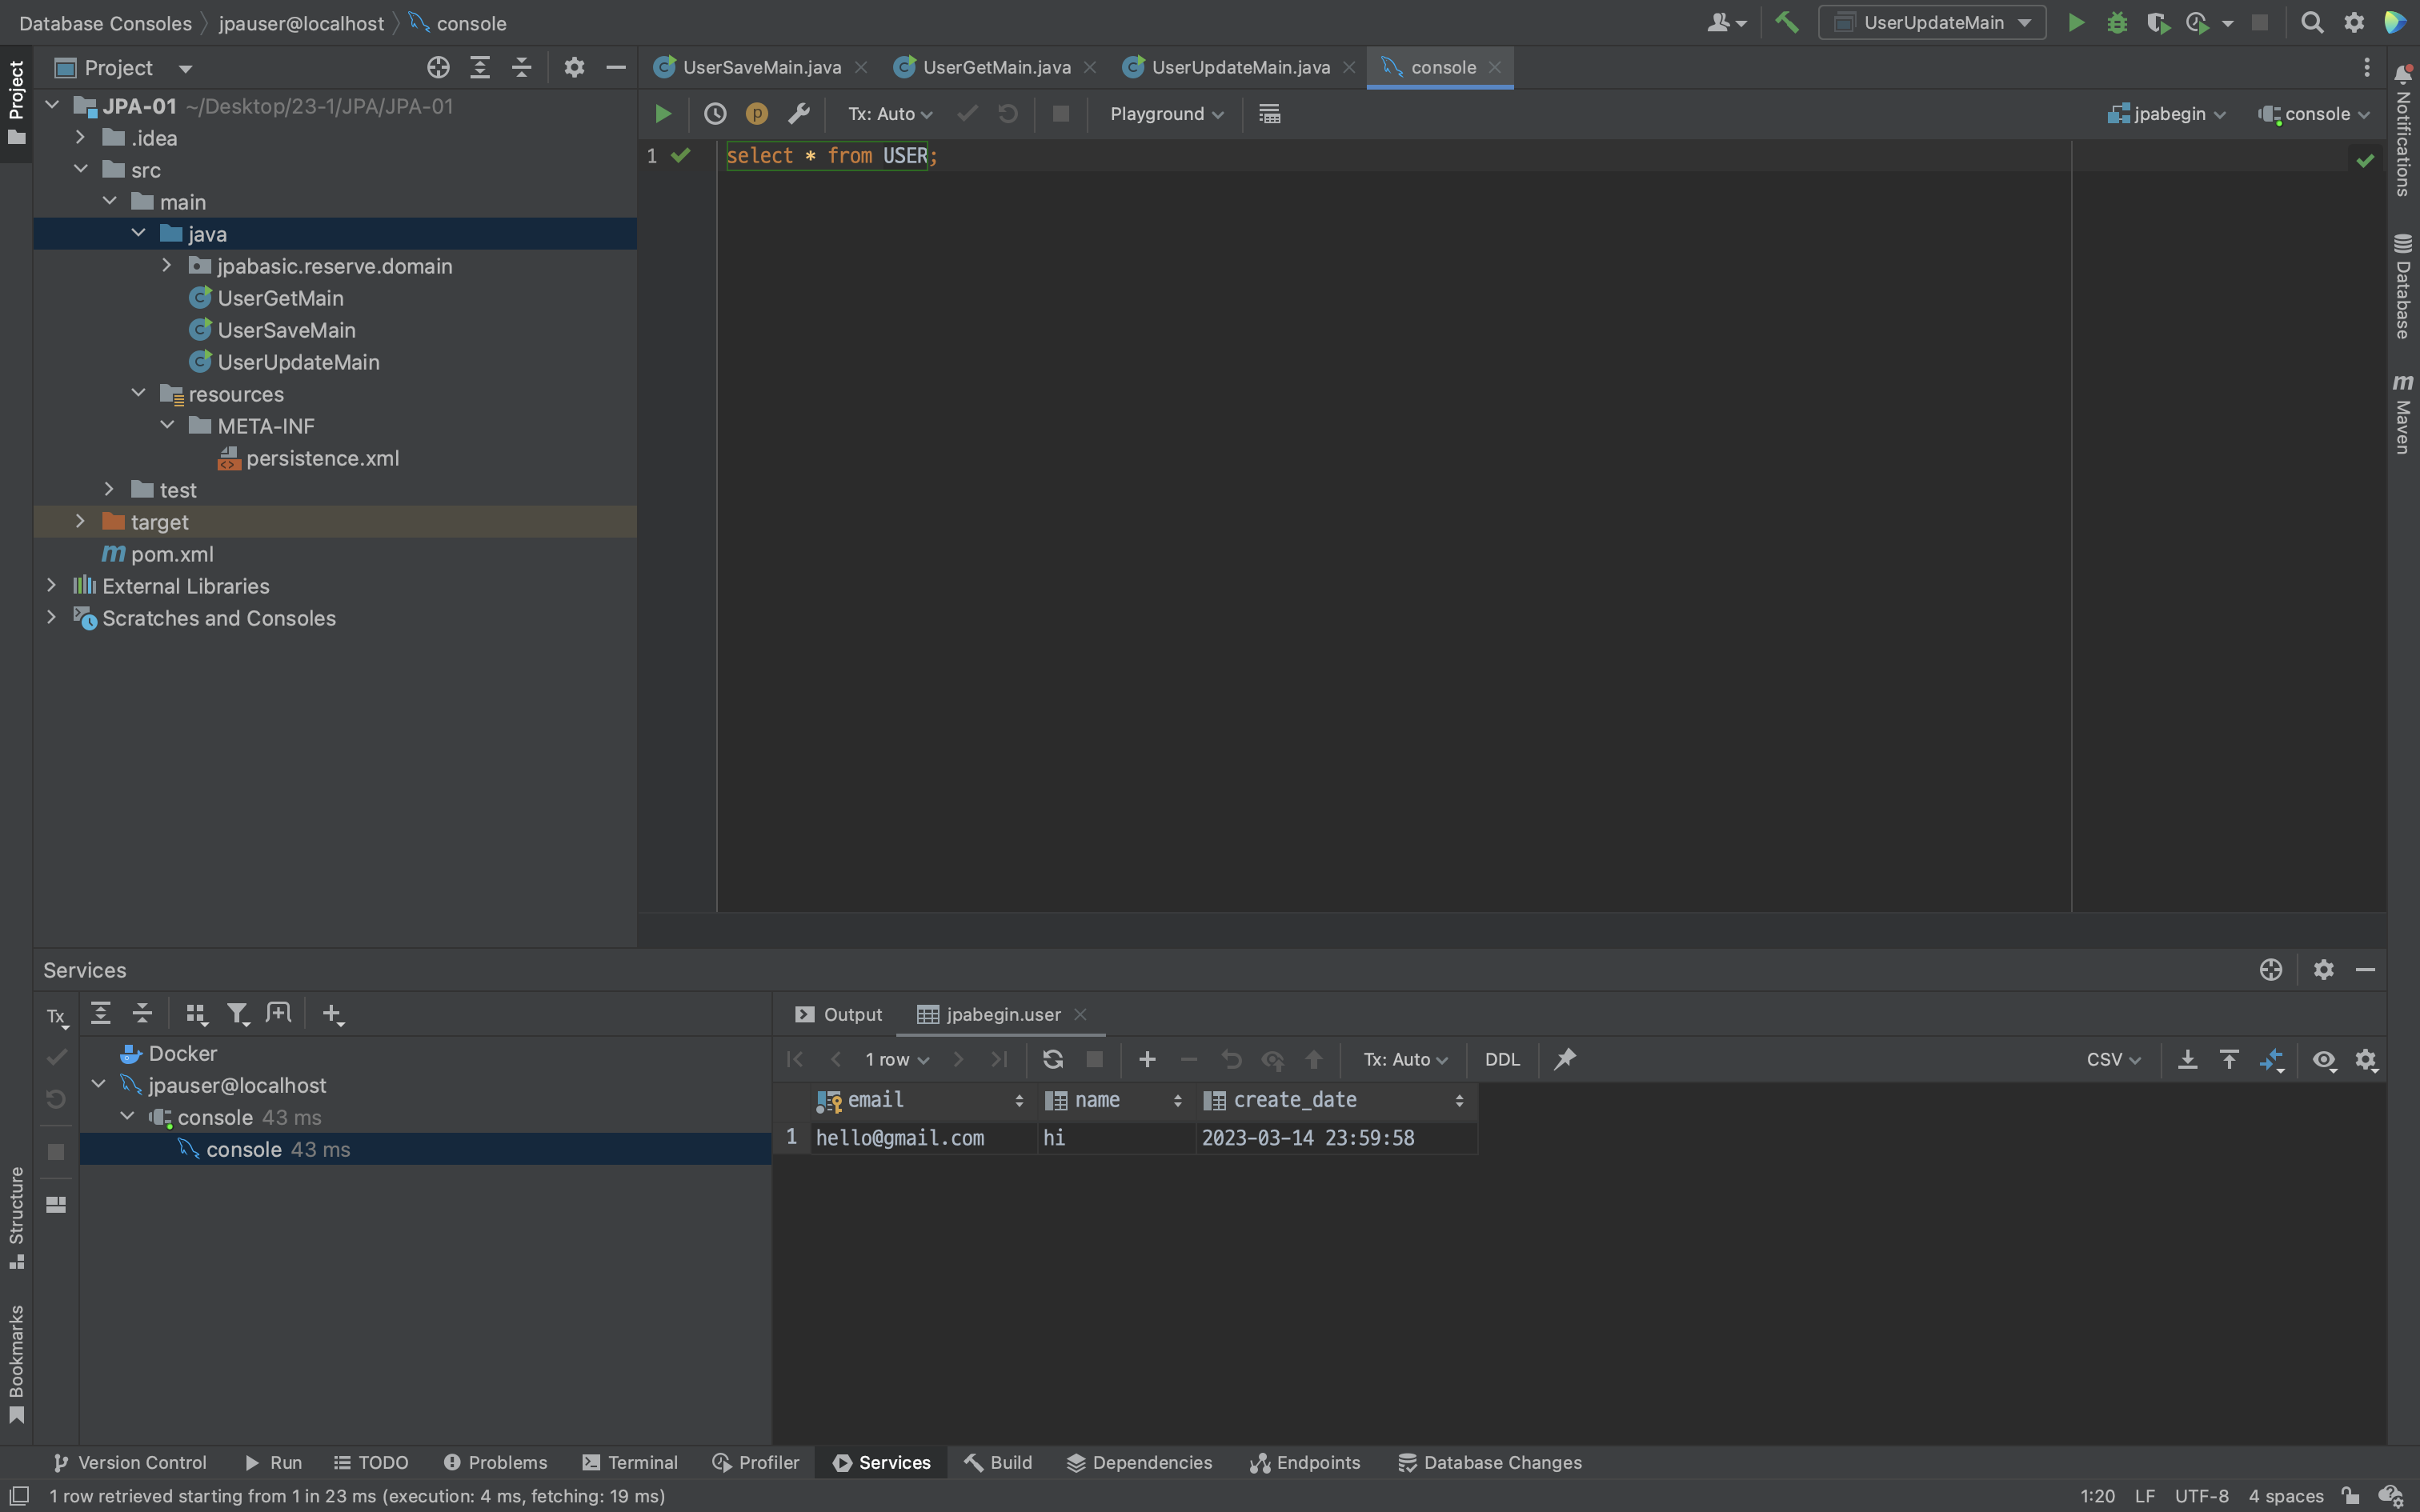
이렇게 정상적으로 수행되는 것을 볼 수 있다.

'Spring > JPA' 카테고리의 다른 글

JPA 6장 (@Embeddable)  (0) 2023.03.17
JPA 5장 (Entity 식별자 생성 방식)  (0) 2023.03.16
JPA 4장 (Entity에 대하여)  (0) 2023.03.16
JPA 3장 (간단한 CRUD 구현해보기)  (0) 2023.03.16
JPA 2장 (영속 컨텍스트)  (0) 2023.03.15

+ Recent posts